How to create and manage voices, terms, and style guidance in Enterprise Brain
Last updated: November 3, 2026
Brand voices and terms define how WRITER sounds and writes when generating content for your organization. In Enterprise Brain, all three live together within a brand, replacing the voice profiles and terms previously managed in Control Center. When linked together through a voice, WRITER applies your voice, style rules, and approved terminology to every generation automatically.
Org admins, Enterprise Brain admins, and Enterprise Brain Brands admins can create and manage these items. Team members with access to a brand can use its voices snd terms in their sessions.
This article is focused on creating and managing voices directly within Enterprise Brain. If your voices remain in Control Center and have not been migrated, please see the documentation here: 📄 Migrating org and team voices to Enterprise Brain
Note: Customers previously using style guides can migrate those to Enterprise Brain as markdown file, however there is no default style guide section. Sections and folders can be customized within the Brand & guidelines section of Enterprise Brain to meet your organizations naming conventions.
How voices and terms work together
WRITER uses three configuration surfaces within a brand that, when linked, ensure outputs sound like your brand and use your preferred terminology:
Voice — defines how WRITER Agent sounds in its outputs, including tone, personality, and writing style.
Guidelines — Markdown files containing principles and rules that control editorial standards, tone, messaging, and other brand guidance. Rules are tagged by strength so agents know exactly how strongly to apply each one.
Terms — a CSV file that manages and enforces organization-specific terminology, including approved words, banned words, and words that require careful use.
Guidelines and terms do not affect WRITER Agent outputs on their own. They only apply once you connect them to a voice through the Configure Voice modal, and that voice is then used to generate content. If a user selects a voice without connected guidelines or terms, those settings won't apply to that output.
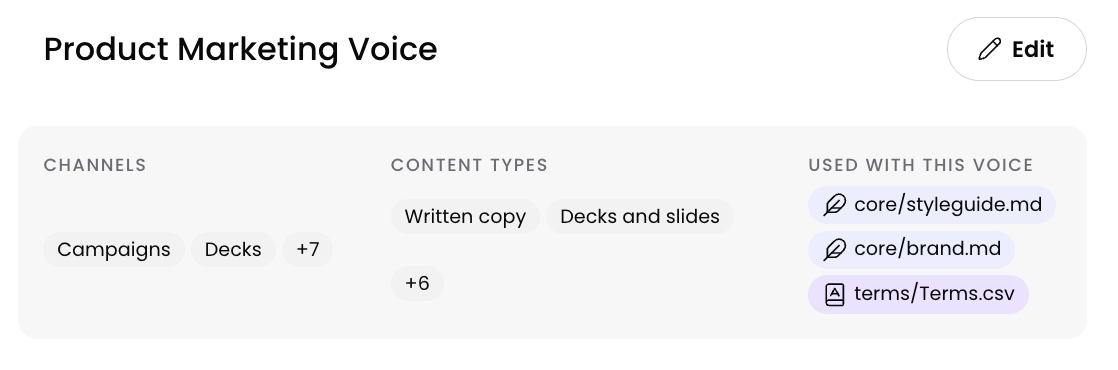
Important: Guidelines and terms must be linked to a voice through the Configure Voice modal for them to apply to outputs generated with that voice. Creating a guidelines or terms file without linking it to a voice will not automatically apply it.
Creating a brand voice
You can create a brand voice from writing examples or by copying a voice from another brand in your organization. WRITER recommends creating voices from examples for the most accurate, brand-aligned results.
How to create a new voice from examples
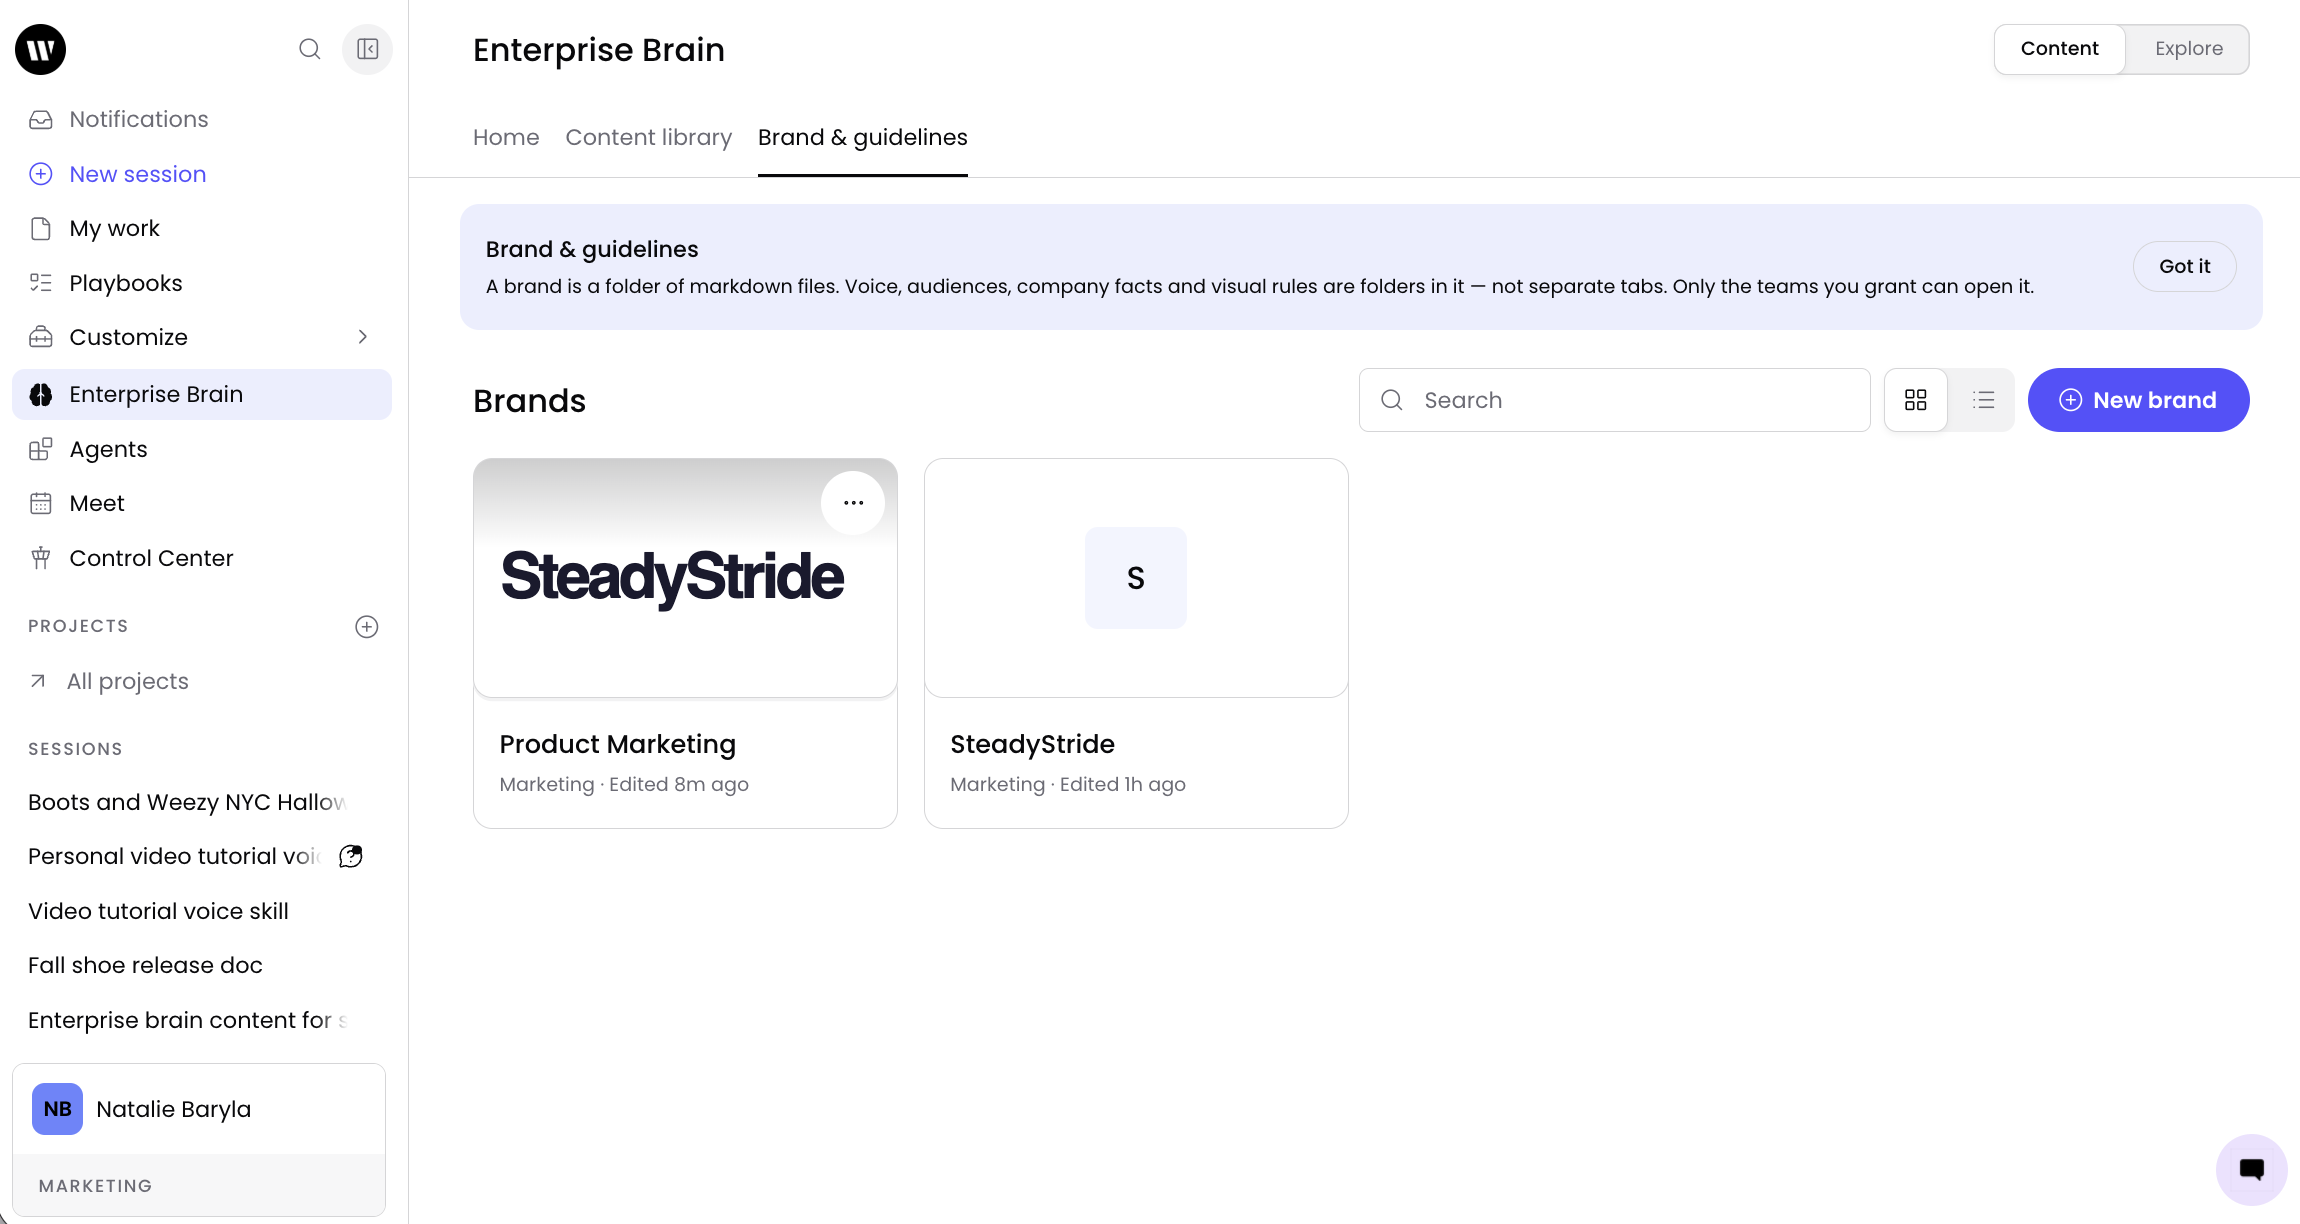
Navigate to Enterprise Brain from the left menu of WRITER and select Brand & guidelines and choose the brand you want to add a voice to.
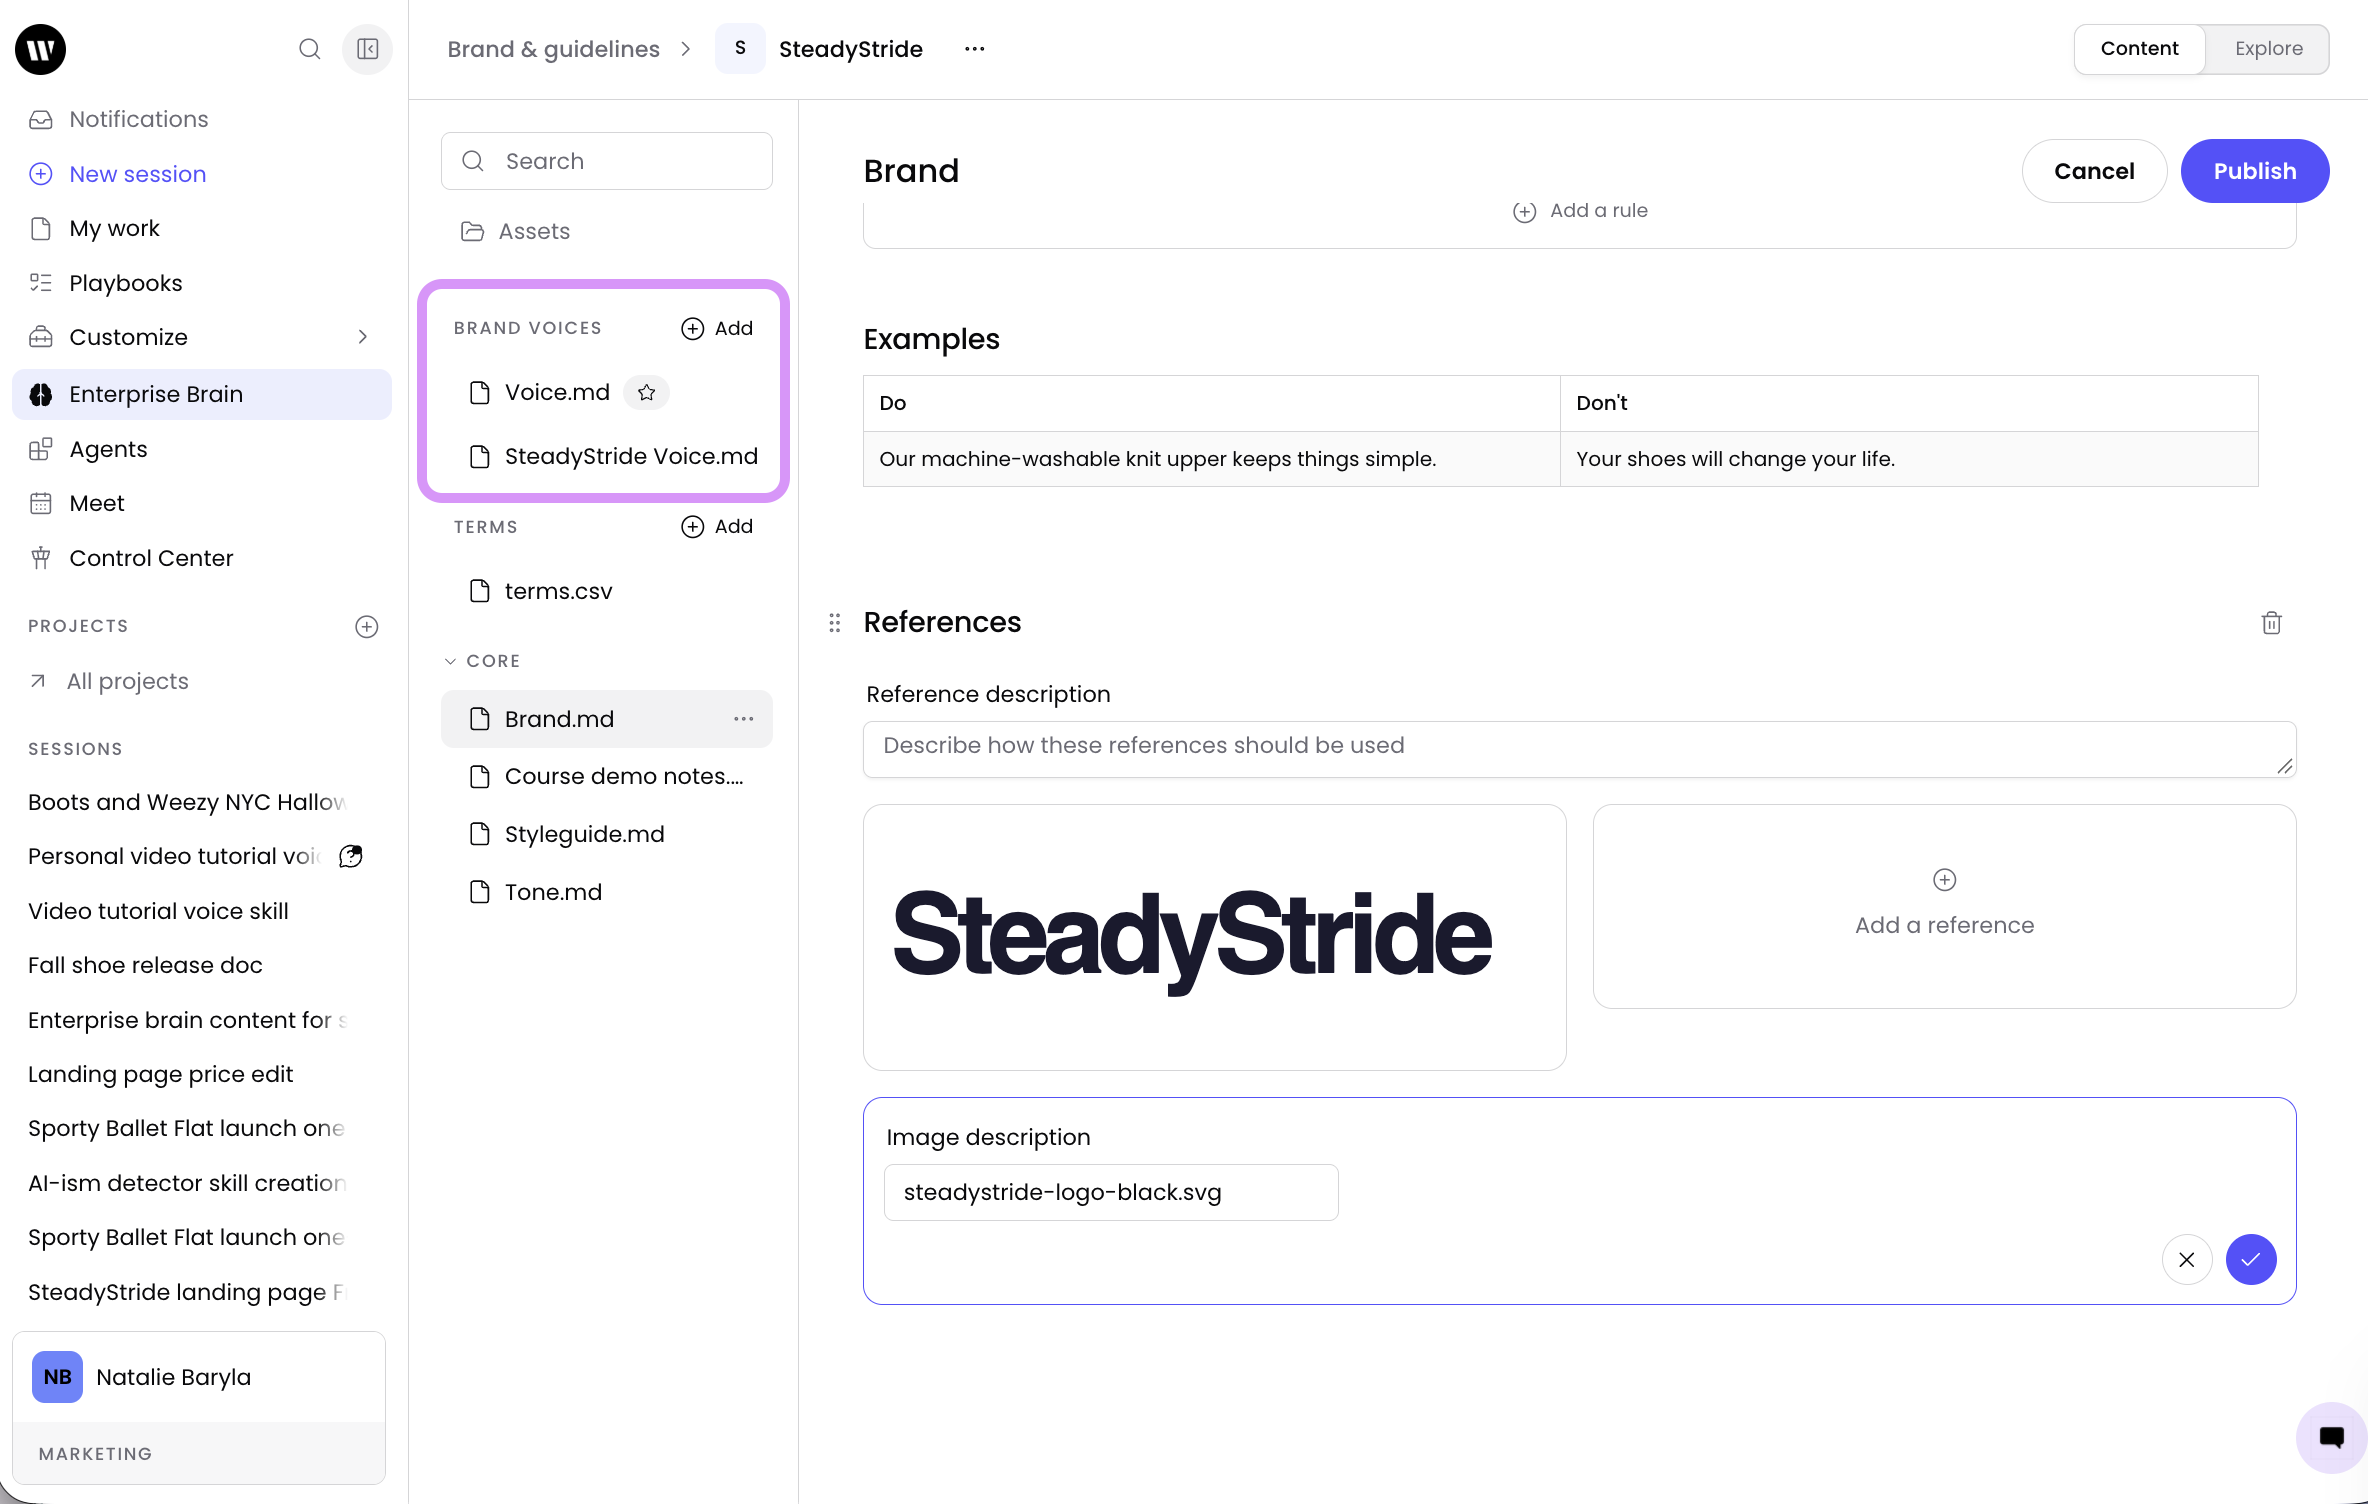
In the file navigation pane, locate the BRAND VOICES section and select + Add.
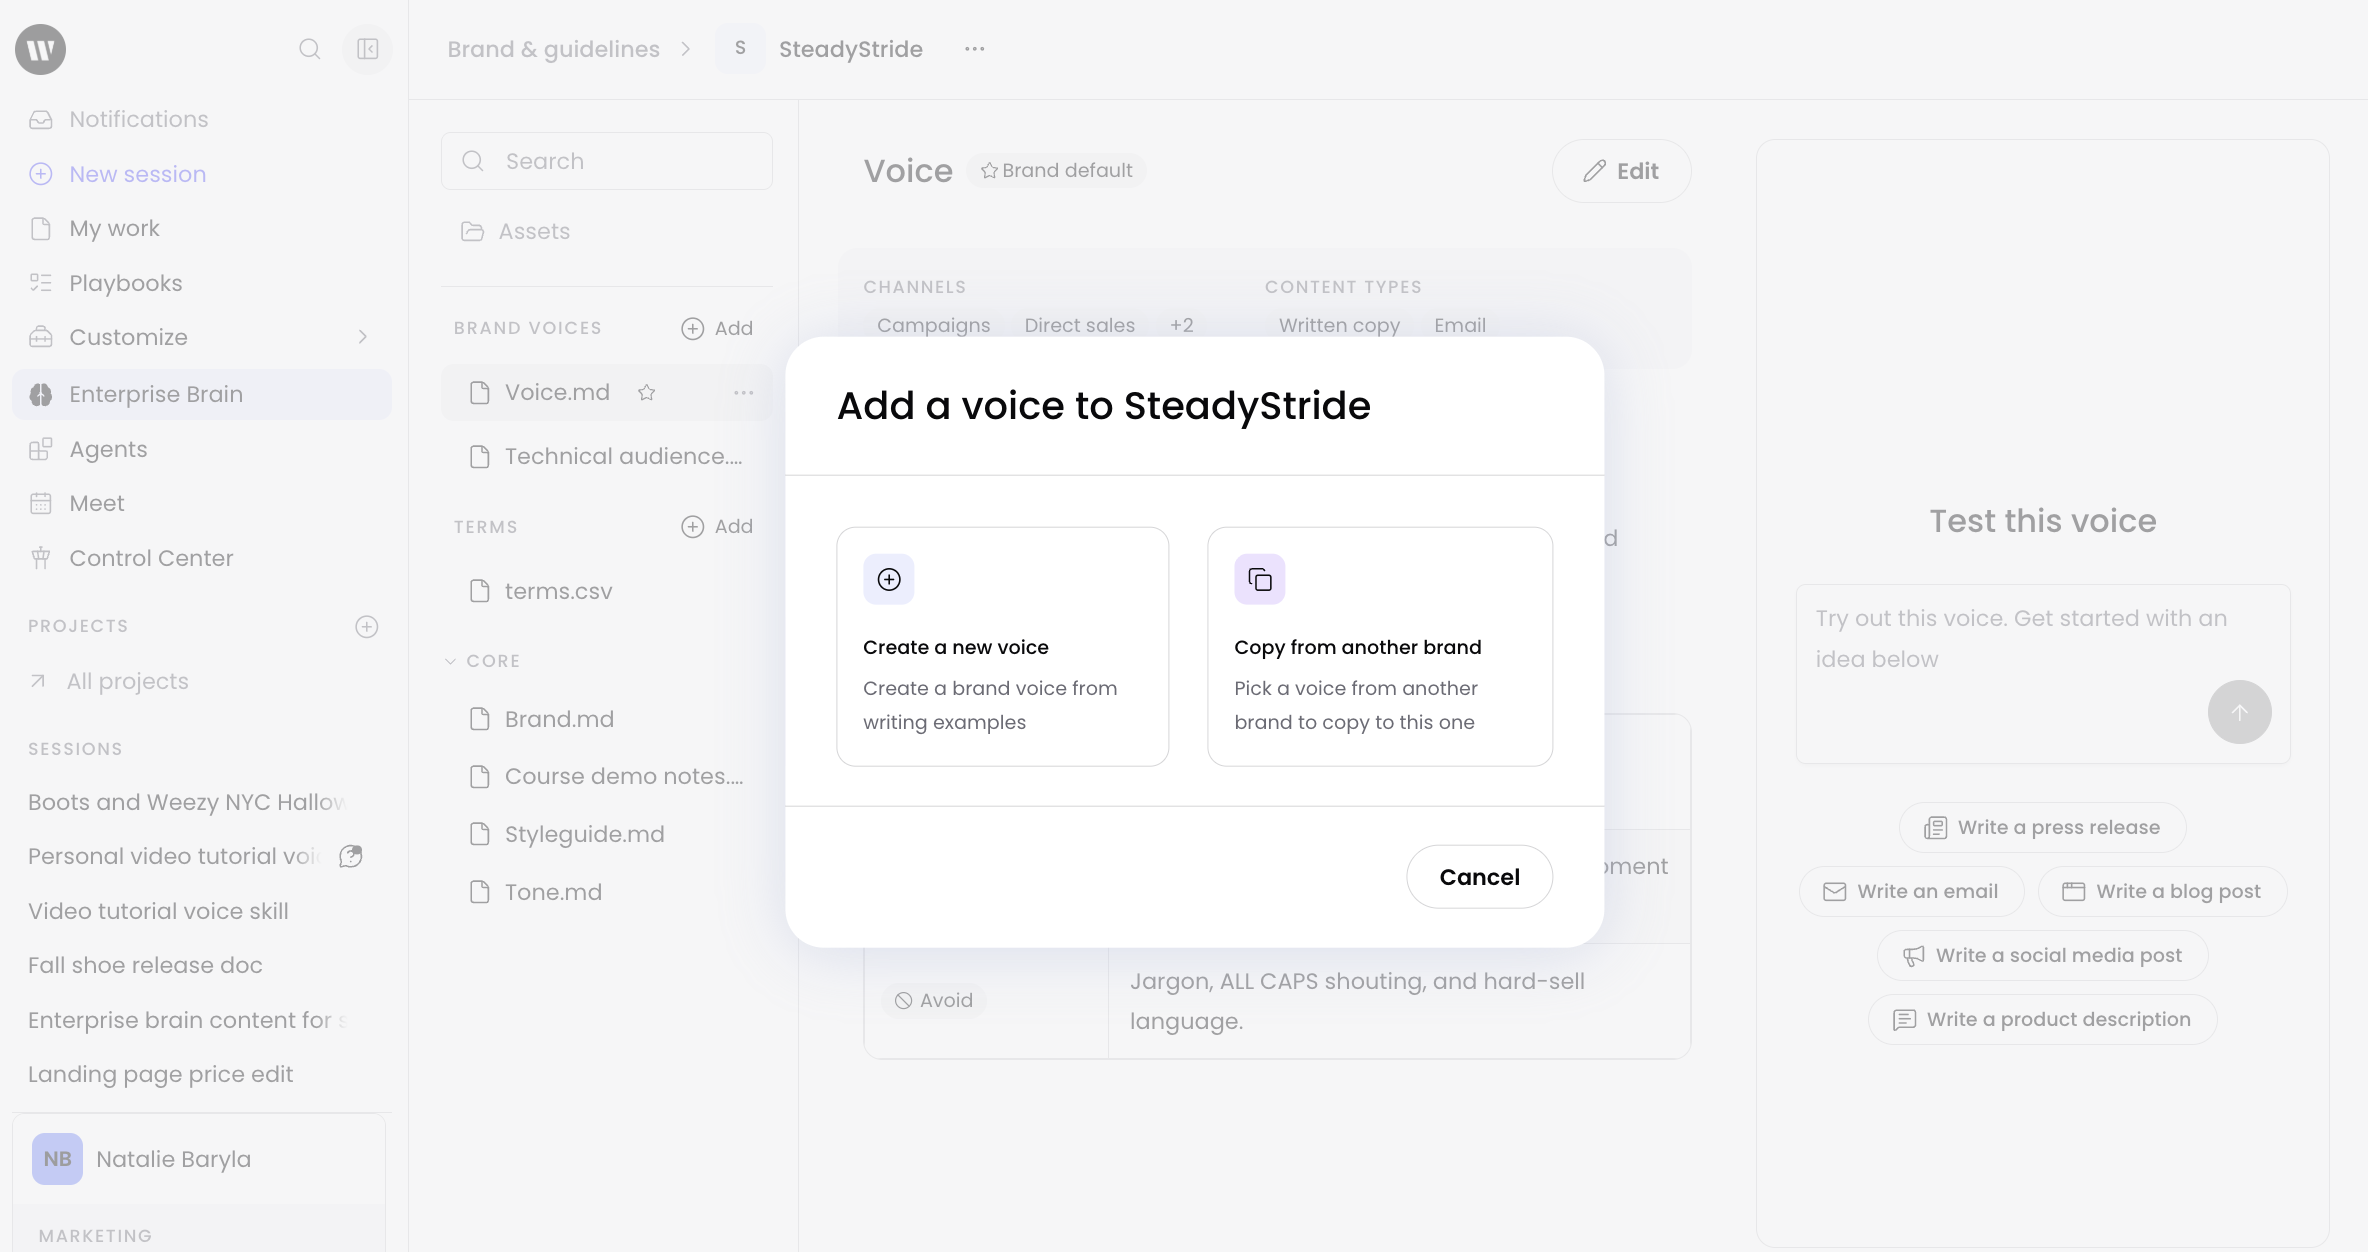
From here you get two options, in this section we will focus on creating a new voice; the following section contains information on copying from another brand. This option allows you to create a voice from scratch, using examples, or uploading a .md file containing your voice information. Select Create new voice.
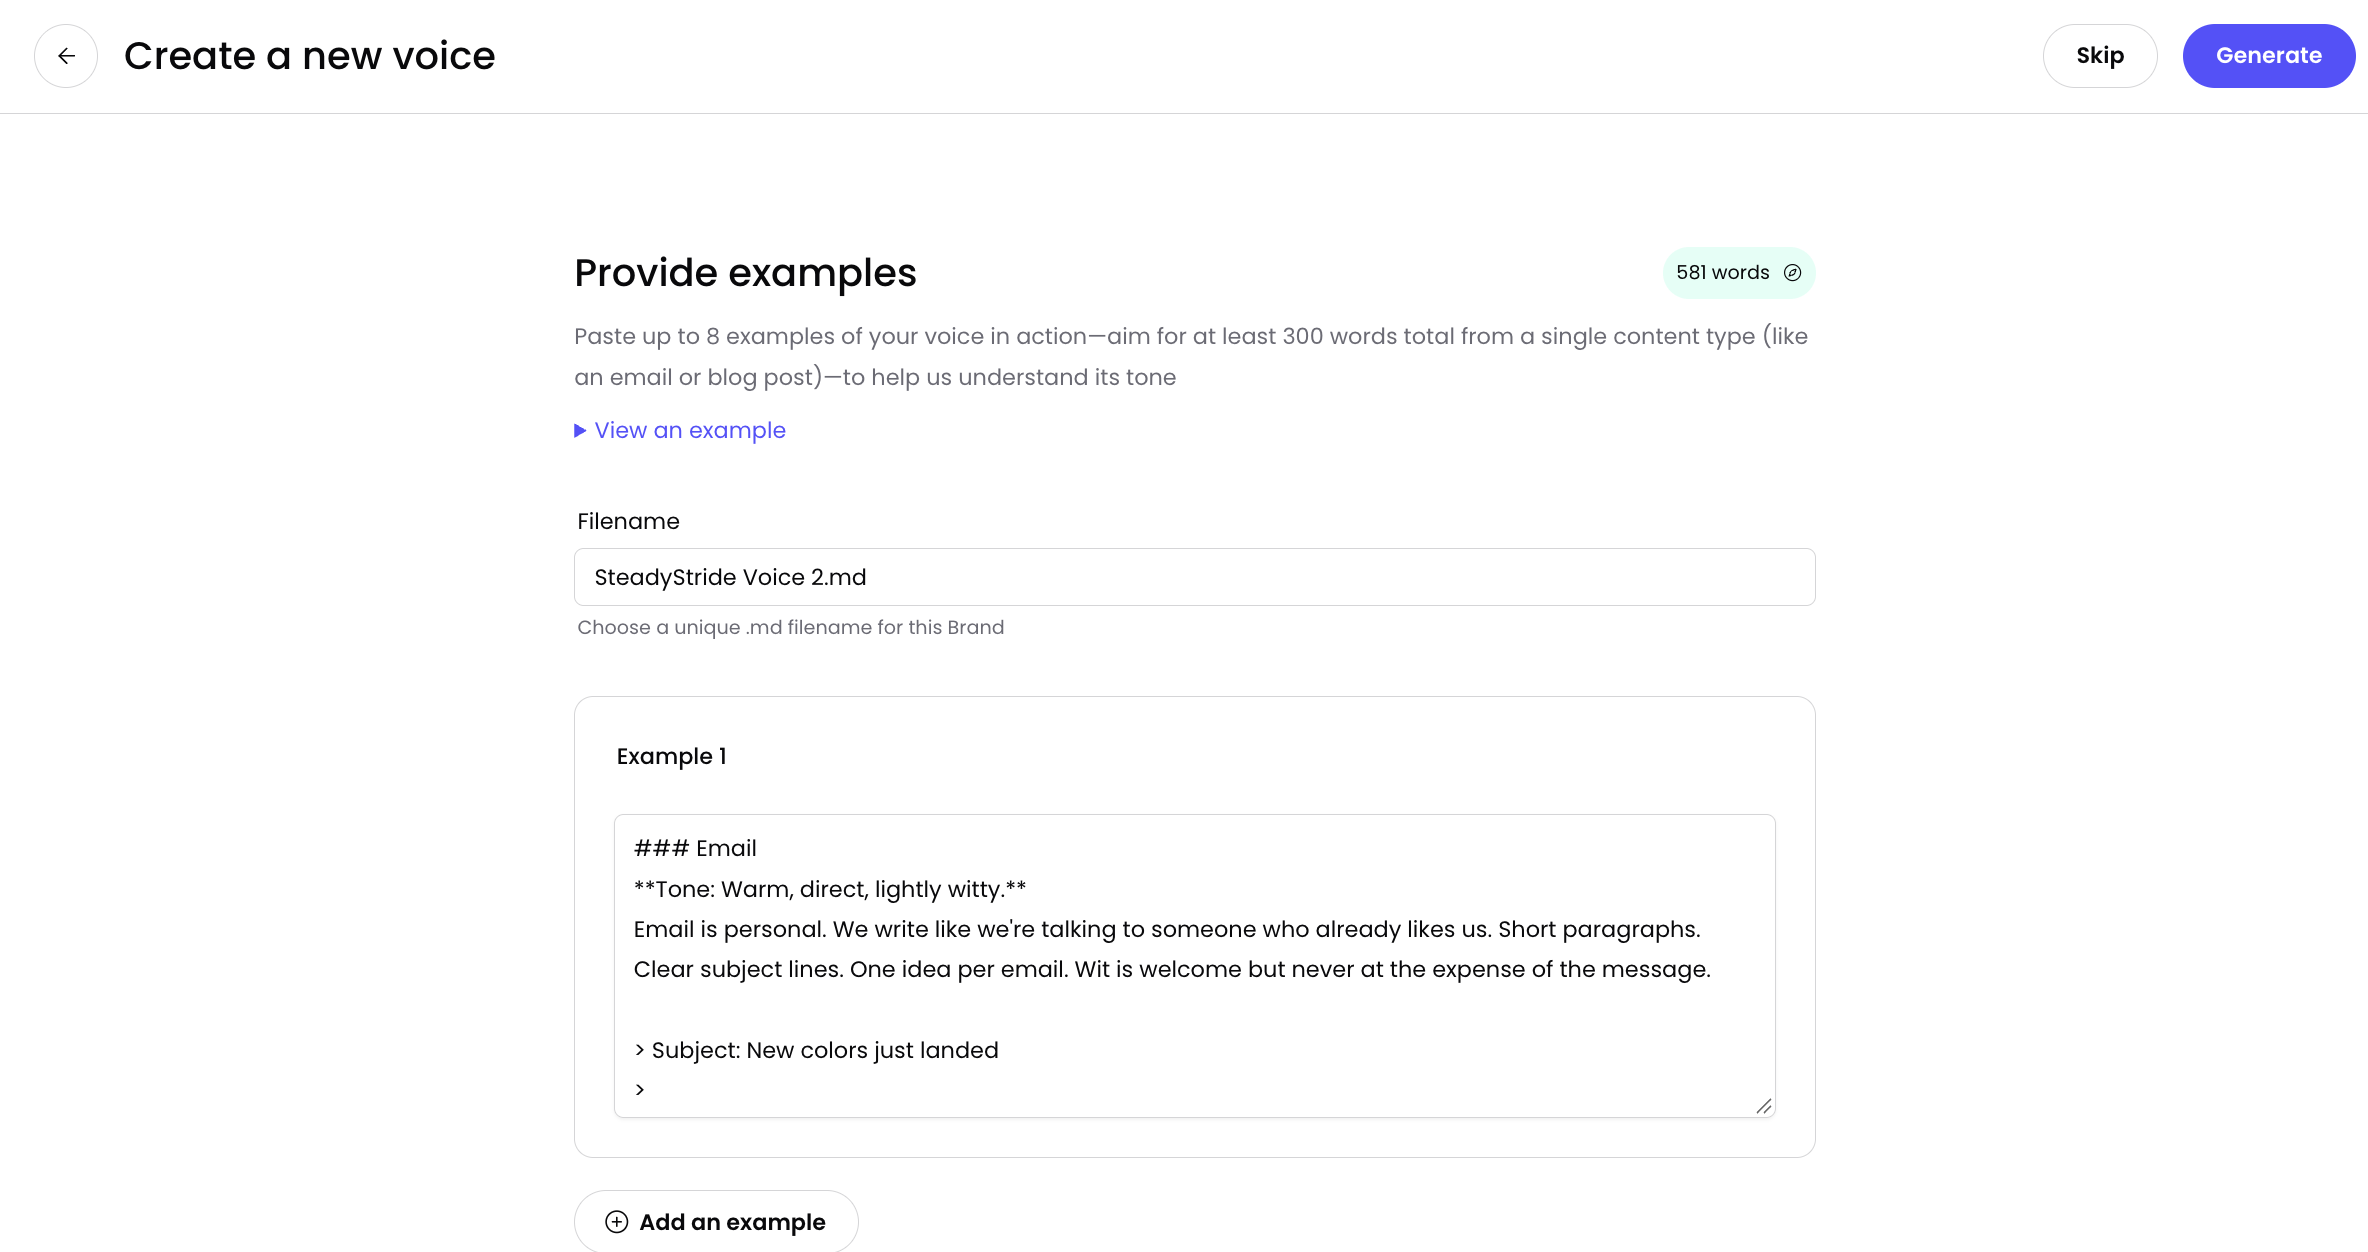
Paste examples of your on-brand content into the text boxes. You can use up to 8 text boxes to organize different examples.
You’ll see adjectives automatically generated and displayed below the example. These can be regenerated after changing the example text and selecting the refresh icon next to the adjectives.
Provide at least 300 words total (500+ words recommended). There is no upper limit—provide as many examples as you need within each example box.
Select Generate from the top right corner.
💡 Tip: For best performance, provide examples from a single content type (like all email examples or all blog posts) rather than mixing different formats. This helps WRITER understand the specific voice for that use case.
WRITER analyzes your examples and extracts a voice profile with a short overview and detailed characteristics. Review the extracted voice profile and select Edit to make adjustments.
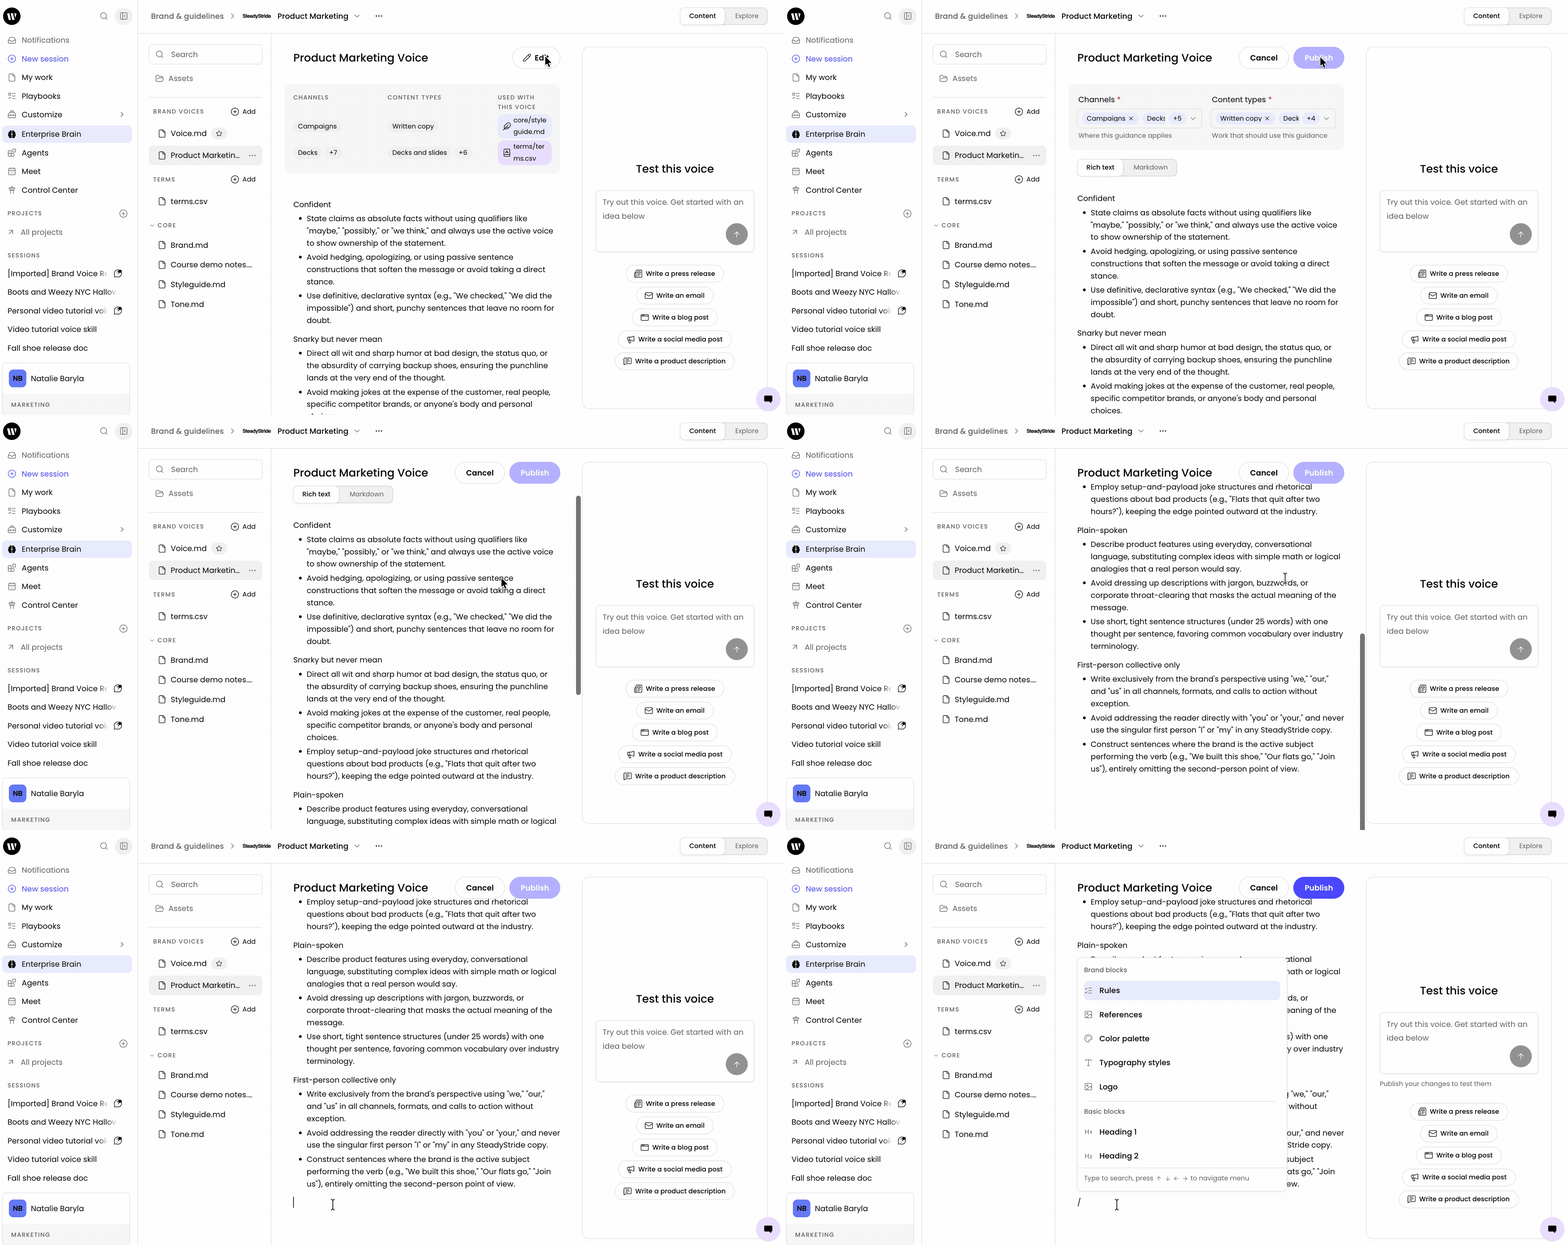
Review the extracted voice profile. If it sounds right, proceed to the next step. If not, you can update your examples and re-extract. To make changes, select Edit in the upper right corner and make adjustments to the voice profile.
Tip: Use the / menu to bring up the block editor to add team specific rules to your voice.
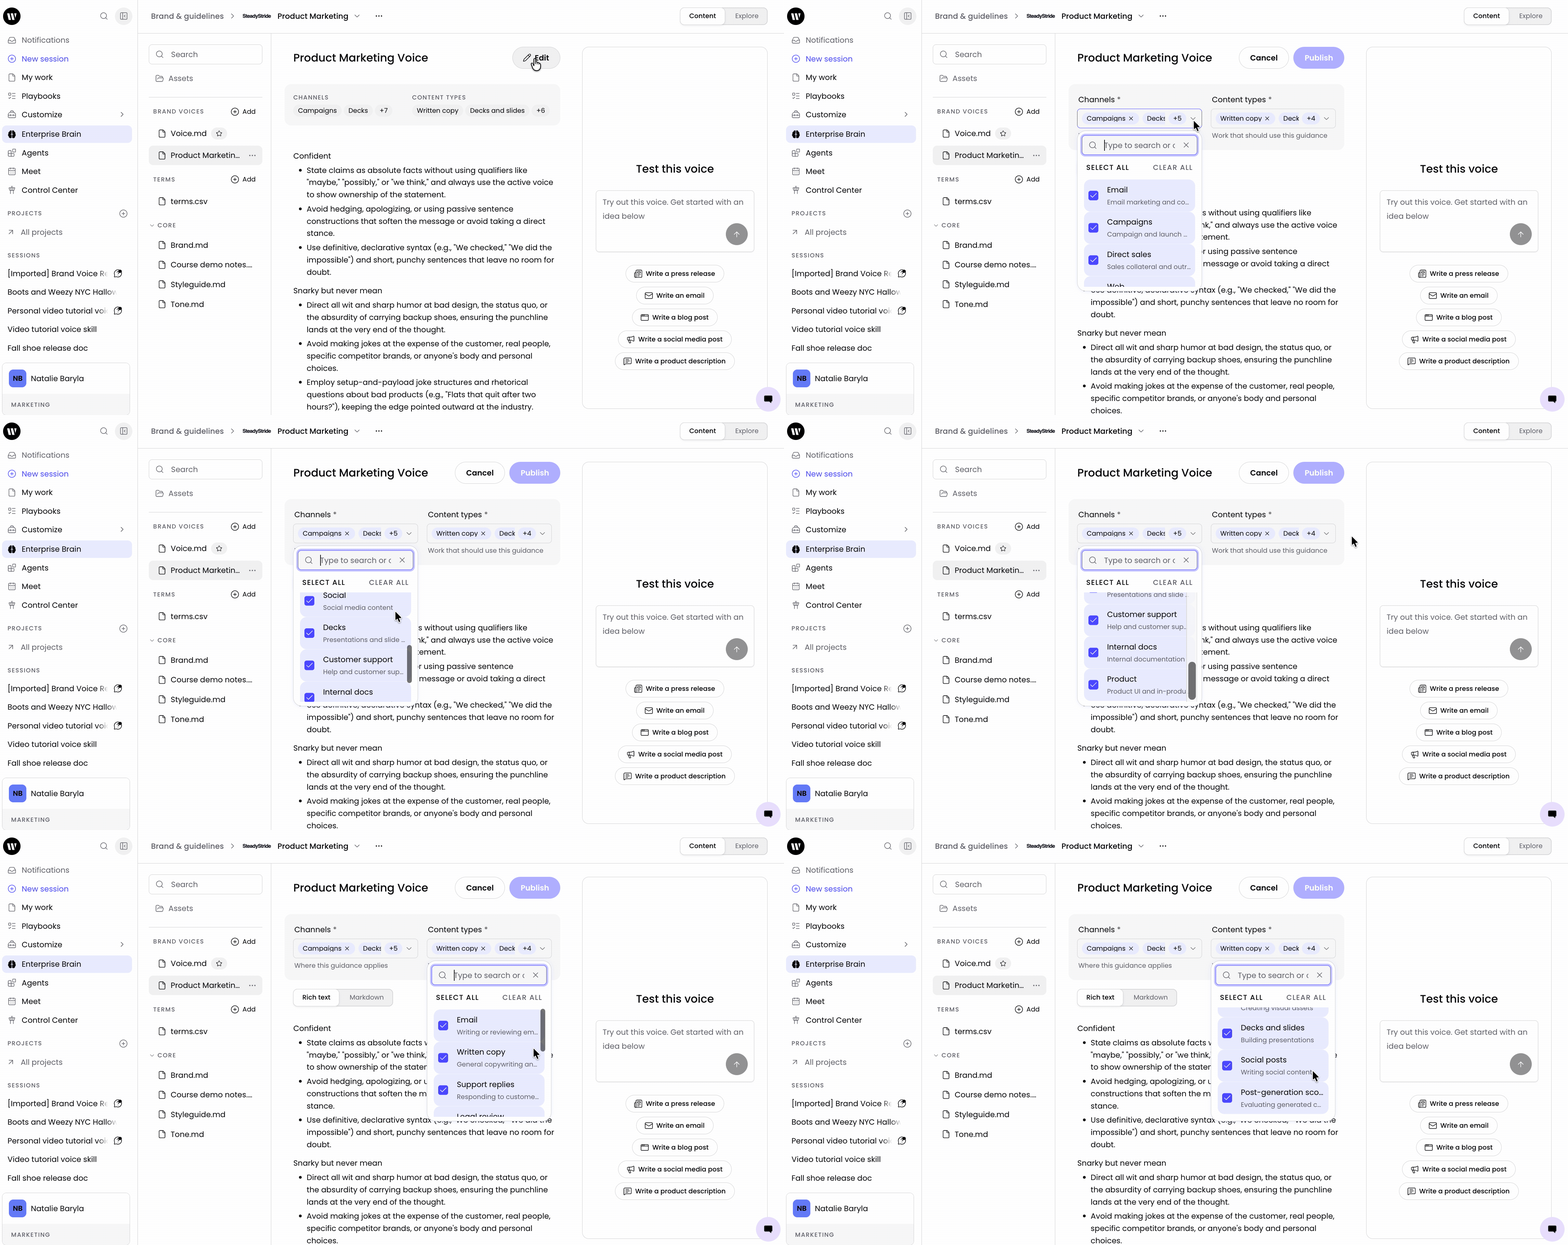
Next, select which channels and content types this voice should apply to. You can have multiple voices per brand so if you require different channels and content types to have different voice profiles or language rules assigned to them you can do that from here.
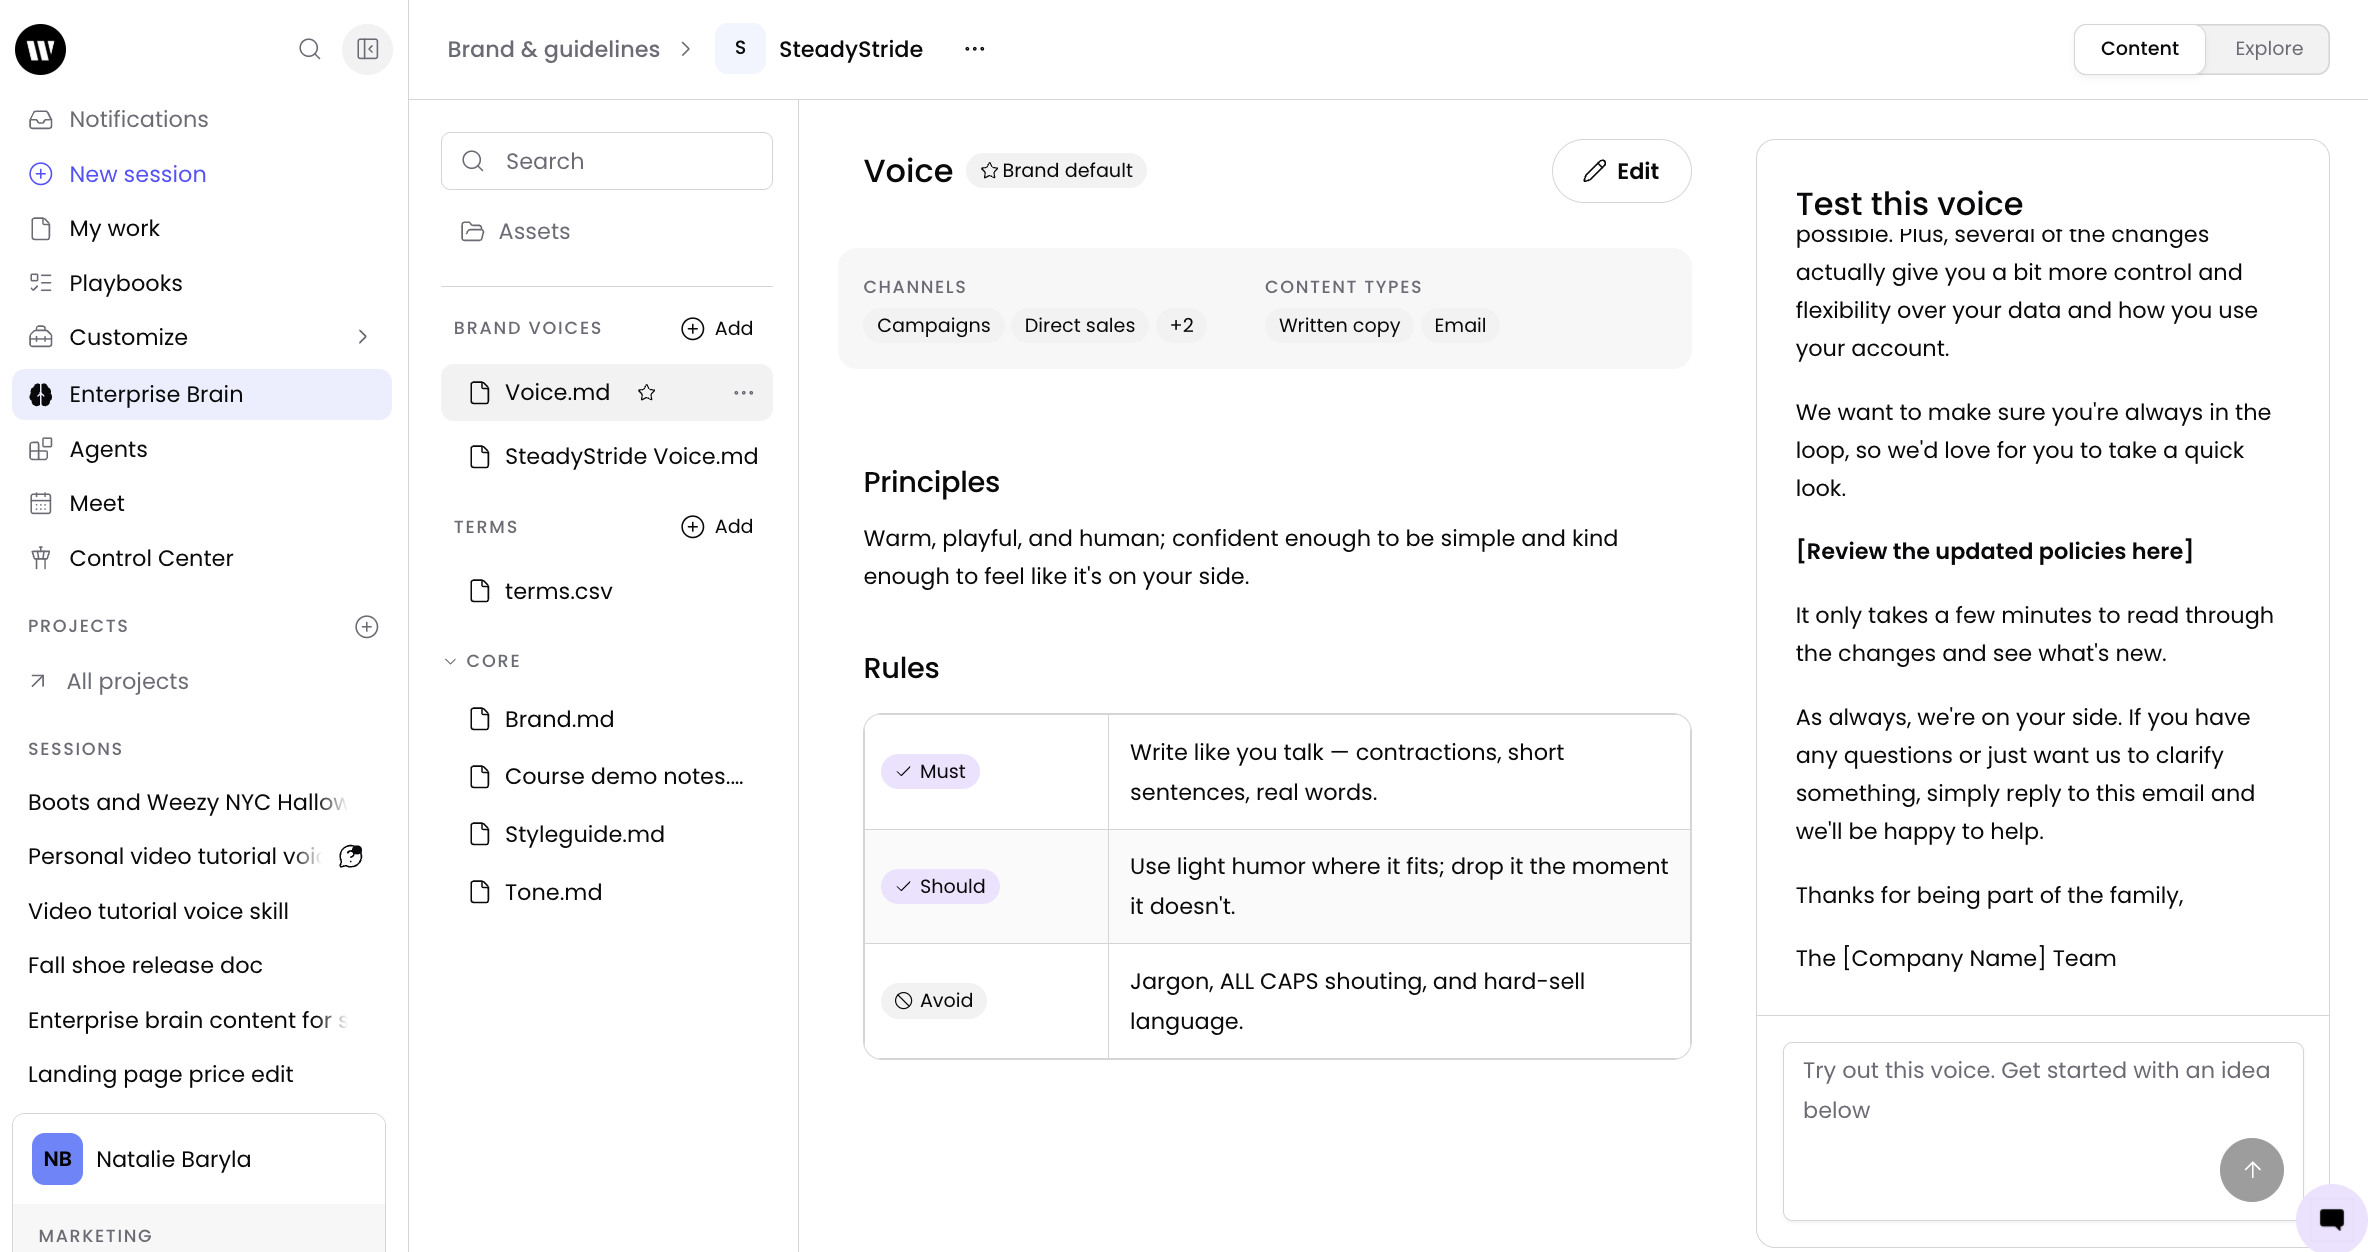
Once you're satisfied with the voice profile it's time to test it. Use the right panel to enter an example use case and see how your voice is applied to the output. Examine the output and make edits to the voice until it's just right.
Tip: Not sure what edits to make to your voice to get it just right? Chat wit WRITER Agent and ask it to help you make adjustments. WRITER Agent can product a markdown file you can import directly to your voice.
Creating a new voice without examples
Note: Voices created from examples consistently produce better, more brand-aligned outputs than manually written descriptions.
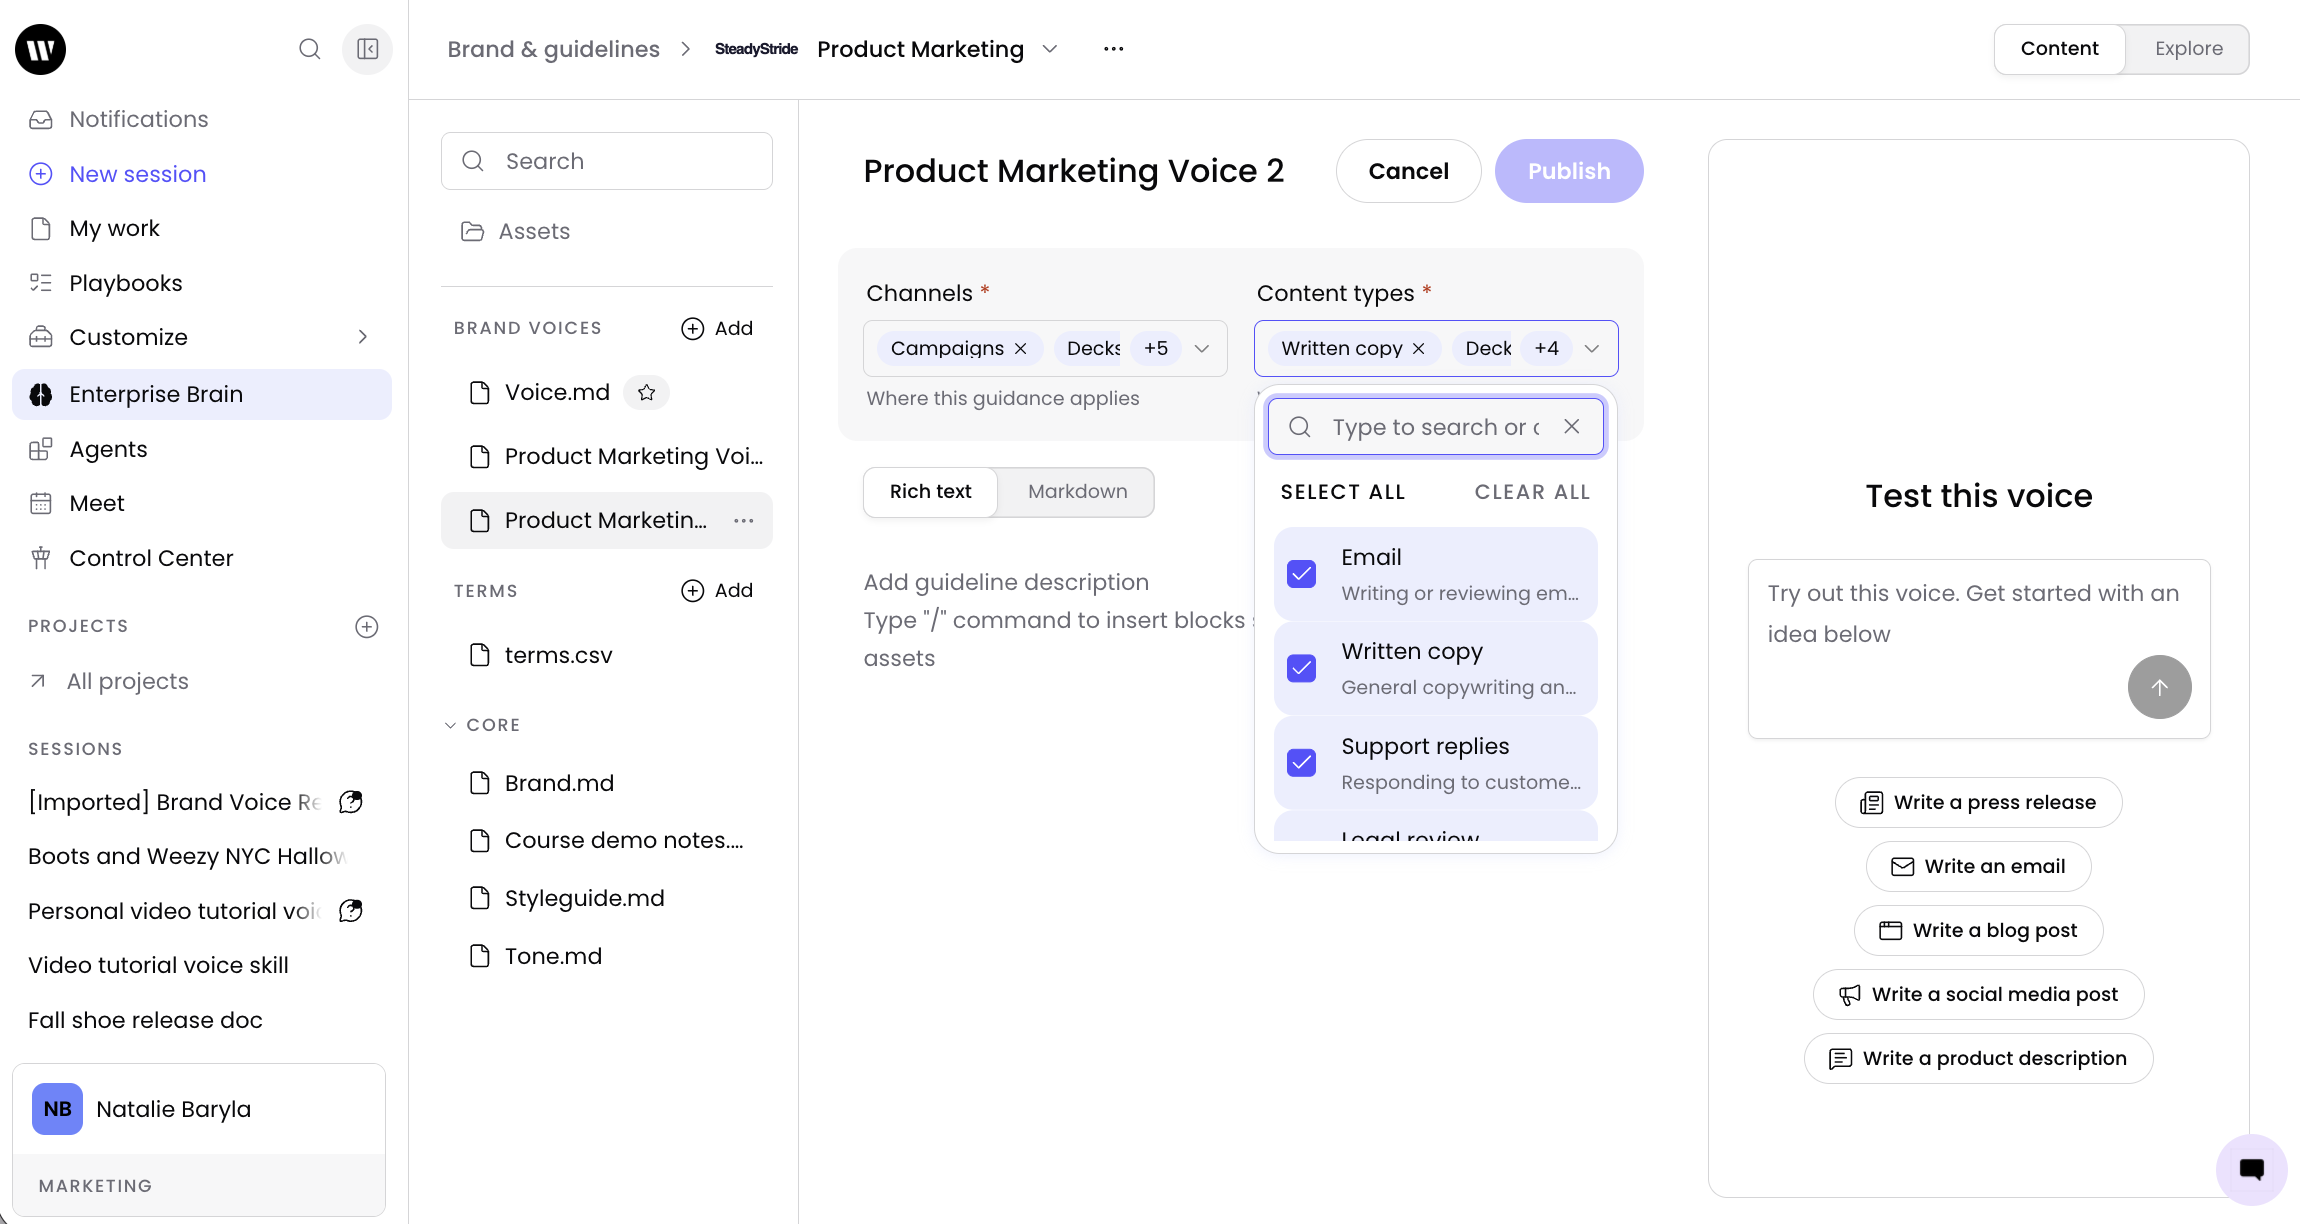
If you select Skip to bypass the examples step and write a voice description manually., you'll be taken to a blank voice file you can edit. You can use the rich text block editor to add your rules, or paste the contents of a markdown file. Once you've created your voice, test it and then publish it.
How to copy a voice from another brand
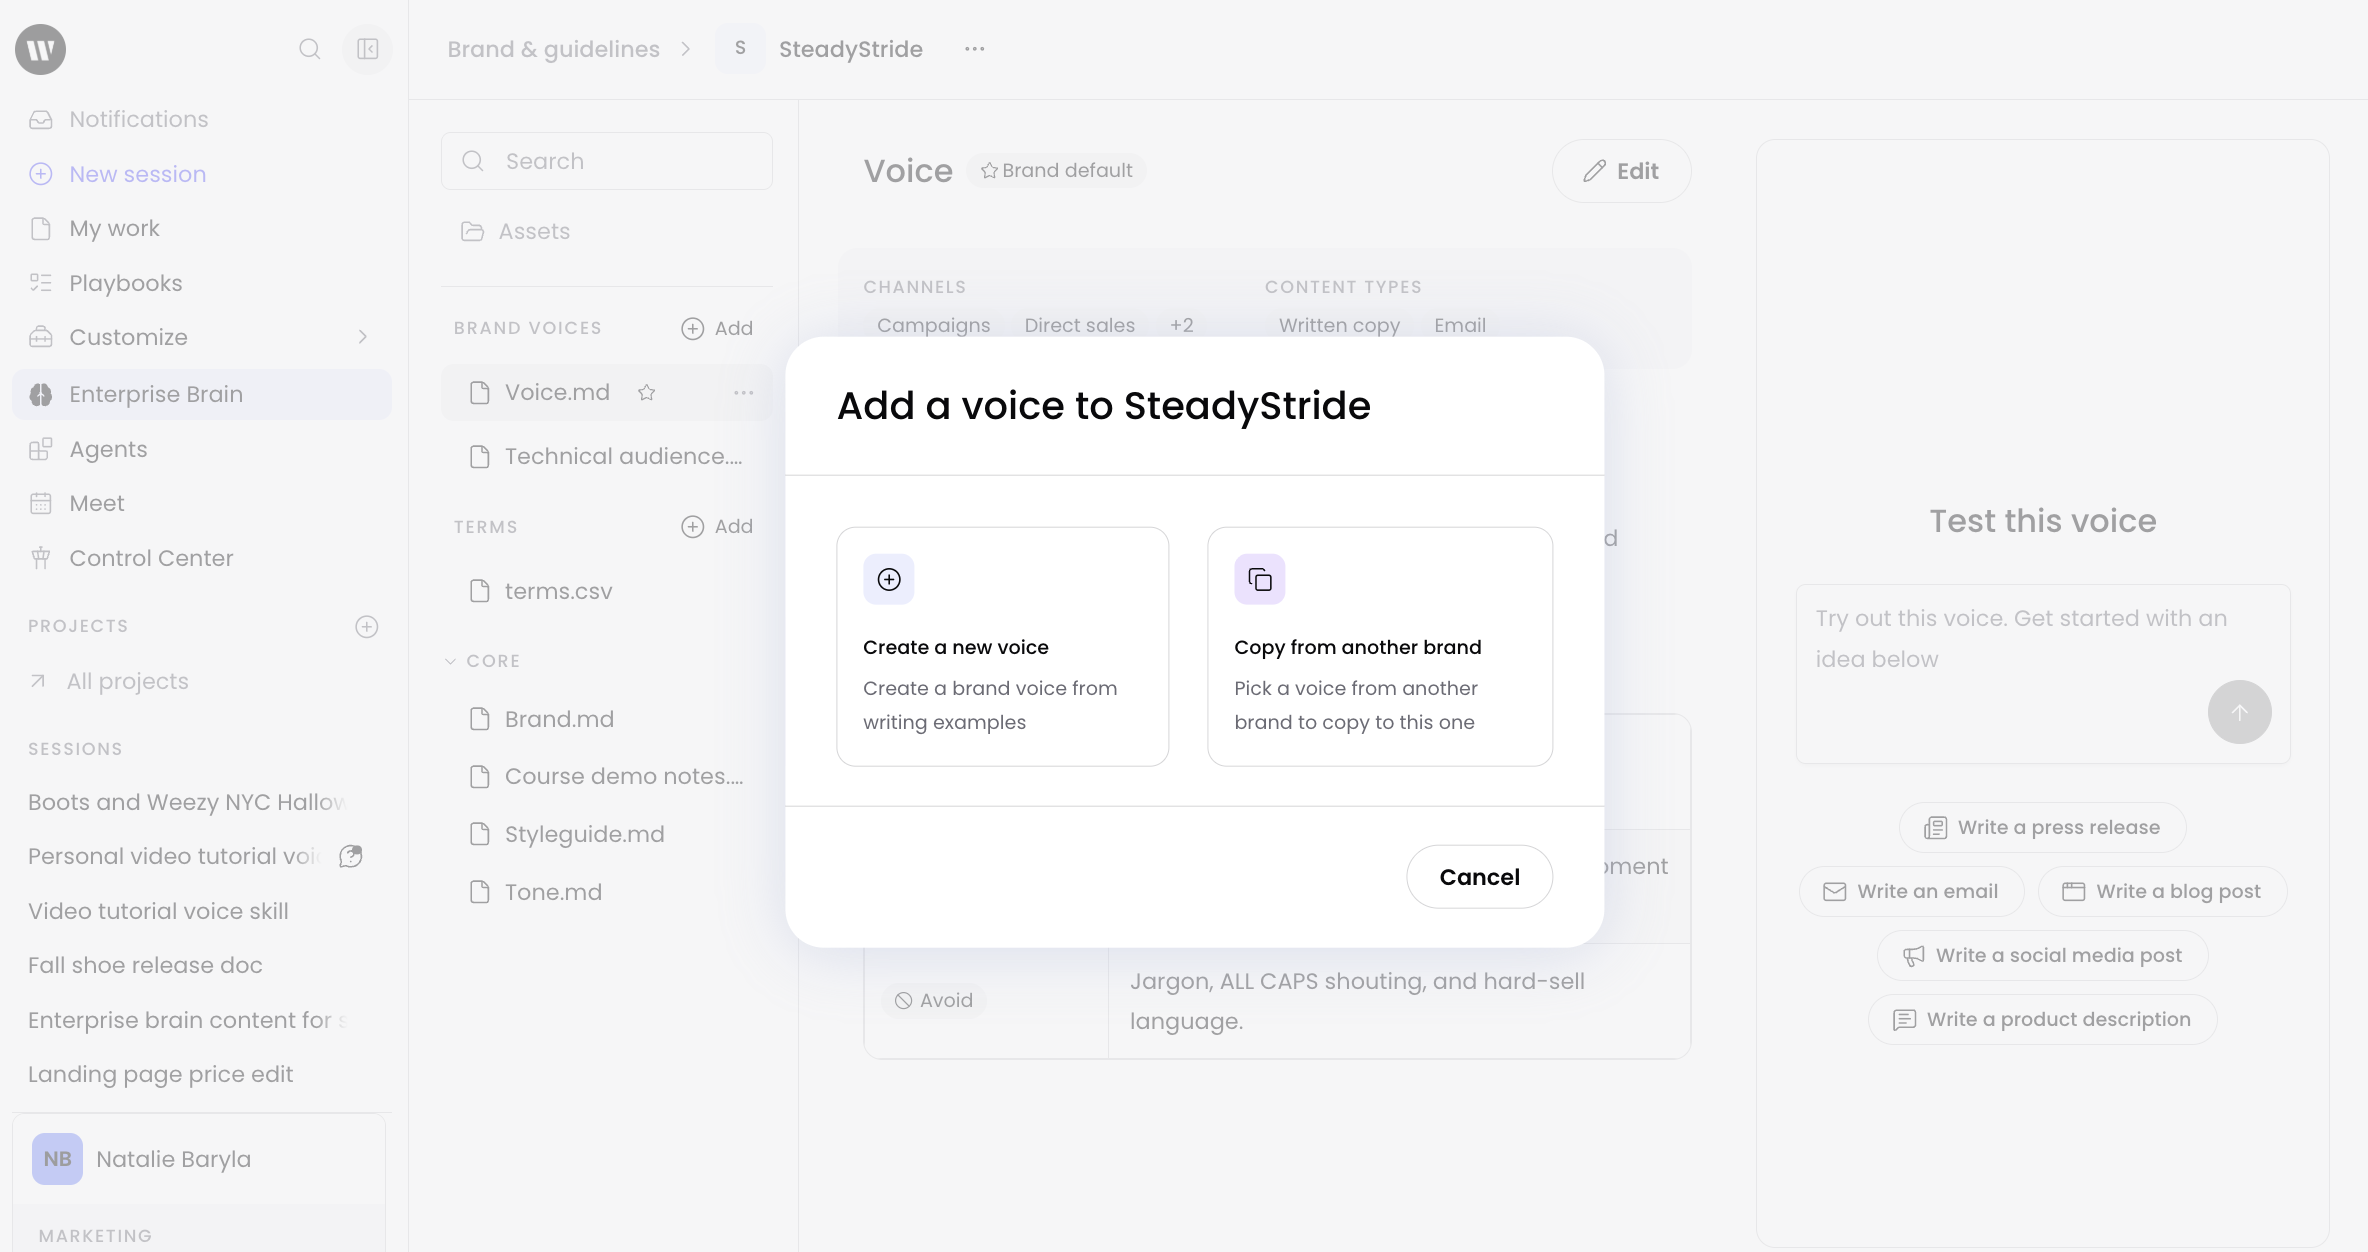
If you'd like to start with a voice that already exists under another brand you have access to within Enterprise Brain and make adjustments so that it's specific to your team or sub-brand select Copy from another brand from the +Add menu within the voice section of Enterprise Brain.
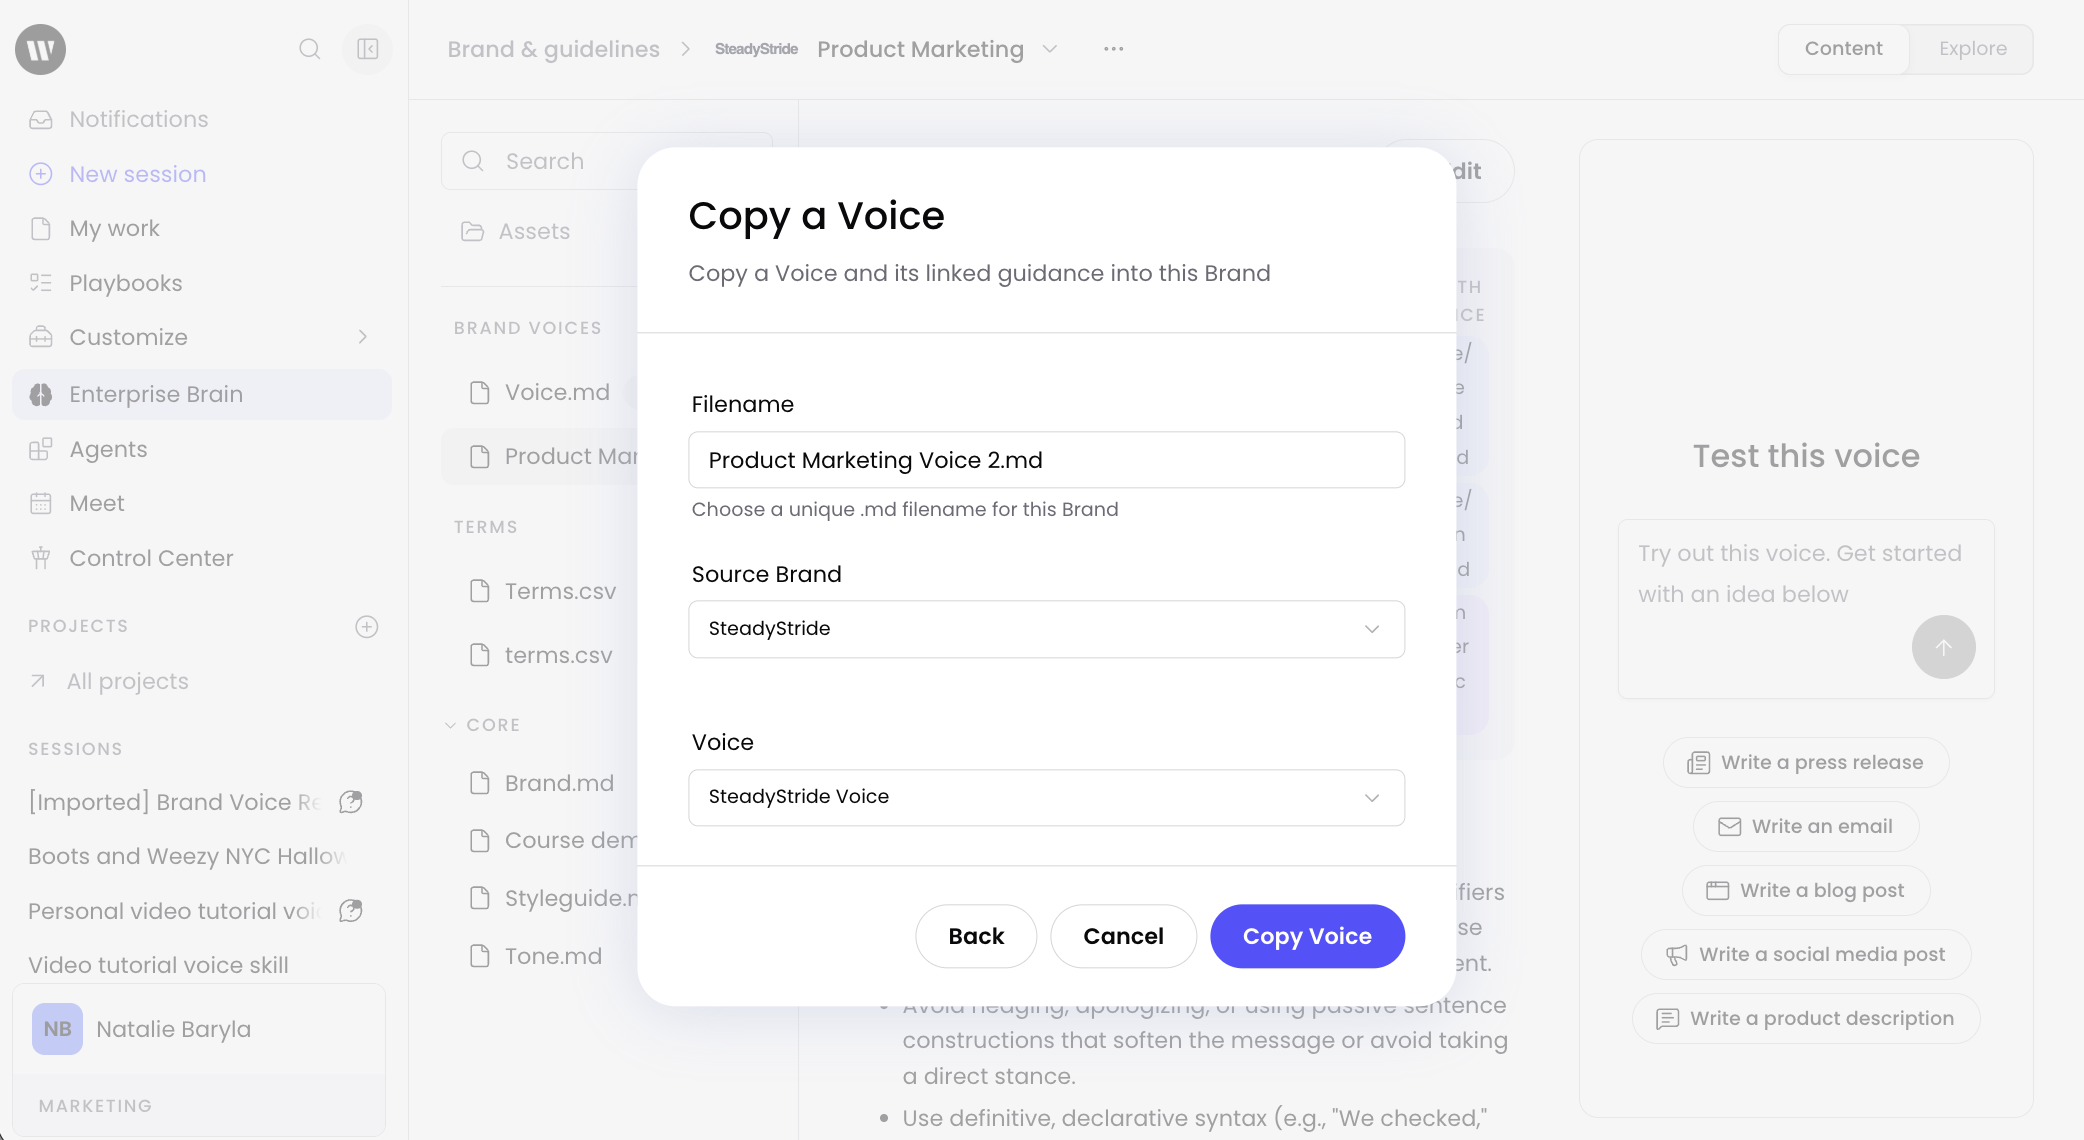
Name the voice file, select the source brand first and then select the voice to copy. Once you select Copy Voice and you'll be taken to a new voice file you can edit using the steps above.
Note: Copying a voice creates a new voice file in the target brand. The copied voice is independent of the original and can be edited without affecting the source voice.
Linking terms and guidance to a voice
Each voice can be linked to guidance files and a terms file from within the same brand. Linked guidance files are applied alongside the voice when WRITER generates content.
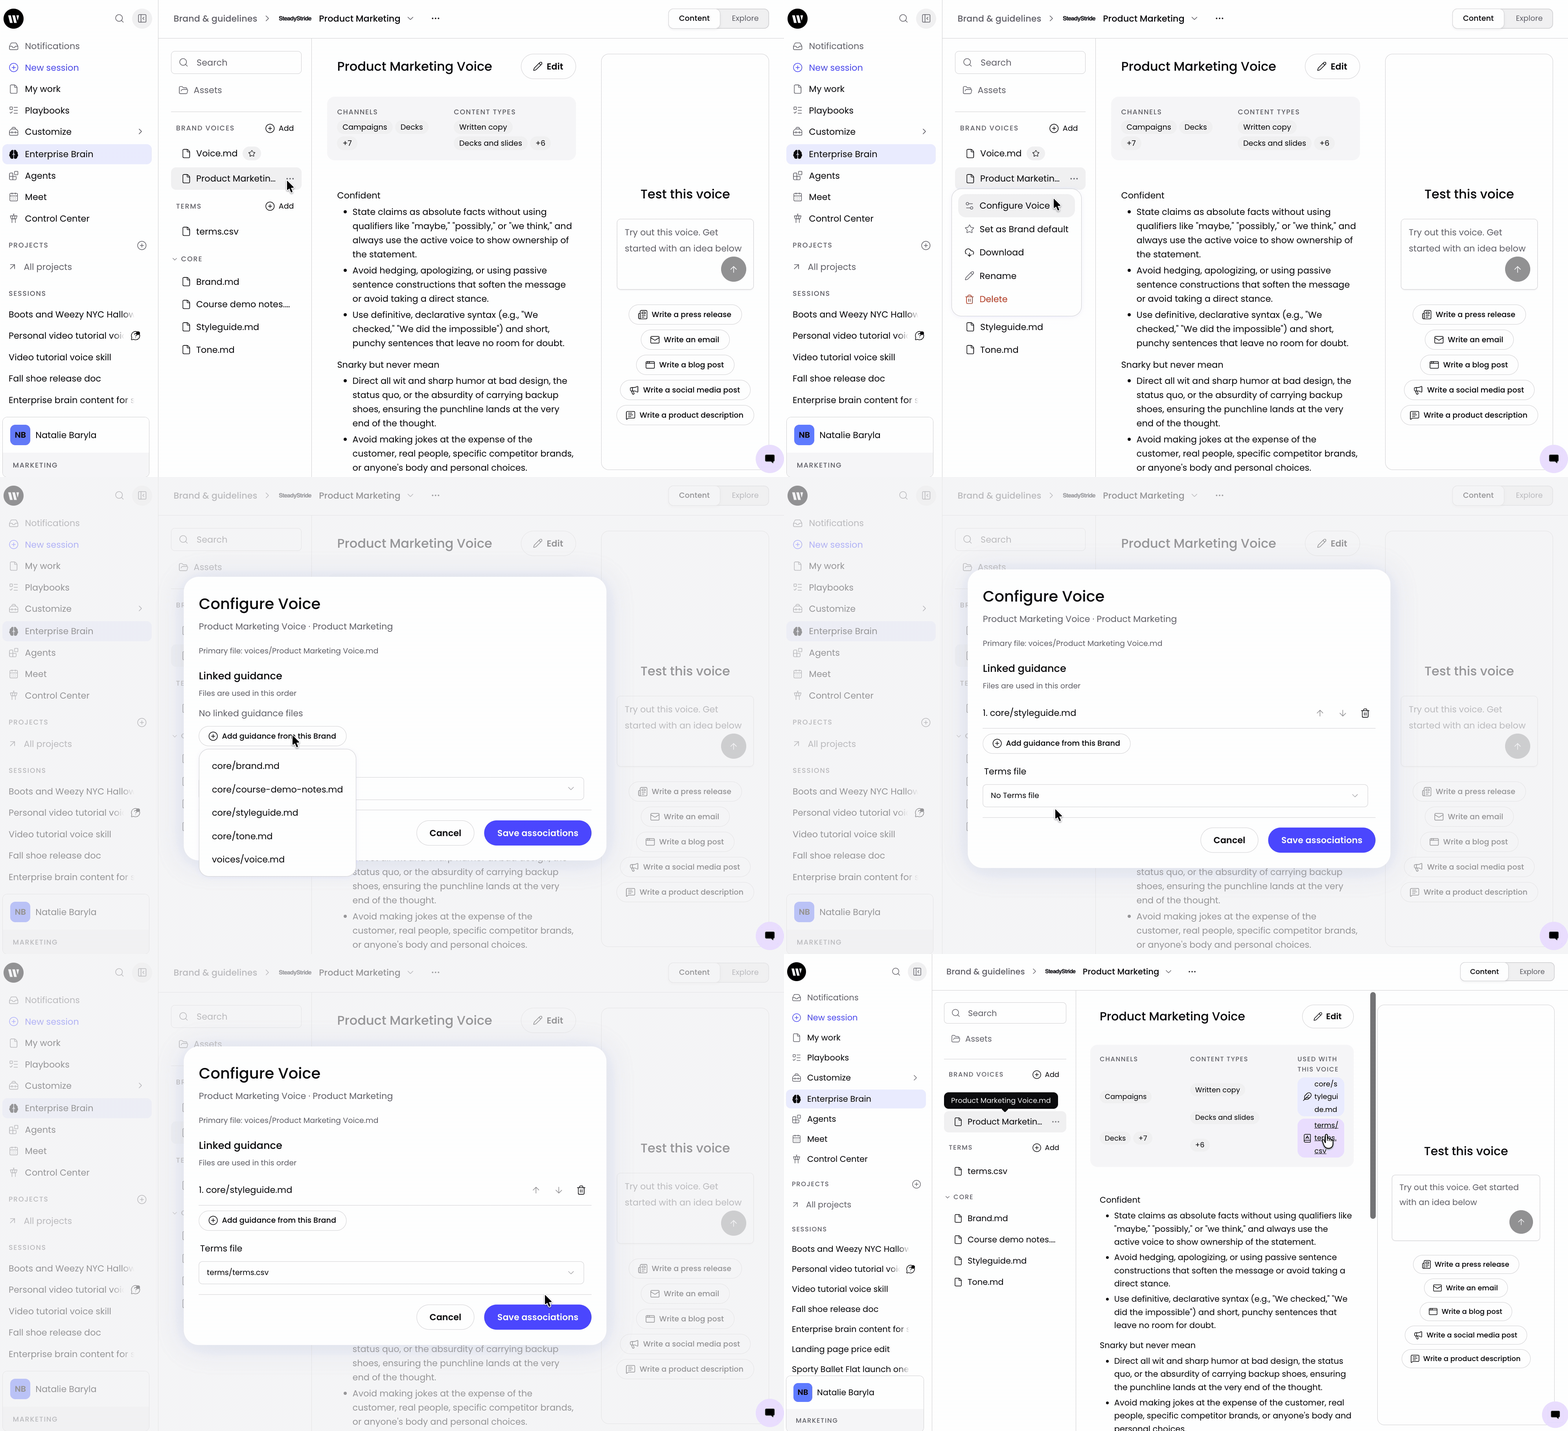
In the Brand voices section, locate the voice you want to configure and select the three dot menu menu next to the voice file. Select Configure Voice from the context menu.
Under Linked guidance, select + Add guidance from this Brand and choose a file from the brand. Under Terms file, use the dropdown to select a terms file from the brand, or select None to remove the terms association.
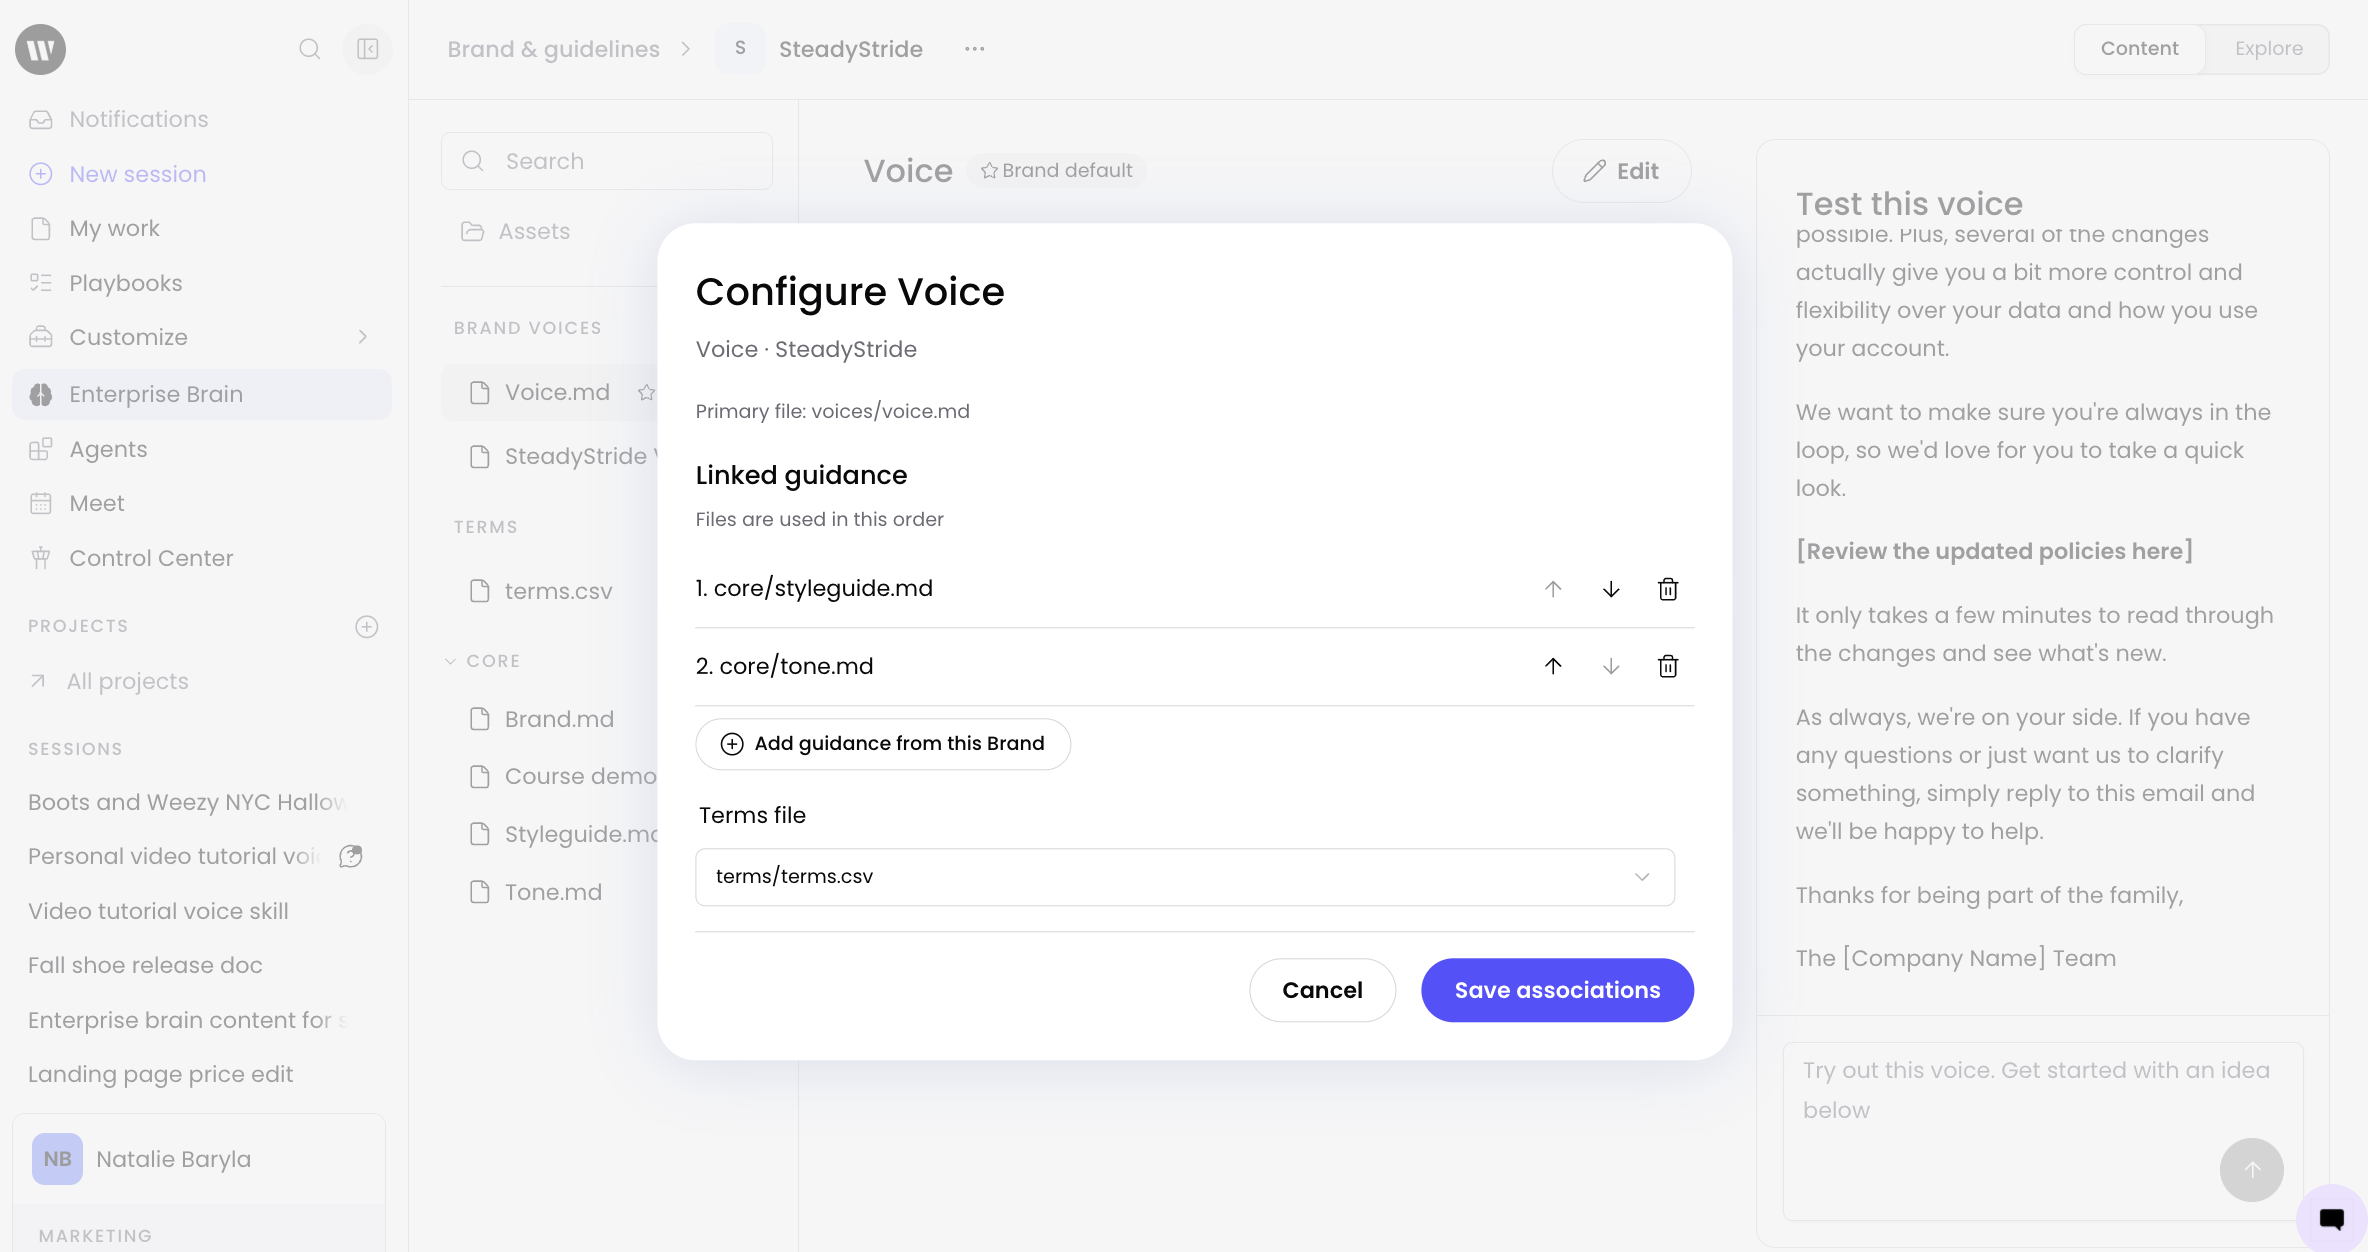
To reorder linked guidance files, use the Move Up (↑) and Move Down (↓) arrows next to each file. The order determines the priority in which guidance files are applied. To remove a linked guidance file, select the Delete (🗑) icon next to it. Select Save associations to apply the changes.
Tip: The order of linked guidance files matters. Files higher in the list take priority when conflicts arise. Place your most authoritative guidance file first.
Editing a voice
You can edit a voice at any time to refine its principles and rules as your brand evolves.
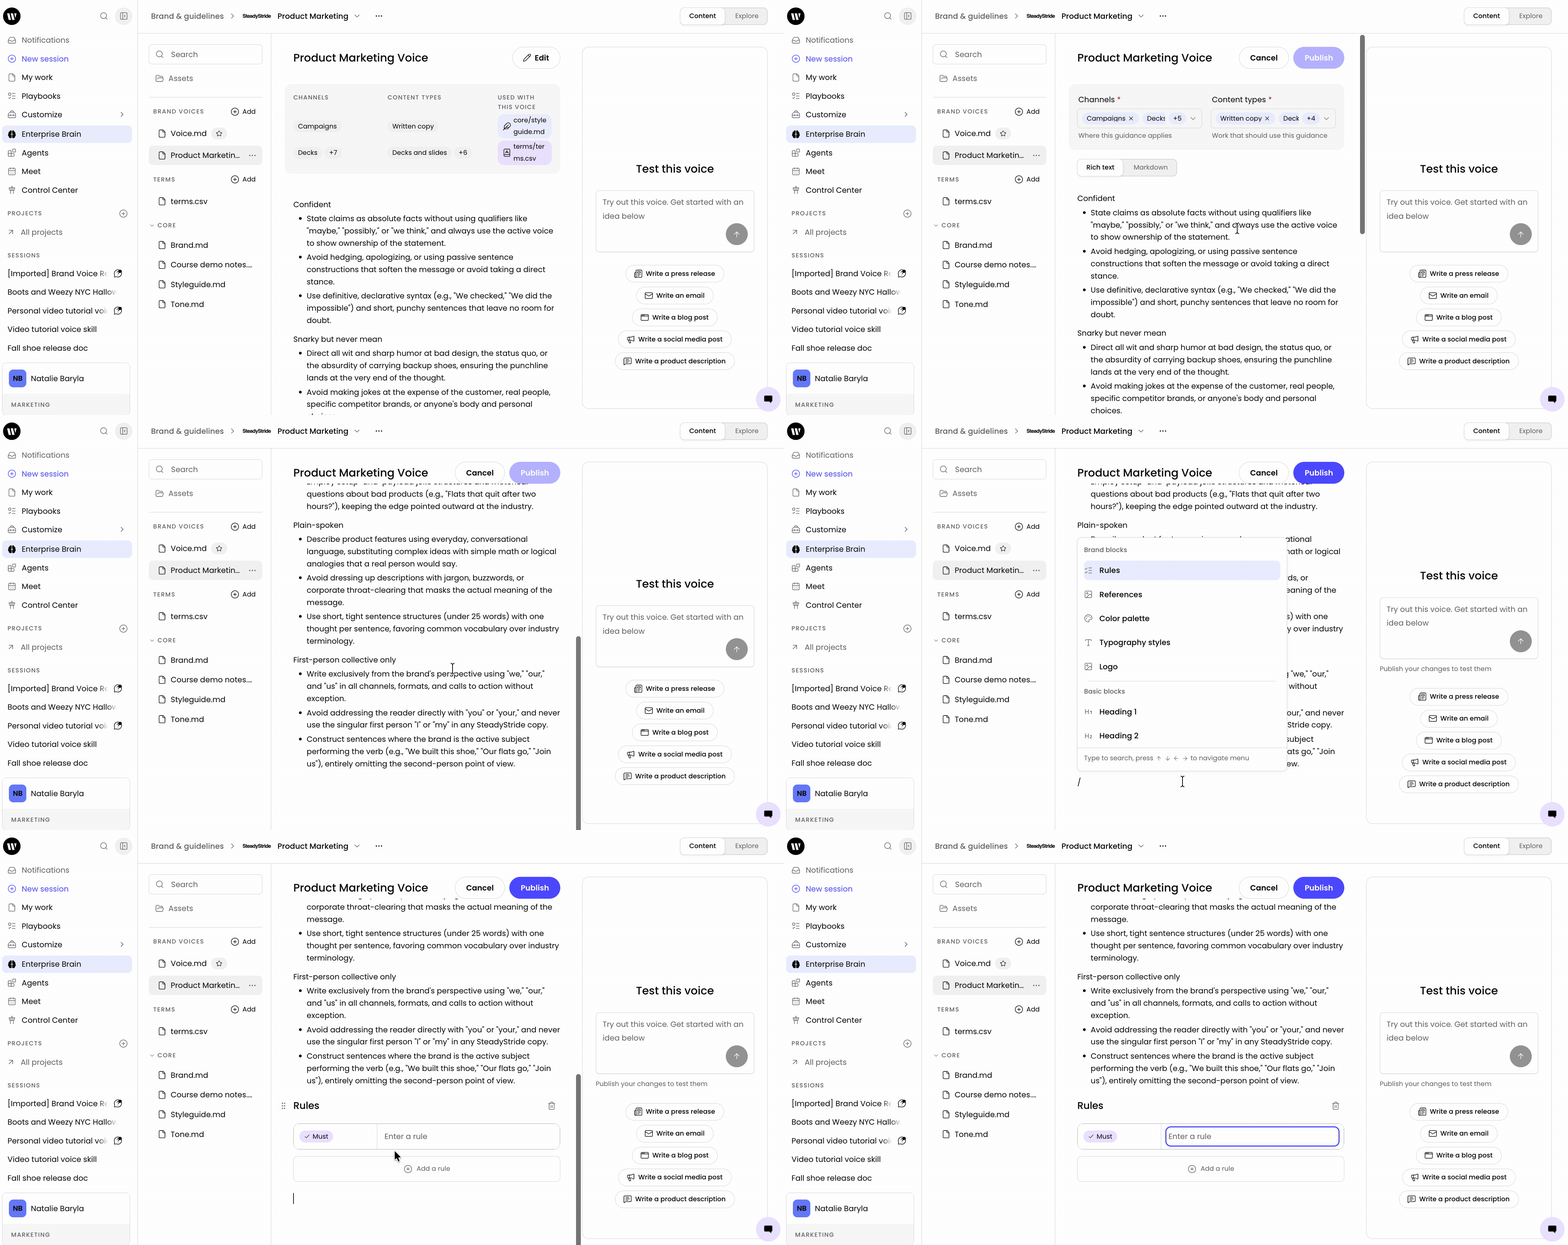
Open the voice file by selecting it from the Brand voices section.
Select Edit in the top right corner of the voice view.
Update the CHANNELS and CONTENT TYPES metadata to reflect where this voice should be used.
Update the voice's principles, rules, and metadata as needed. Each rule can be tagged by strength:
Must — WRITER always applies this rule. These are non-negotiable standards for your brand.
Should — WRITER applies this rule when relevant. These are strong recommendations that allow some flexibility.
Avoid — WRITER steers clear of this behavior. These mark things that don't fit your brand.
Never — WRITER never does this. These are hard prohibitions.
Select Save to apply the changes.
Tip: Use Must sparingly for the rules that matter most. Too many Must rules can over-constrain WRITER. Reserving the tag for your most important standards keeps them meaningful.
Managing brand voices
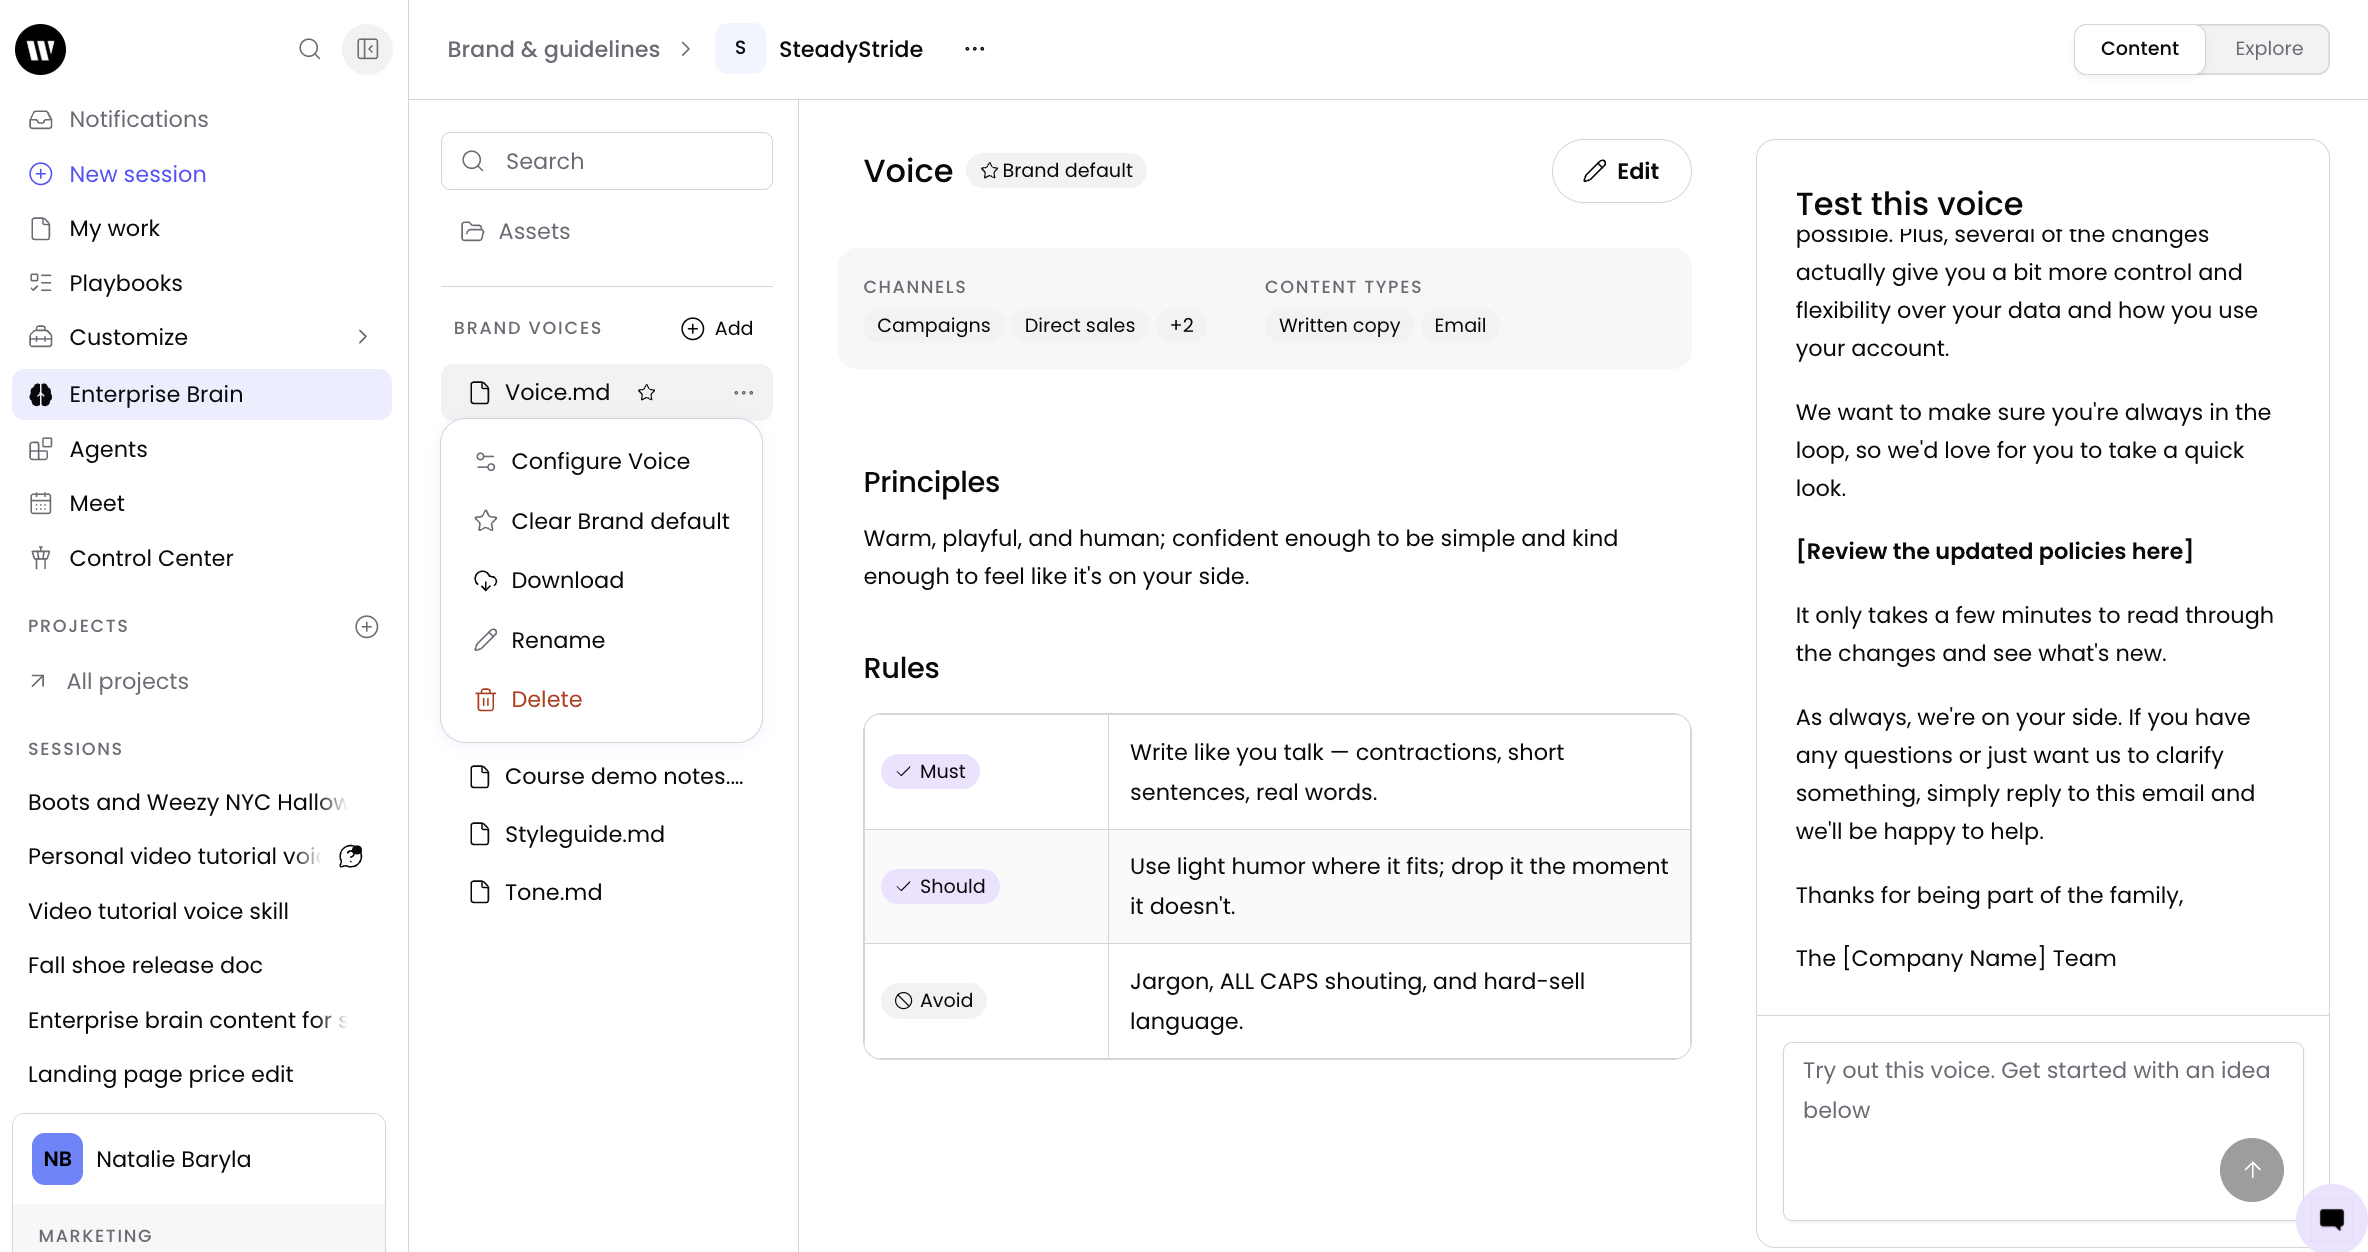
From the file navigation pane in Brand & guidelines, you can manage all voices within a brand. Select the ... menu next to any voice file to access the following options:
Configure Voice — Link guidance files and terms to the voice, and manage the order of linked guidance files.
Clear Brand default — Remove the brand default designation from this voice. This option appears only if the voice is currently set as the brand default.
Set Brand default — Make this voice automatically apply to WRITER Agent sessions for team members who have access to the brand.
Download — Download the voice file as a Markdown file.
Rename — Change the filename of the voice.
Delete — Remove the voice file from the brand.
Warning: Deleting a voice is irreversible. If the voice is linked to sessions or playbooks, those references will no longer have the voice applied. Consider downloading the voice file before deleting it if you may need it later.
Setting a brand default voice
Each brand can have one default voice. The default voice is automatically applied to WRITER Agent sessions for team members who have access to the brand.
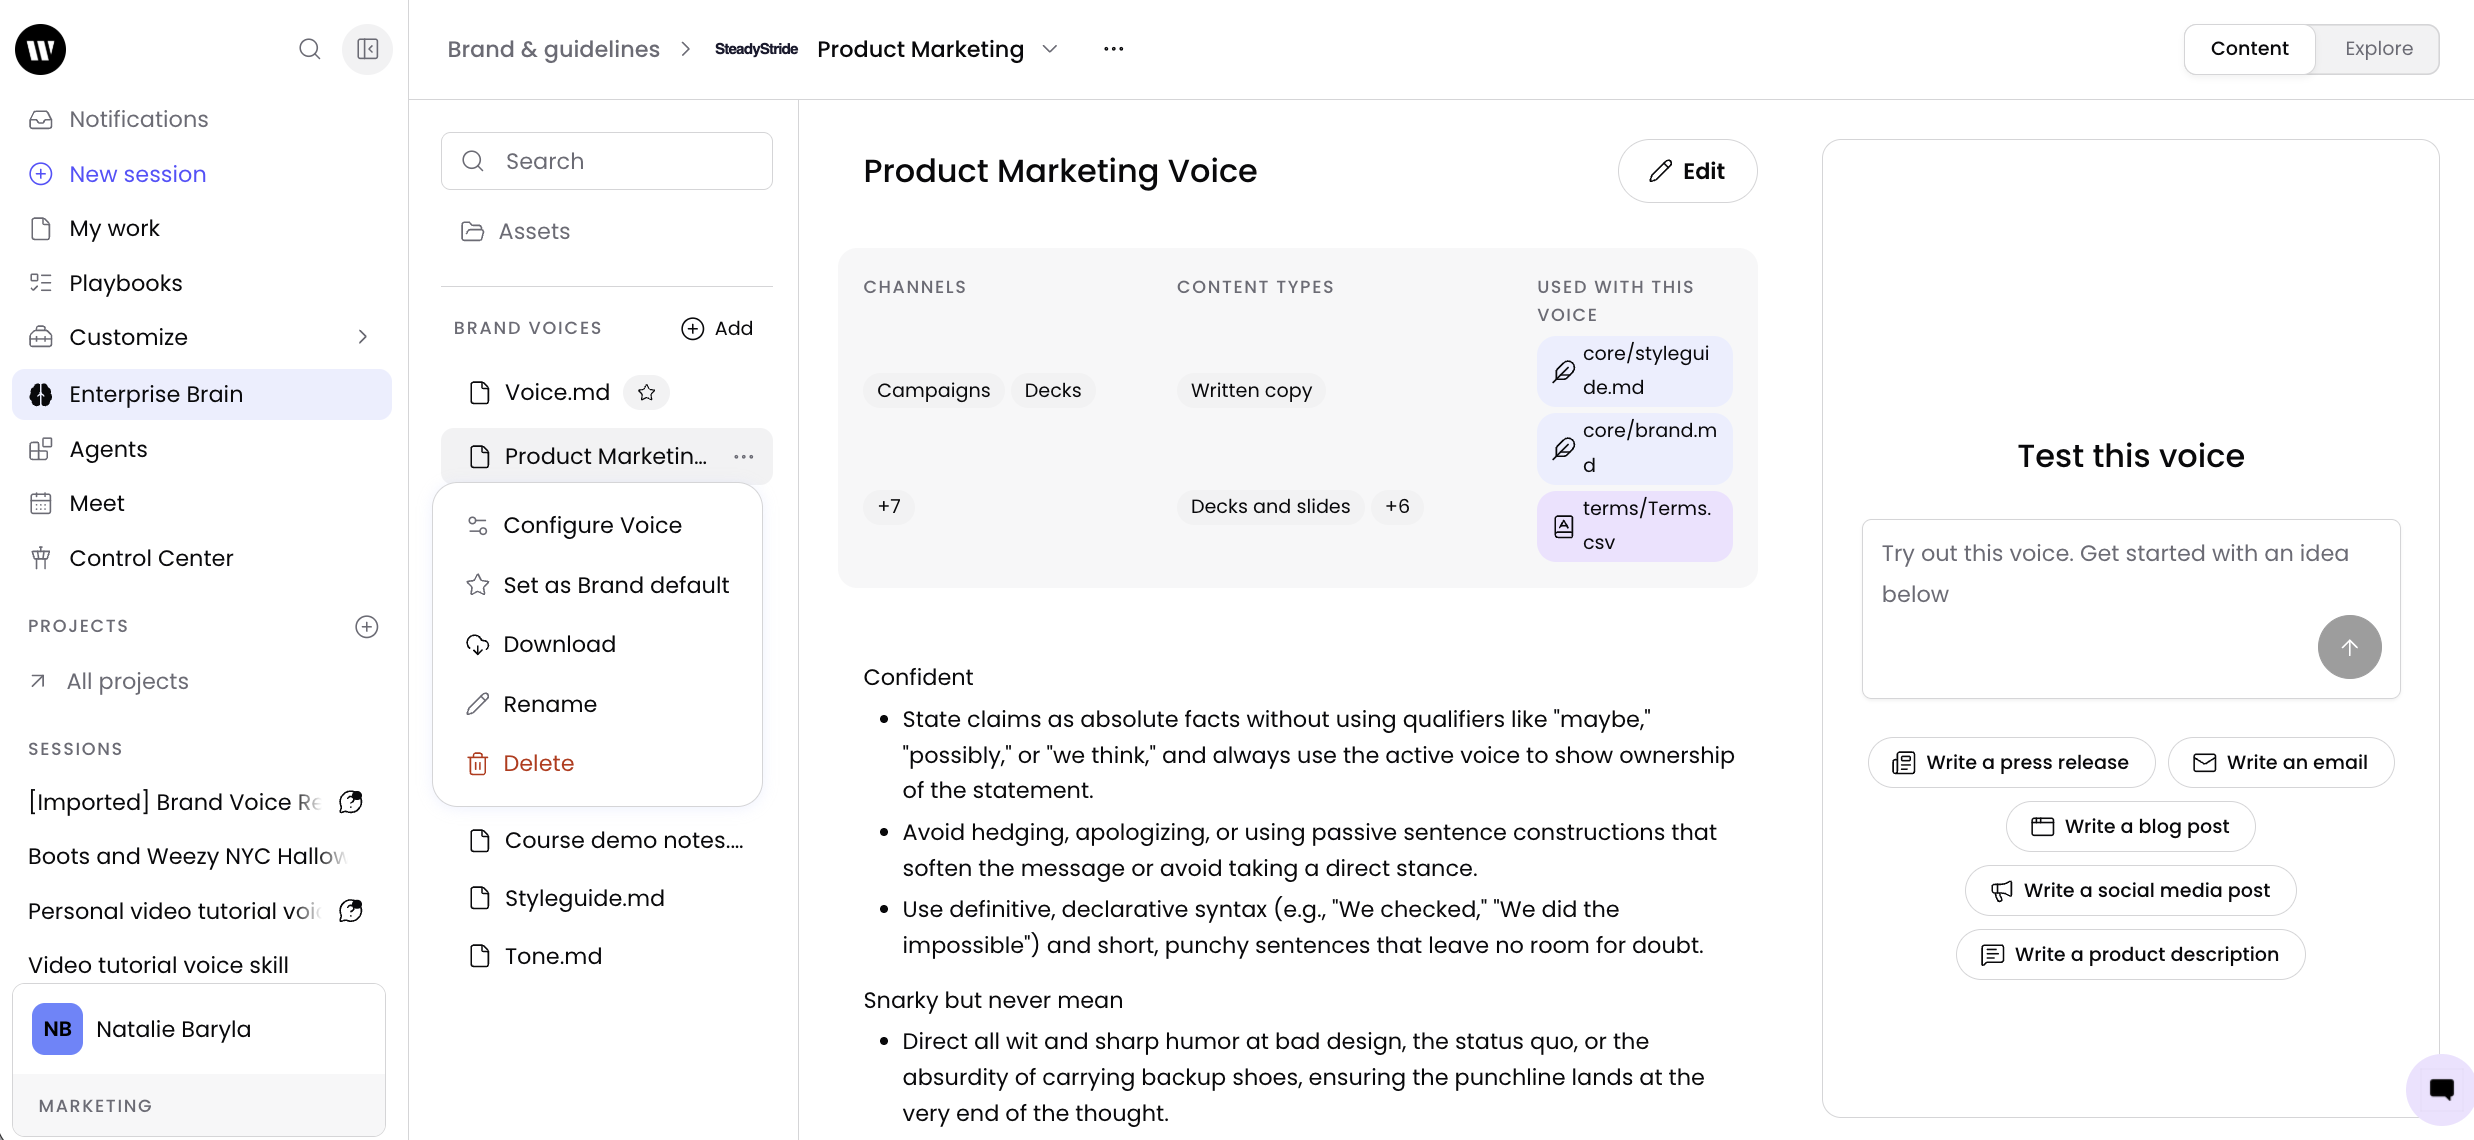
Navigate to Enterprise Brain > Brand & guidelines and select your brand.
In the Brand voices ection, locate the voice you want to set as the default.
Select the ... menu next to the voice file.
Select Set as Brand default from the context menu.
Note: Setting a new default voice replaces the previous default. The previous default voice remains in the brand but is no longer automatically applied to sessions.
Creating and managing guidelines and rules
In Enterprise Brain, brand guidance lives as individual Markdown files within the brand's file structure. In the brand & guidelines section you create and organize guidance files however makes sense for your organization. Files can be named anything, sorted into folders, and arranged within the brand section to suit your workflow.
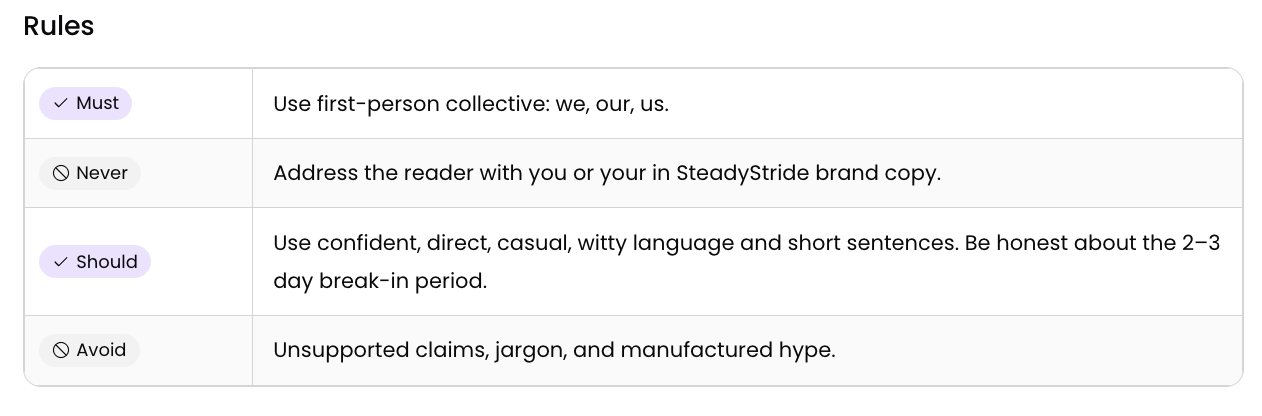
Each guidance file contains principles and rules. Rules are tagged by strength so agents know exactly how strongly to apply each one:
Must — Agents always apply this rule. These are non-negotiable standards for your brand.
Should — Agents apply this rule when relevant. These are strong recommendations that allow some flexibility.
Avoid — Agents steer clear of this behavior. These mark things that don't fit your brand.
Never — Agents never do this. These are hard prohibitions.
How to create a guidance file
Navigate to Enterprise Brain > Brand & guidelines and select your brand.
In the file navigation pane, select + Add next to the section where you want to add the file.
Enter a filename for the guidance file using a
.mdextension. Name it whatever makes sense for your organization — for example,Styleguide.md,Tone.md, orBrand.md.Add content to the file using the block-based editor. Type
/to open the menu and add structured rule blocks with Must, Should, Avoid, and Never directives, or add plain text.Select Save to apply the changes.
[IMAGE: Screenshot of the brand file navigation pane showing the CORE section with the + Add button highlighted, alongside the BRAND VOICES and TERMS sections.]
Tip: You have full flexibility to name and organize guidance files within the brand. Create separate files for tone, messaging, editorial standards, or any other category — or combine related guidance into a single file. Use folders to group files by team, purpose, or content type.
How to edit a guidance file
Open the guidance file by selecting it from the file navigation pane.
Select Edit in the top right corner.
Update the file's principles and rules as needed. Use the block-based editor to add, reorder, or remove rule blocks.
Select Save to apply the changes.
[IMAGE: Screenshot of a guidance file in edit mode showing the block-based editor with rule blocks tagged as Must, Should, Avoid, and Never.]
Tip: Keep brand guidelines focused on what the whole team or organization needs to know. Move task-specific instructions into skills. Avoid creating two sources of truth for the same guidance — if the same rule lives in both a brand guideline and a skill, agents may not know which takes priority.
Creating and managing terms
Terms let you manage, enforce, and share terminology specific to your organization. You can use terms to flag misspelled company names, ban deprecated or non-inclusive language, highlight words that need careful use, and create a shareable glossary for your team.
Types of terms
You can create four types of terms in WRITER:
Approved — terms that are ok to use. These are part of your taxonomy (such as what you call a feature or service) or word list (words you prefer writing a certain way, like Internet or email). For each Approved term, you can add common mistakes — ways that writers tend to write the term incorrectly.
Don't use — terms your writers shouldn't use. These might be words banned for compliance reasons, or because they're deprecated or extremely sensitive. You can link a Don't use term to an Approved term that your team should use instead.
Use carefully — terms that can be used in certain, specific contexts. WRITER always flags these terms so your team can double-check whether they're using them appropriately.
Pending — terms waiting for sign-off from your team before they're officially labeled as Approved, Don't use, or Use carefully. WRITER doesn't check for Pending terms in your content.
[IMAGE: Screenshot showing the four term types — Approved, Don't use, Use carefully, and Pending — with example terms and descriptions.]
How to create a terms file
Navigate to Enterprise Brain > Brand & guidelines and select your brand.
In the file navigation pane, locate the TERMS section.
Select + Add next to the TERMS section name.
Enter a filename for the terms file using a
.csvextension.Save the file to create an empty terms file in the brand.
[IMAGE: Screenshot of the brand file navigation pane showing the TERMS section with the + Add button highlighted.]
How to add individual terms
Open the terms file by selecting it from the TERMS section.
Select Add term.
Complete the term information:
Term — the word or phrase.
Type — select Approved, Don't use, Use carefully, or Pending.
Description — provide context about how to use the term.
Examples — add examples of correct or incorrect usage.
Configure any advanced options as needed (see the Advanced term options section below).
Select Save.
[IMAGE: Screenshot of the Add term form showing the Term, Type, Description, and Example fields, along with advanced options for part of speech and case sensitivity.]
Tip: When renaming a noun, create separate terms for both the singular and plural versions. For example, if you've renamed a feature from "Doohicky" to "Thingy-Majigg," create two terms for "Doohicky" and "Doohickies" to maintain correct agreement.
How to manage terms
From the terms file, you can:
Edit a term — Select the term to update its information, type, or advanced options.
Delete a term — Select the term and choose Delete.
Download terms — Select the download icon in the terms toolbar to export your terms as a CSV file.
Use tags — Add tags to organize terms by use case, Team, or category. Tags also let you specify which terms to publish when sharing your style guide.
Enable or disable suggestions — Use the enable/disable suggestions toggle to control whether WRITER enforces a term in content.
How terms are enforced
When terms are linked to a voice through the Configure Voice modal, WRITER Agent considers the following term rules during generation:
Don't use terms — WRITER avoids using the term.
Don't use terms with suggestions enabled — WRITER avoids the term and uses the linked Approved alternative instead.
Approved terms with common mistakes — WRITER uses the approved term instead of any listed common mistakes.
How to link terms to a voice
Terms must be linked to a voice through the Configure Voice modal to apply to WRITER Agent outputs. See Configuring a voice with linked guidance and terms for step-by-step instructions.
Each voice can be linked to one terms file at a time. When you update the terms file after linking it to a voice, the changes apply automatically — you do not need to re-link the file.
Important: Terms only affect WRITER Agent outputs when linked to a voice that is then used to generate content. If a user selects a voice without a connected terms file, the terms settings won't apply to that output.
Importing terms
You can import terms in bulk via CSV or XLSX file, up to 5MB in size. This is useful when migrating an existing termbank or adding many terms at once.
How to import terms
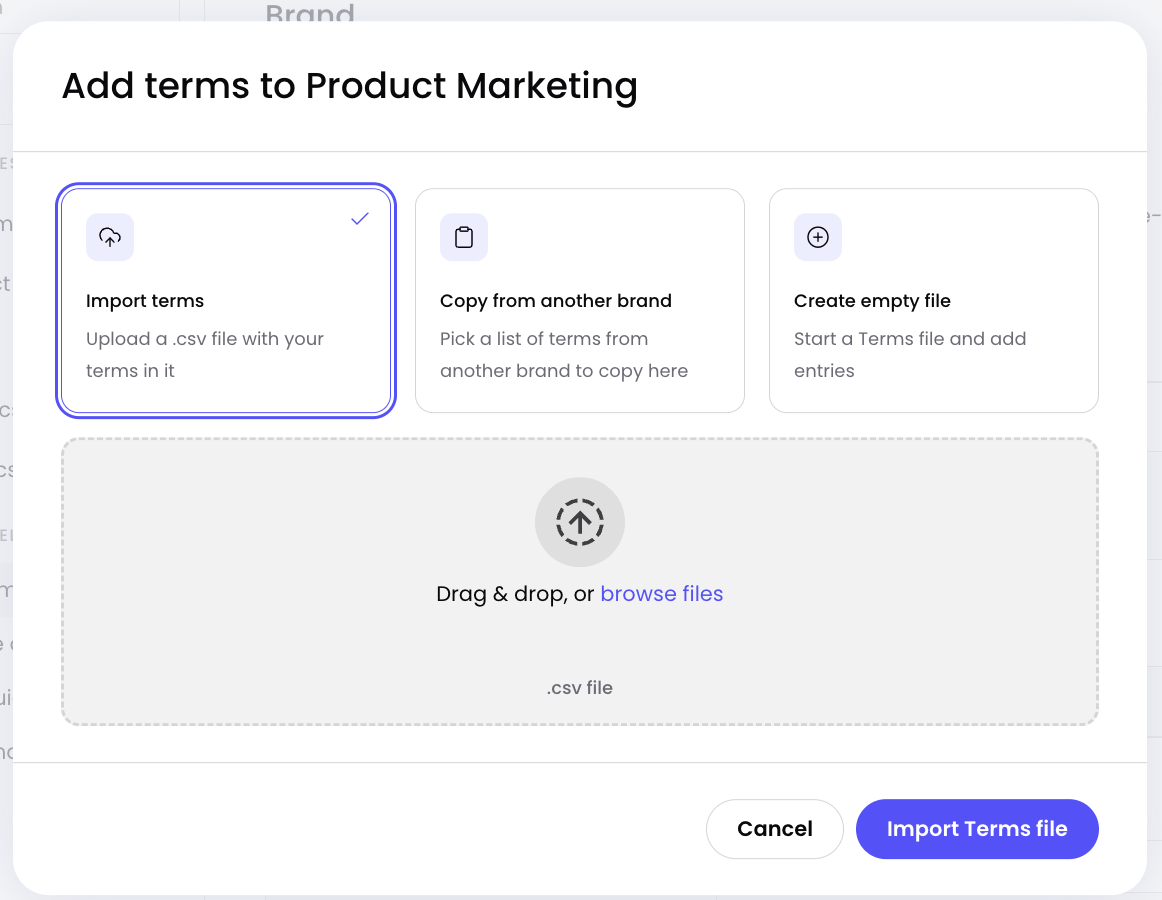
Navigate to Enterprise Brain > Brand & guidelines and select your brand.
Open the terms file from the TERMS section.
Select the import icon in the top right.
Prepare your import file:
At minimum, include a term column and a type column.
Upload your file. WRITER will auto-match the column headers to its terms fields.
If any columns are unmatched (shown in red), manually match them using the column dropdown menu. Unmatched columns won't be imported, but you can continue as long as the term and type columns are matched.
Select Import terms to begin the import.
Review any errors. If some terms encountered errors, WRITER provides a CSV error report with details on how to resolve them. Fix the issues in your file and re-run the import for the remaining terms.
[IMAGE: Screenshot of the terms import flow showing the file upload step, column matching screen, and the Import terms button.]
Formatting your import file
Use the following formatting guidelines when preparing your import file:
Column | Accepted values |
|---|---|
Type |
|
Part of speech |
|
Tags | Comma-separated values in a single column |
For Do example, Don't example, and Common mistakes, add each as a separate column. For example, if you have three common mistakes, create three columns each with the header "Common mistake."
Remove any columns you won't be importing.
Note: If your CSV shows unexpected characters when opened in Excel, open the file with UTF-8 encoding. On macOS, use Import File and select UTF-8.
Advanced term options
Advanced options let you control exactly when and how WRITER flags a term.
Part of speech
WRITER supports four parts of speech: noun, verb, adjective, and adverb. You can add the same term more than once if it has different parts of speech.
For example, the term "login" can be written as "login" when used as a noun, but should be written as "log in" when used as a verb. To set this up, add "login" as an Approved term with the part of speech set to noun, then add "login" as a Common Mistake with the part of speech set to verb. WRITER will only flag "login" as a mistake when it's used as a verb.
Case sensitivity
Terms, including common mistakes, can be case sensitive or insensitive:
Case sensitive — WRITER only flags the term if the exact casing matches.
Case insensitive — WRITER flags the term regardless of casing.
If a term is case sensitive, two additional options are available:
Capitalize at the start of a sentence (default on) — When on, WRITER suggests capitalizing the term at the start of a sentence even if it's lowercase in your terms list. Turn this off for brand names with a lowercase first letter.
Automatically suggest correct capitalizations (default on) — When on, WRITER suggests the correct capitalization if a user writes the term with wrong casing, even if you haven't listed the wrong casing as a common mistake.
Enable or disable suggestions
If you're not ready to enforce a term with WRITER suggestions, use the enable/disable suggestions toggle to turn off enforcement for that term.
Using tags
Tags organize terms by use case, Team, or category. When you're ready to share and publish your terms, use tags to specify exactly which terms to publish on your style guide page.
Frequently asked questions
Voices
What is the difference between a brand voice and the old Voice Profiles in Control Center?
Brand voices in Enterprise Brain replace Voice Profiles previously managed in Control Center. Voices now live within a brand alongside guidelines, terms, and other brand files. This integration ensures that voice, guidance, and terminology rules are applied together when WRITER generates content, rather than being managed separately.
How do I migrate my existing Voice Profiles to Enterprise Brain?
WRITER provides a migration flow to move org and team voices from Control Center to Enterprise Brain. See our article on migrating org and team voices to Enterprise Brain for step-by-step instructions.
Can I create a voice without providing examples?
Yes. Select Skip in the voice creation flow to bypass the examples step and write a voice description manually. However, voices created from examples consistently produce better, more brand-aligned outputs than manually written descriptions.
Can I edit a voice after I've created it?
Yes. Open the voice file and select Edit to update the voice's principles, rules, channels, and content types. You can also update linked guidance and terms through the Configure Voice modal at any time.
Can I have multiple voices in a single brand?
Yes. You can create multiple voices within a brand for different use cases, audiences, or content types. Only one voice can be set as the brand default at a time.
What happens if I delete a voice that is set as the brand default?
Deleting a brand default voice removes it from the brand. WRITER will no longer apply a default voice to sessions for that brand until you set a new default. Consider downloading the voice file before deleting it if you may need it later.
Who can create and manage brand voices?
Org admins, Enterprise Brain admins, and Enterprise Brain Brands admins can create and manage brand voices. Collaborators can edit brand guidelines, including voices, for brands they have access to. Viewers can use voices in their sessions but cannot create or edit them.
Guidelines and rules
Does Enterprise Brain replace the Style Guide feature in Control Center?
Yes. Enterprise Brain replaces the Style Guide, Voice, and Terms features in Control Center. Legacy style guides migrate into the CORE section of your brand as guidance files. After migration is complete, the Style Guide options in Control Center will be turned off.
How are guidelines different from the old Style Guides?
In Enterprise Brain, there is no separate "style guide" concept. Instead, brand guidance lives as individual Markdown files within the brand's file structure. You can create as many guidance files as you need, name them whatever makes sense, and organize them into folders within the brand. Each file contains principles and rules tagged by strength (Must, Should, Avoid, Never).
Can I link multiple guidance files to a single voice?
Yes. You can link multiple guidance files to a voice through the Configure Voice modal. The order you set determines the priority in which they are applied. Files higher in the list take precedence when conflicts arise.
Do guidance file changes apply automatically to connected voices?
Yes. When you update a guidance file within the brand, the changes are automatically reflected in any voice that has the file linked. You do not need to re-link the file after updating it.
Do guidance changes apply to existing outputs?
No. Changes apply to outputs generated after the update. Existing outputs are not retroactively changed.
How should I organize my guidance files?
You have full flexibility to name and organize guidance files within the brand. Create separate files for tone, messaging, editorial standards, or any other category. Use folders to group files by team, purpose, or content type. There is no required structure — organize files in whatever way makes sense for your organization.
Terms
Does Enterprise Brain replace the Terms feature in Control Center?
Yes. Enterprise Brain replaces the Terms feature in Control Center. Terms now live as CSV files within a brand's TERMS section and are linked to voices through the Configure Voice modal.
Can I link a terms file from a different brand to my voice?
No. You can only link terms files that exist within the same brand as the voice. If you need a terms file from another brand, copy it to the current brand first.
Can I link more than one terms file to a voice?
No. Each voice can be linked to one terms file at a time through the Configure Voice modal.
Can I add duplicate terms?
Yes, but they must be different parts of speech and have unique case sensitivity settings.
Why isn't my Approved term getting highlighted?
WRITER only highlights Approved terms that have a description filled in. Approved terms are not highlighted in the Word or Outlook add-ins.
What should I do with a term that isn't quite Don't use but isn't Approved either?
Use the Use carefully type for these terms, then use the description field to explain the correct context for using the term. WRITER always flags Use carefully terms so your team can double-check the context.
Can I import terms from a file?
Yes. You can import terms via CSV or XLSX file, up to 5MB in size. Download the CSV or XLSX template from the import flow to get started. See the Importing terms section for details.
Connecting voices, guidelines, and terms
Do I need to connect guidelines and terms separately to a voice?
Both guidance files and terms are connected through the Configure Voice modal. Once linked and saved, WRITER Agent applies both to outputs generated using that voice.
What happens if a user selects a different voice?
Only the guidance and terms connected to the selected voice apply. If a user selects a voice without connected guidance or terms, those settings won't apply to that output.
Can I connect guidance files to more than one voice?
Yes. You can connect the same guidance files and terms to multiple voices. Each voice will apply those settings to its outputs.
Can I enforce guidelines and terms without relying on users to select the right voice?
Yes. Set the voice with connected guidance and terms as the brand default. The brand default voice is automatically applied to WRITER Agent sessions for team members with access to the brand.
Who can connect guidance and terms to a voice?
Org admins, Enterprise Brain admins, and Enterprise Brain Brands admins can configure voices and link guidance files and terms. Collaborators can edit brand guidelines for brands they have access to.