Setting up SAML SSO
Last updated: July 16, 2026
Who can use this feature
Supported on Team and Enterprise plans
Note: Team plans are limited to Okta and Google SAML only
Anyone with an org admin or IT admin role can access and edit SSO
In this article, we'll show you how to set up single sign-on, so users can authenticate into WRITER easily. If you're looking for information about automatically provisioning new users, check out our article, Setting up SCIM provisioning.
Configuring single sign-on
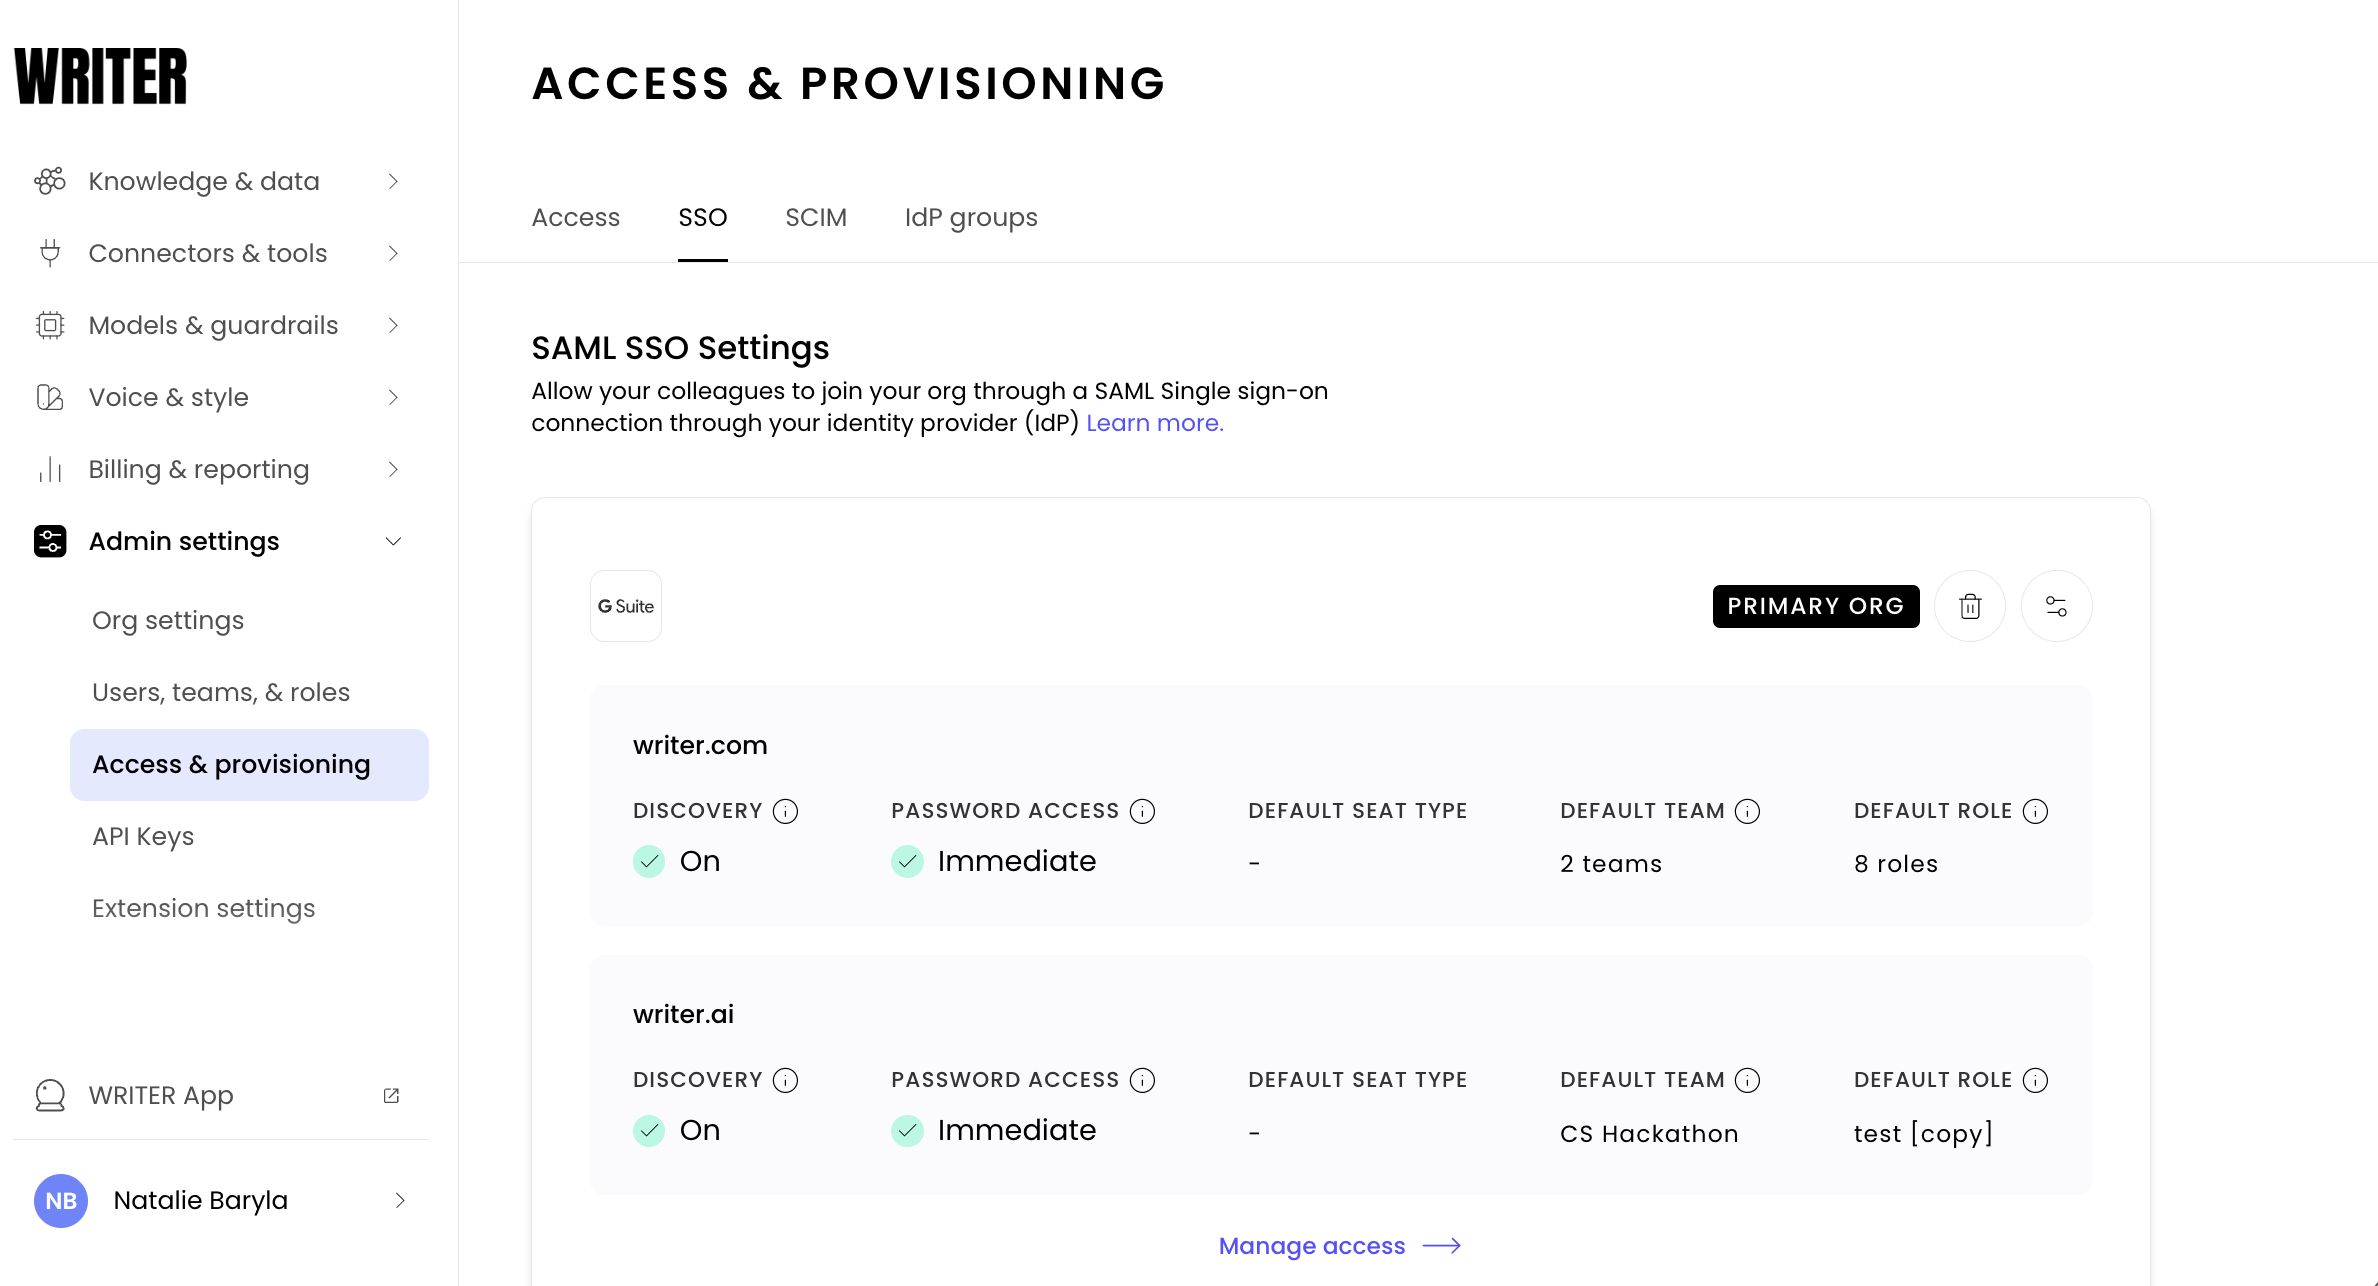
Start by navigating to Admin > Access & provisioning then selecting the SSO tab. Select Set up single sign-on.
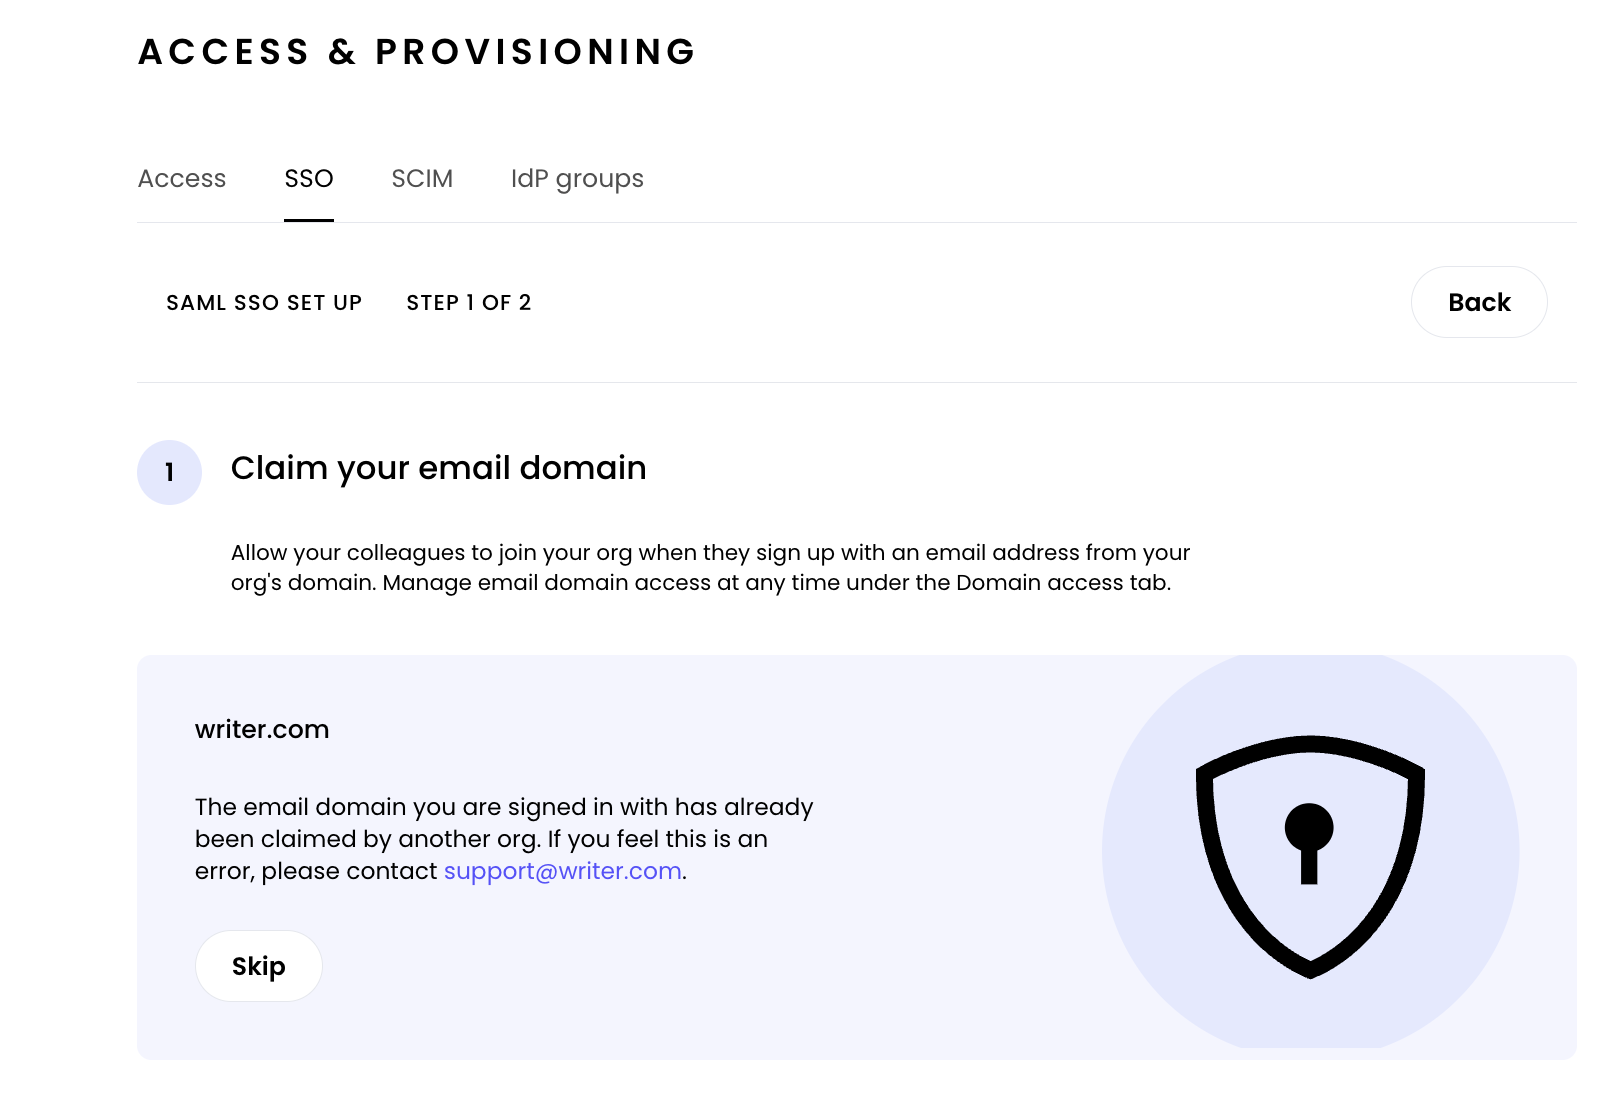
Before you can set up single sign-on, you'll need to claim your domain. To do so, select Claim domain. Learn more about claiming a domain here.
Configuring domain access before setting up single sign-on
We strongly recommend the following configuration choices:
Enable domain discoverability before you continue setting up single sign-on.
Keep the ability to create passwords turned on until you've fully tested your SSO configuration.
These two steps will prevent users from being locked out of WRITER while you're troubleshooting your single sign-on configuration.
Once you've successfully launched and tested single sign-on, you can turn off password creation if you wish.
Next, you'll switch back and forth between WRITER and your identity provider (IdP) to share information between the two systems.
Select your IdP (identity provider)

Give your SSO connection a Name to identify it easily.
WRITER actively supports single sign-on with multiple providers specified on this page. However, you can also set up single sign-on with other identity providers as well. If you’re using another identity provider, select Other IdPs. Then scroll down to complete the connection.
Share information from WRITER with your identity provider (IdP)
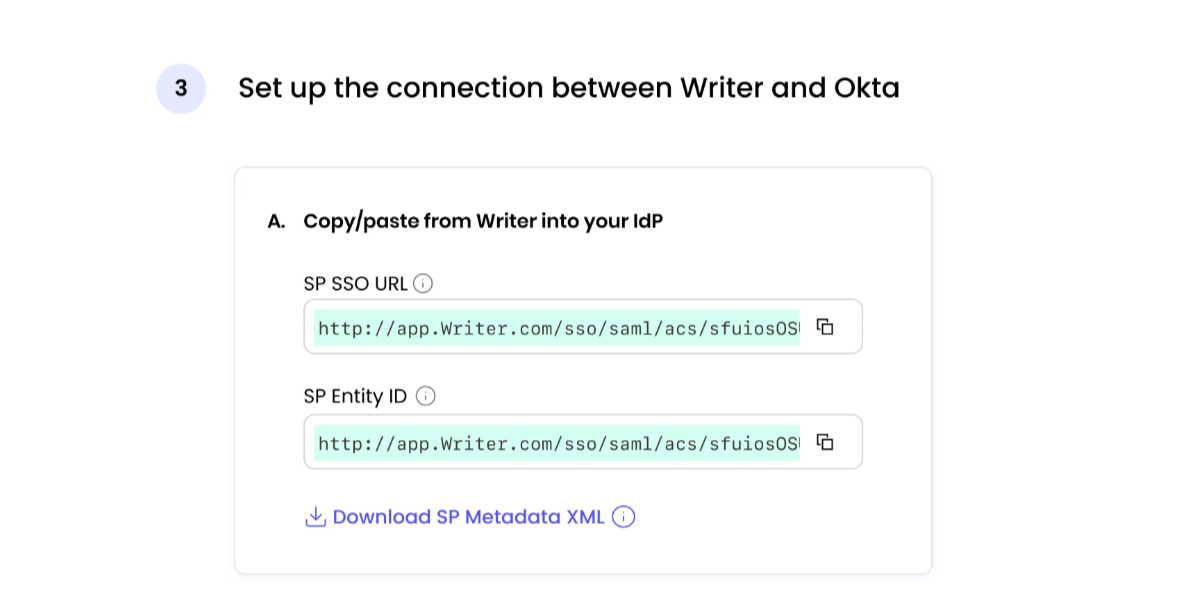
If you look at Box A, you’ll see 2 fields that you’ll need to paste into your IdP (SP SSO URL and SP Entity ID).
Note: Identity providers sometimes use different terminology for these fields
SP SSO URL is sometimes known as ACS (Assertion Consumer Service) URL or Recipient
SP Entity ID is sometimes known as an Audience URL.
Some IdPs may ask you to upload a metadata XML file from WRITER to your IdP. This is rare, but if you need this, select Download SP Metadata XML. You can then upload this into your IdP.
Share information from your identity provider with WRITER
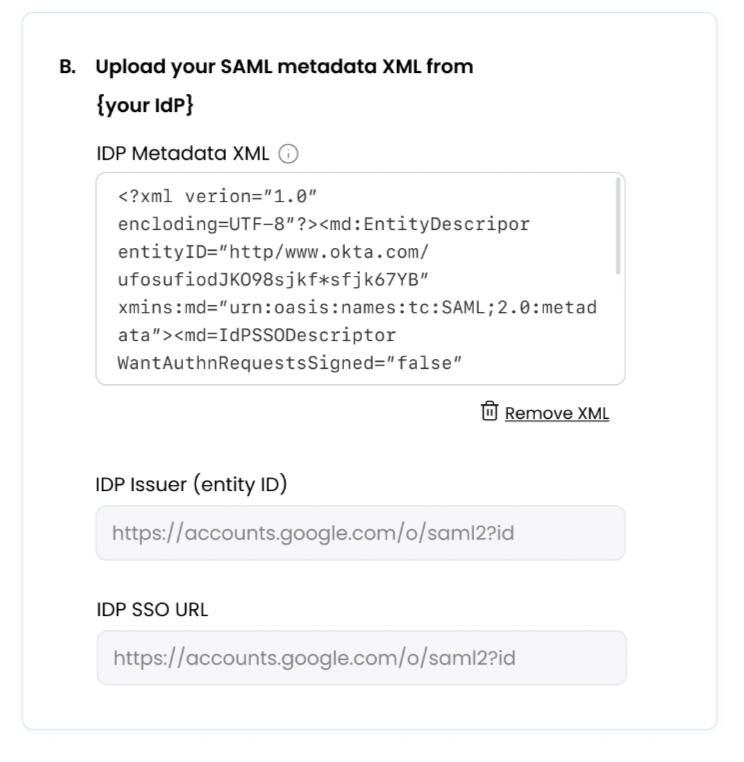
Go to the WRITER SSO application in your identity provider to retrieve a SAML metadata XML. This process differs depending on your IdP. Below are some guides for our most popular IdPs:
Almost all IdPs will provide a SAML metadata XML. This is required from WRITER to complete configuration. Once you have the XML from your IdP, upload it in Section B. We’ll analyze this XML and auto-populate the IdP Issuer and IdP SSO URL fields.
Once we have your IdP’s XML uploaded, you can select Finish to finish setup.
Single sign-on settings

When you navigate to Admin settings > Access & provisioning and select the SSO tab, you should see your new SSO identity provider at the top of the page.
To edit your configuration settings, select the settings icon in the top right.
To delete your SSO configuration, select the trash can.
Set up SCIM provisioning
Once your SSO configuration is complete, you can provision users directly from your IdP by setting up a SCIM (System for Cross-domain Identity Management) connection. Learn more in our Help Center article Setting up SCIM provisioning.
Frequently asked questions
General
Q: Do I need to do anything in the IdP before my users are able to sign on via SAML?
Make sure to assign users to the app in your IdP before they can sign on via SAML.
Q: Do you support configurable session timeouts from the IdP?
No, we do not support configurable session timeouts.
Q: How do I switch identity providers?
Select the trash can icon to remove your SSO configuration and repeat the process with your new IdP.
Q: What role/access will new users have when added via SAML?
They will have the default role as specified in Admin > Access & provisioning under the Domain access tab. Learn more here.
Q: Does your application support SAML 2.0 authentication?
Yes.
Q: Does your application support OIDC authentication?
No.
Q: Does your application provide SAML SP metadata?
Yes, under Admin > Access & provisioning under the SSO tab.
Once you've selected an identity provider, select Download SP Metadata XML.
Q: What is the SAML Single Sign On URL (ACS URL, Recipient)?
https://app.writer.com/api/access/samlQ: What is the SAML SP Entity ID (Audience)?
This is found at Admin > Access & provisioning under the SSO tab, once an identity provider is selected. For most accounts, this will be app.writer.com though some accounts may see app.writer.com/api/access/saml.
Q: What SAML binding do you support?
HTTP POST
Q: What is the default SAML relay state?
We don't enforce a default value. This can be empty.
Q: What SAML NameID formats do you support?
emailAddress or any other format if the email profile attribute is defined.
Q: What Identity Providers have you previously integrated with successfully?
Azure, GSuite, Okta, OneLogin, PingIdentity.
Q: What additional profile attributes, if any, are you expecting in the assertion/claim from SAML IdP?
first_name, family_name, picture_url
Q: Do you require encrypted assertions?
No.
Q: Do you require encrypted name identifiers?
No.
Q: Do you support Service Provider Initiated SSO, Identity Provider Initiated SSO, or both?
Both.
Q: Do you support "deep linking" and if yes, how do you offer this?
No.
Q: Do you support JIT or OOB user provisioning?
Both.
Q: If OOB user provisioning is required, what methods do you support?
SCIM. Learn more about setting up SCIM provisioning here.
Q: Do you have a non-prod environment we could connect to?
No.
Q: Can the application be configured to remove users who have not logged in for a specific period of time?
No.
Error messages
Q: When I add my email domain and select Next, I’m getting an error that says “One or more of the domains you added are already registered by another organization.”
Email domains that you add to single sign-on have to be completely unique. It’s possible that someone else from your organization has already set up another WRITER account. To resolve this, email support@writer.com and we’ll help you sort it out.
Q: When I add my IdP metadata XML and select done, I’m getting an error that says “Your IdP configuration failed: Identity provider with same entity id is already registered!”
Your IdP metadata has to be completely unique. It’s possible that someone else from your organization has already set up another WRITER account. To resolve this, email support@writer.com
Q: I got an email from WRITER saying that our SSO certificate is about to expire. Where do I upload a new certificate?
Upload a new certificate by navigating to Admin > Access & provisioning and select the SSO tab. Follow the steps listed here.