Using WRITER Agent chat mode
Last updated: July 16, 2026
How to use Chat mode
Based on our beloved Ask WRITER feature, WRITER Agent’s chat mode is ideal for quick, straightforward requests. Generate text or code, use file uploads, reference Knowledge Graphs, and more! WRITER Agent pulls results from it’s training data and when necessary will conduct a web search to pull in the most up to date information.

In the WRITER Agent chat window, you can brainstorm ideas, generate text, or ask questions—just type your request and hit Enter.
Once you select enter, you'll be taken to a new WRITER Agent session. You’ll see the output generated by WRITER Agent, and a new input chat box, where you can chat back and forth until you obtain your desired output.
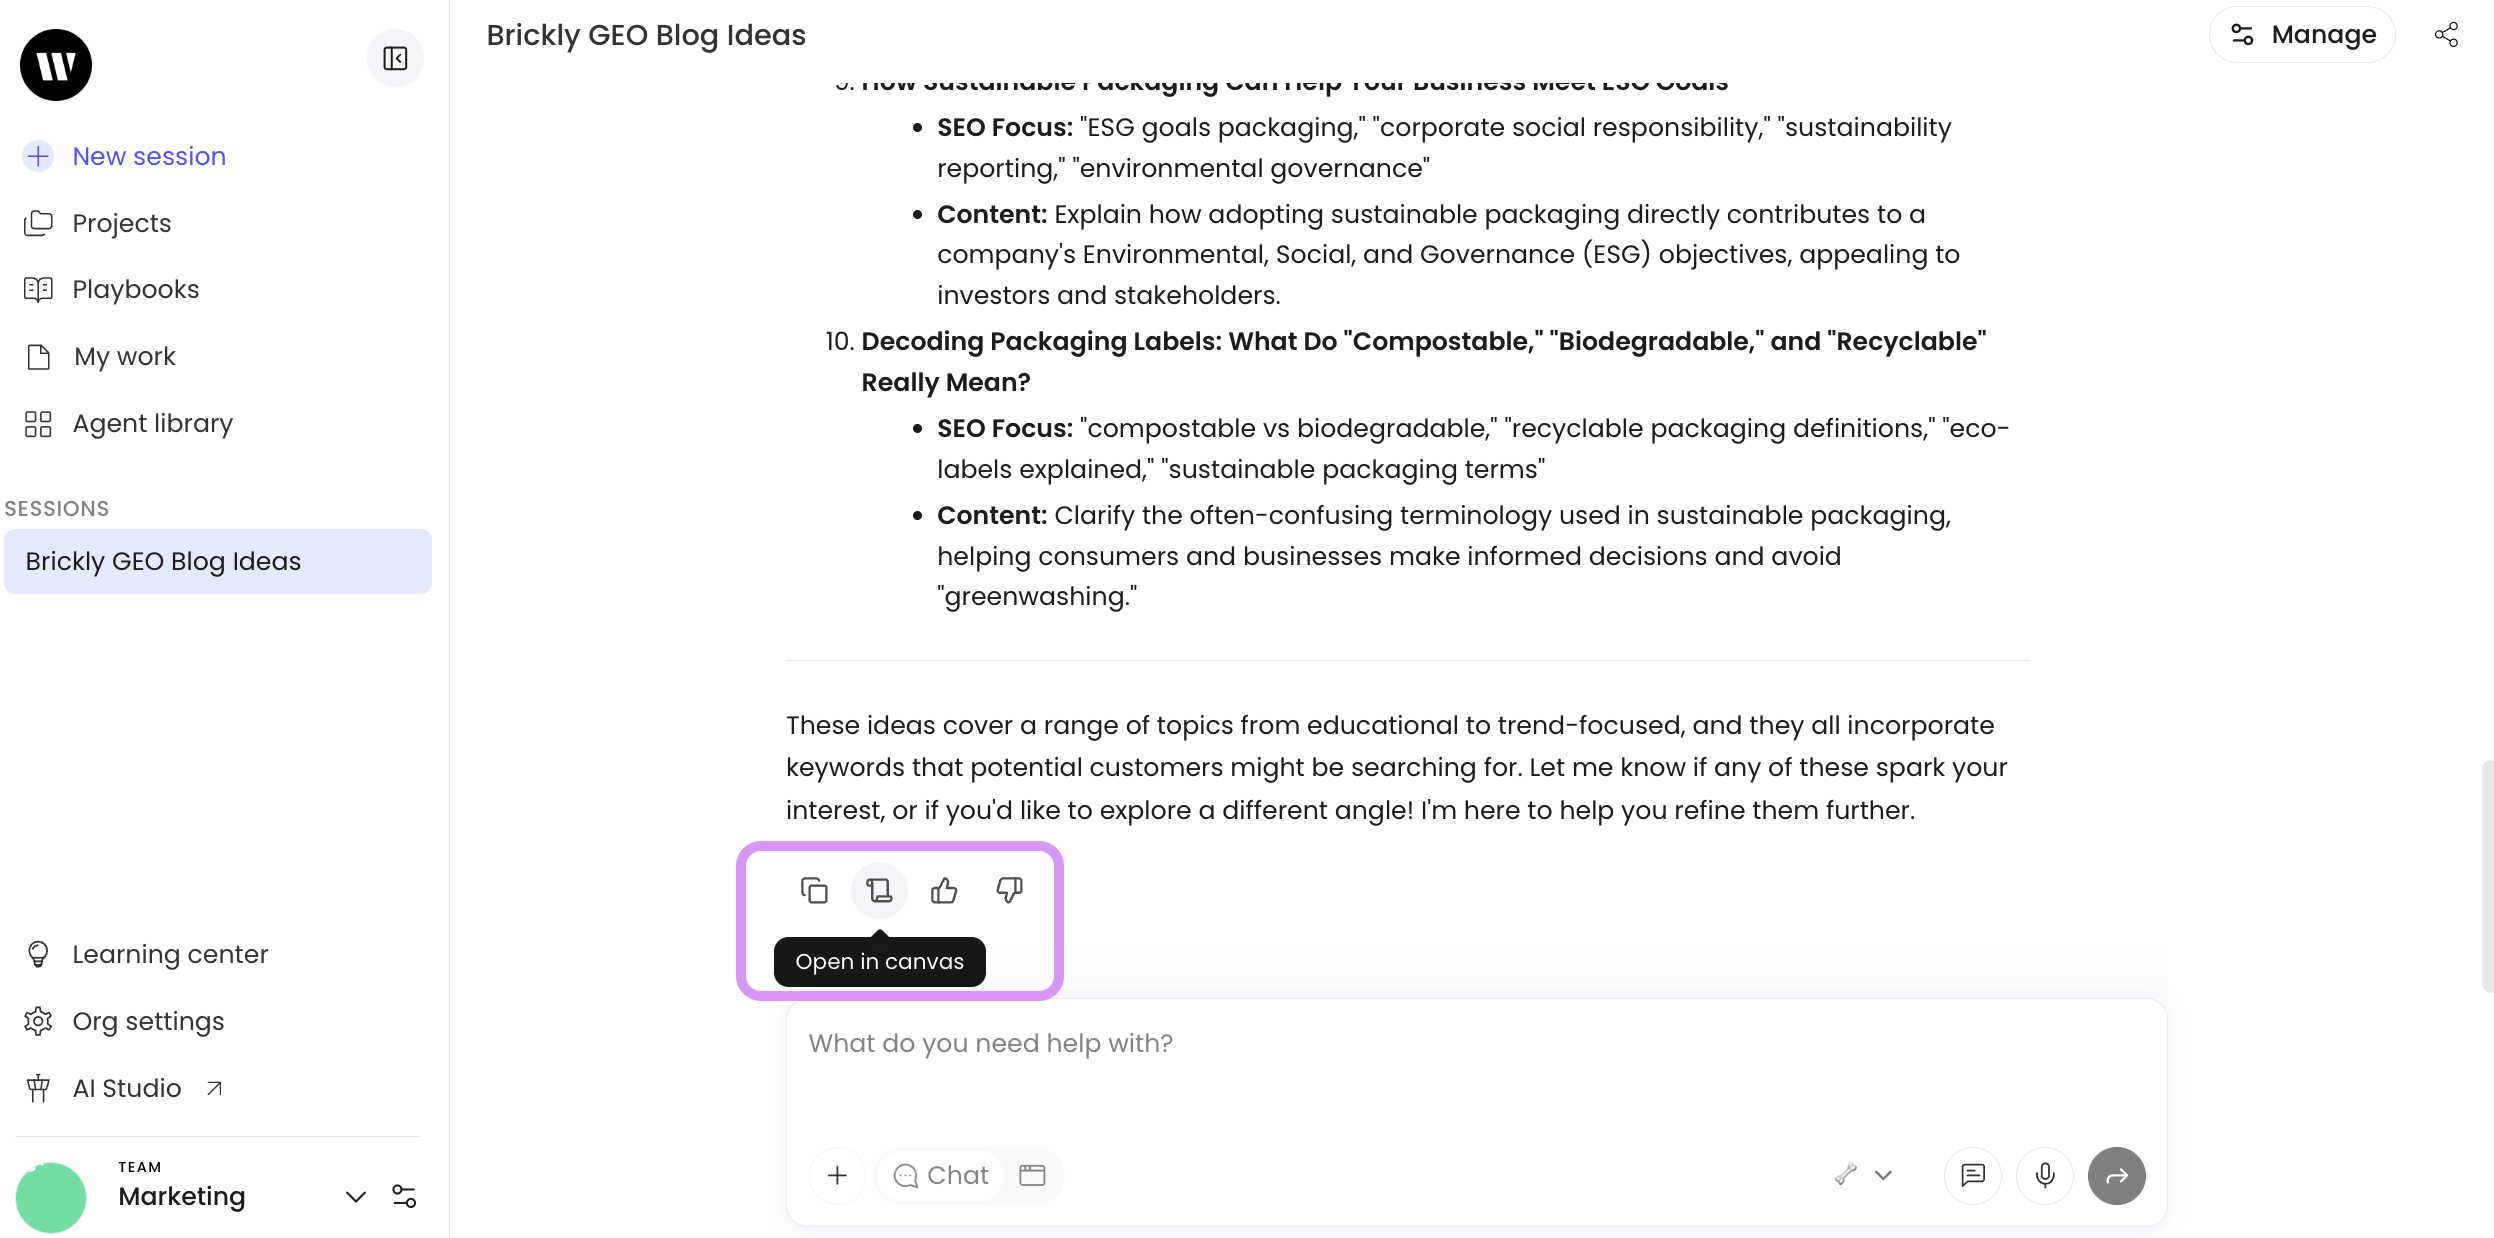
Select the Open in canvas icon to generate an interactive workspace for your output, with enhanced editing capabilities.
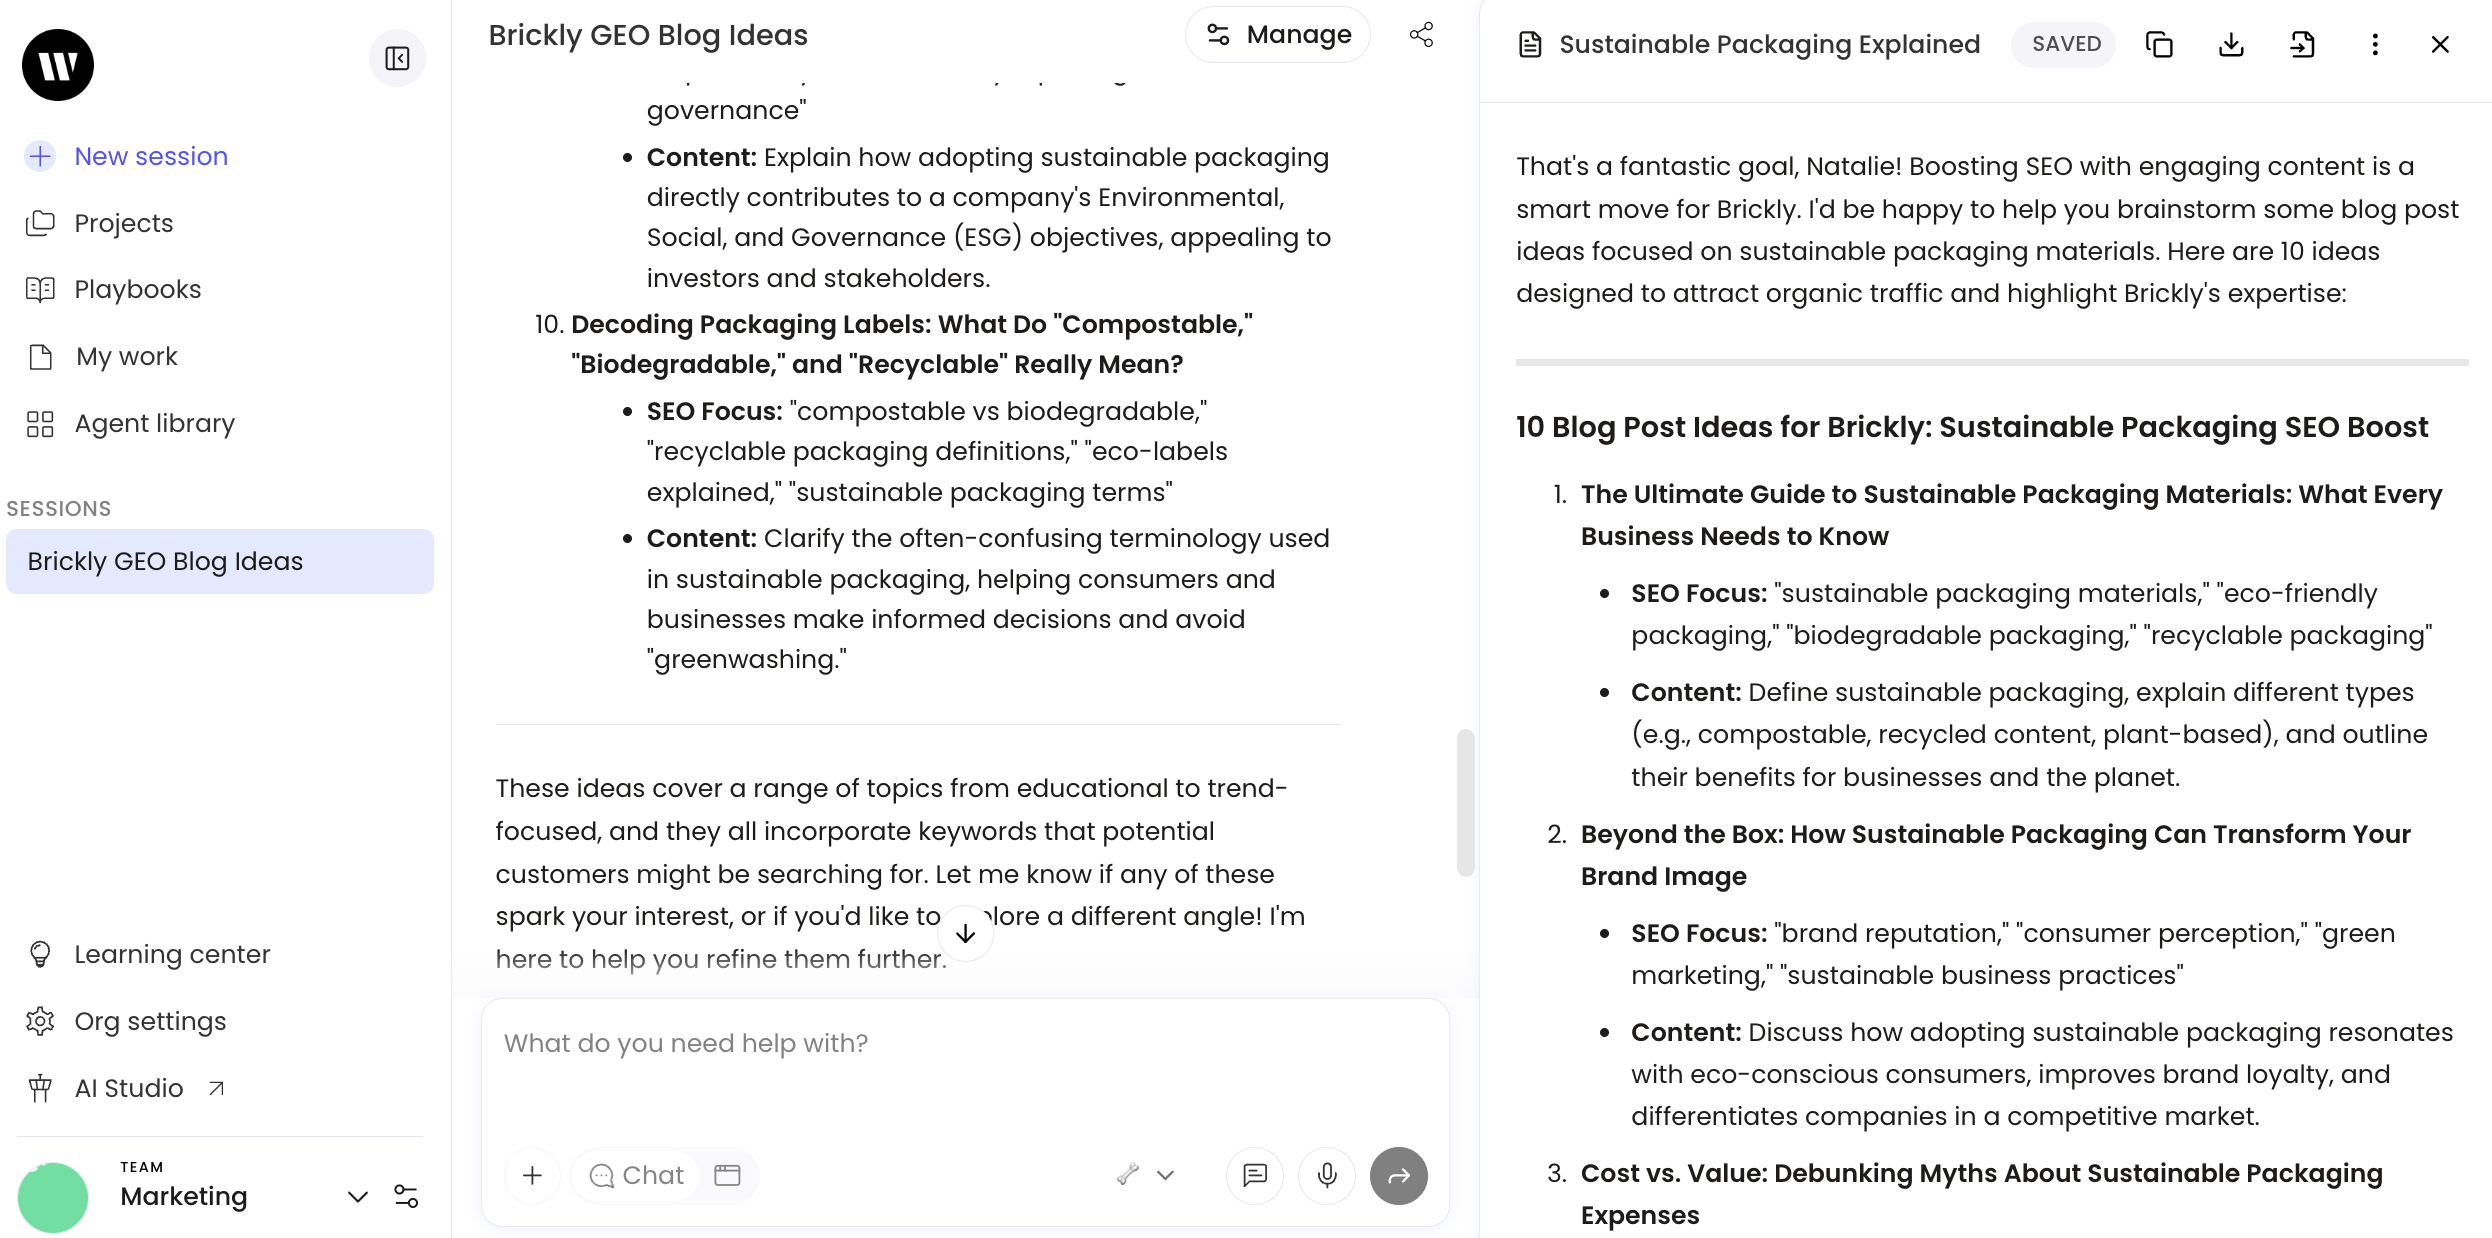
If you've enabled the canvas option, you'll see a preview of the generated output in the left window. You can continue to chat back and forth with WRITER Agent on the left, or make edits directly in the canvas.
No matter what you're working on, you can chat back and forth with WRITER, asking followup questions or iterating on the output until you're satisfied with the results. To learn more about using the canvas functionality click here.
Understanding sessions
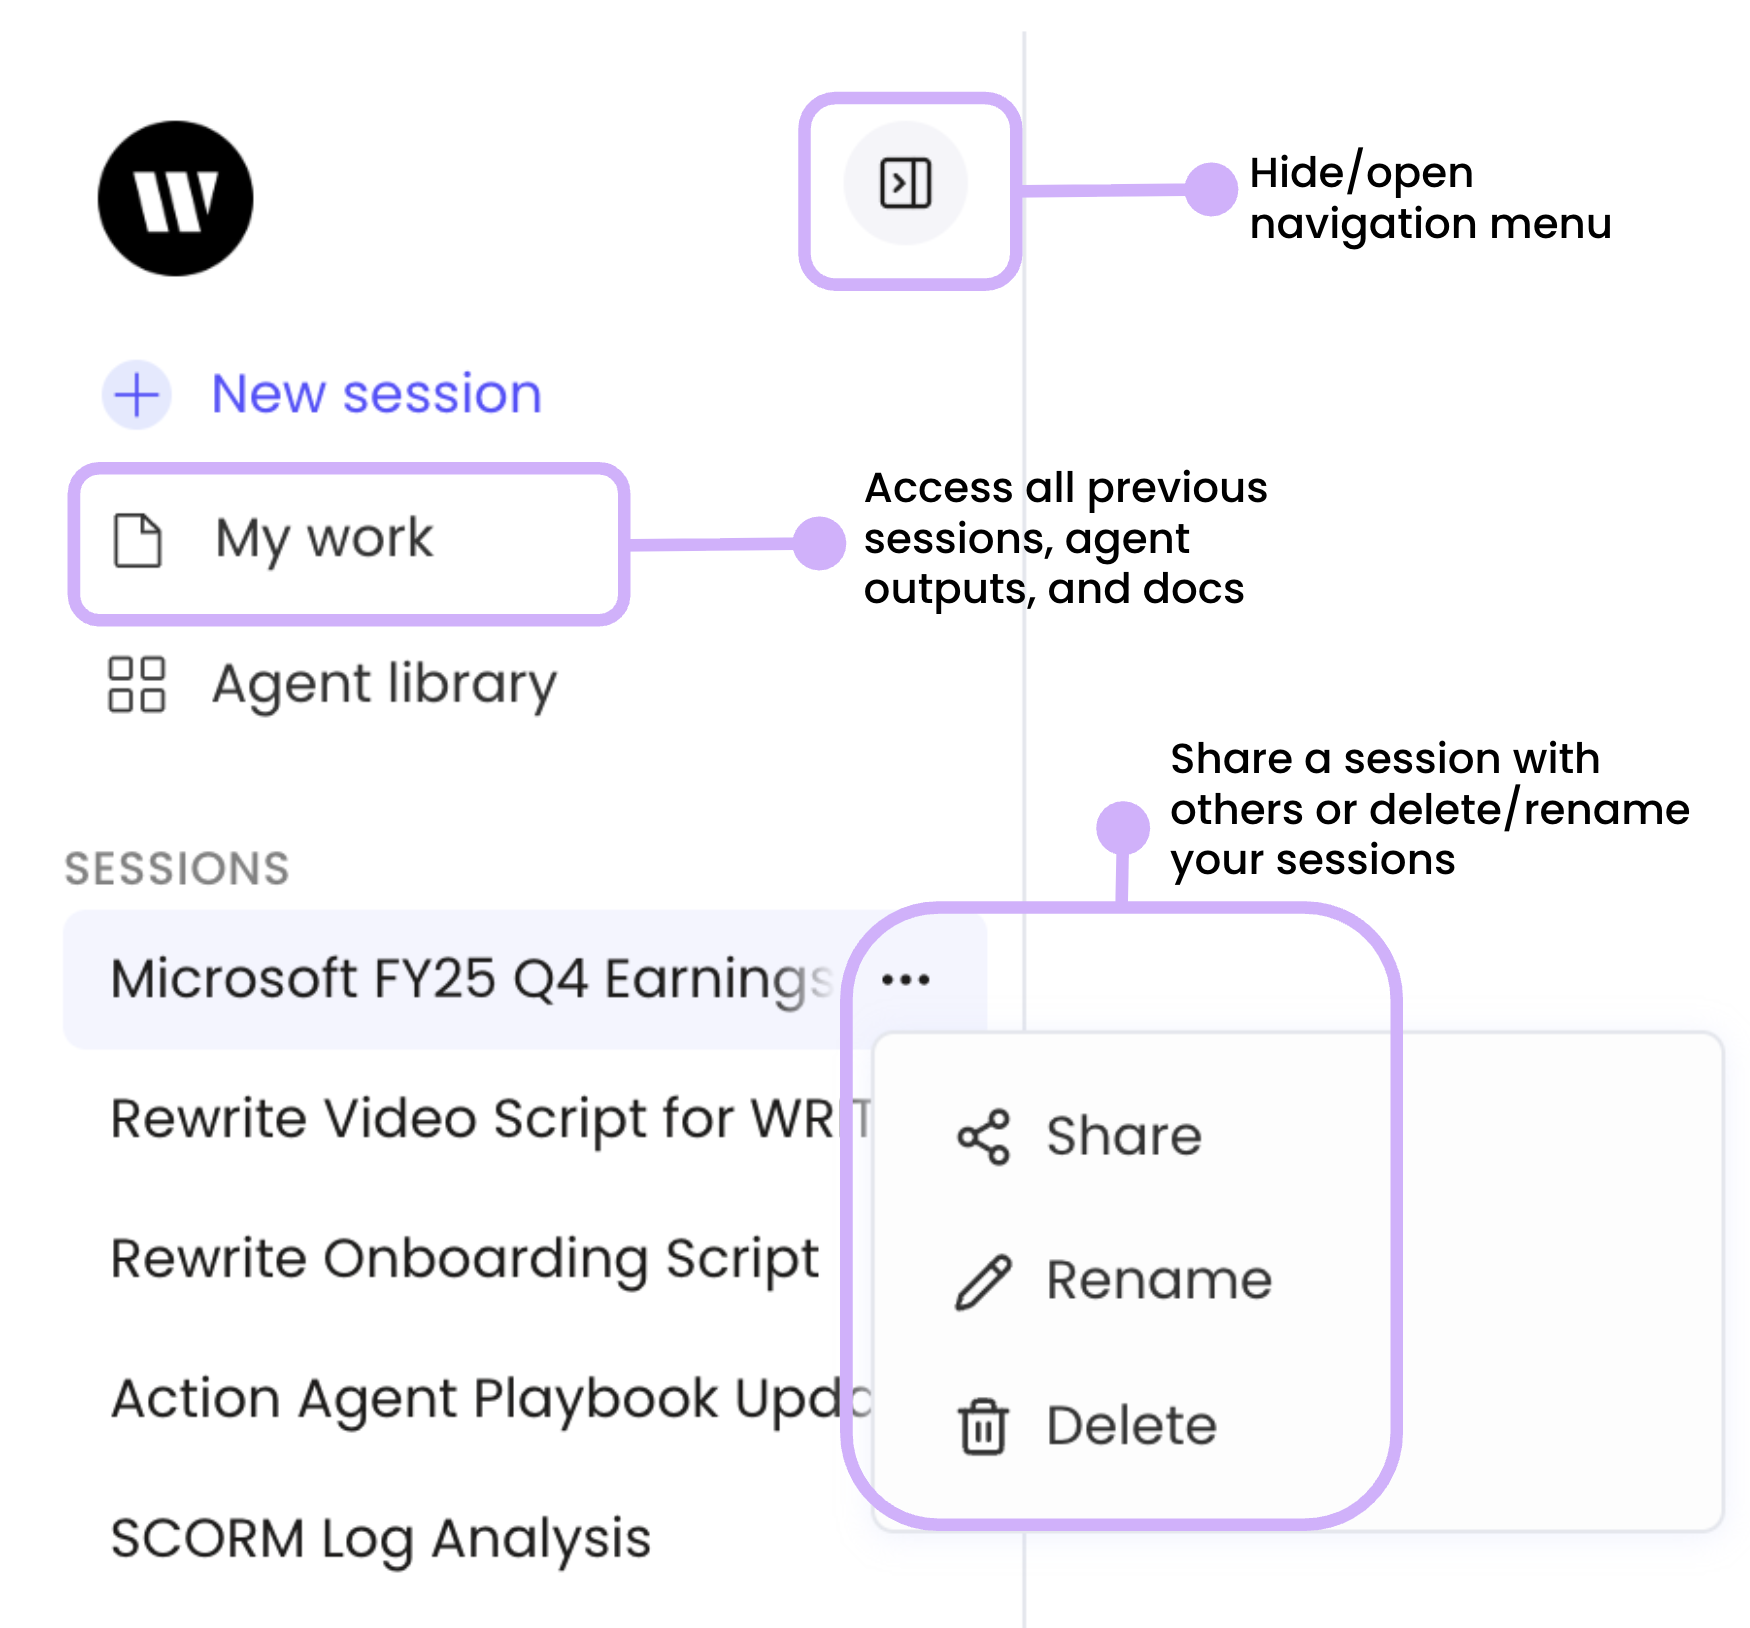
WRITER Agent turns each conversation into a session. You can access previous sessions and switch between them on the left side menu. You can select + New session to create a blank session. We recommend creating a new session whenever you start working on a new query – there's no limit to the number of sessions you can create!
Using the Prompt library
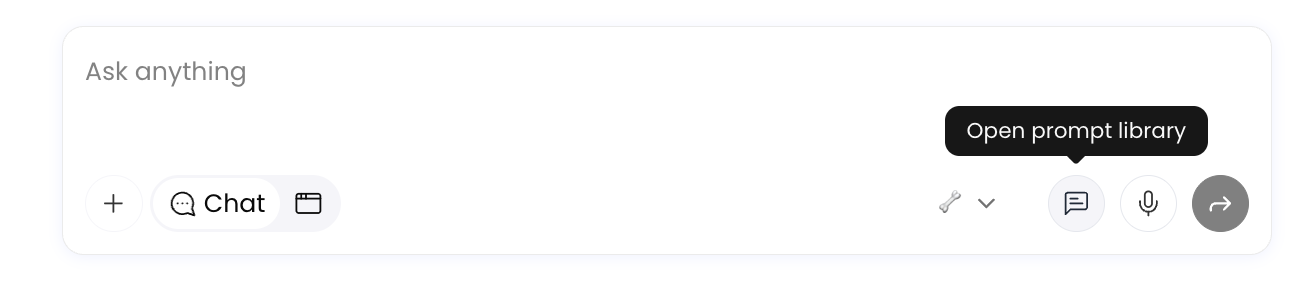

Need help getting started? The best way to learn about different types of requests, discover new use cases, or format your queries efficiently is to explore our Prompt Library.
Select the View prompts button in the input field. Then, when you find a prompt you want to work with, select Use to insert it into WRITER Agent. Replace any variables with your own information, then submit. Learn more about the prompt library here.
Using documents & files
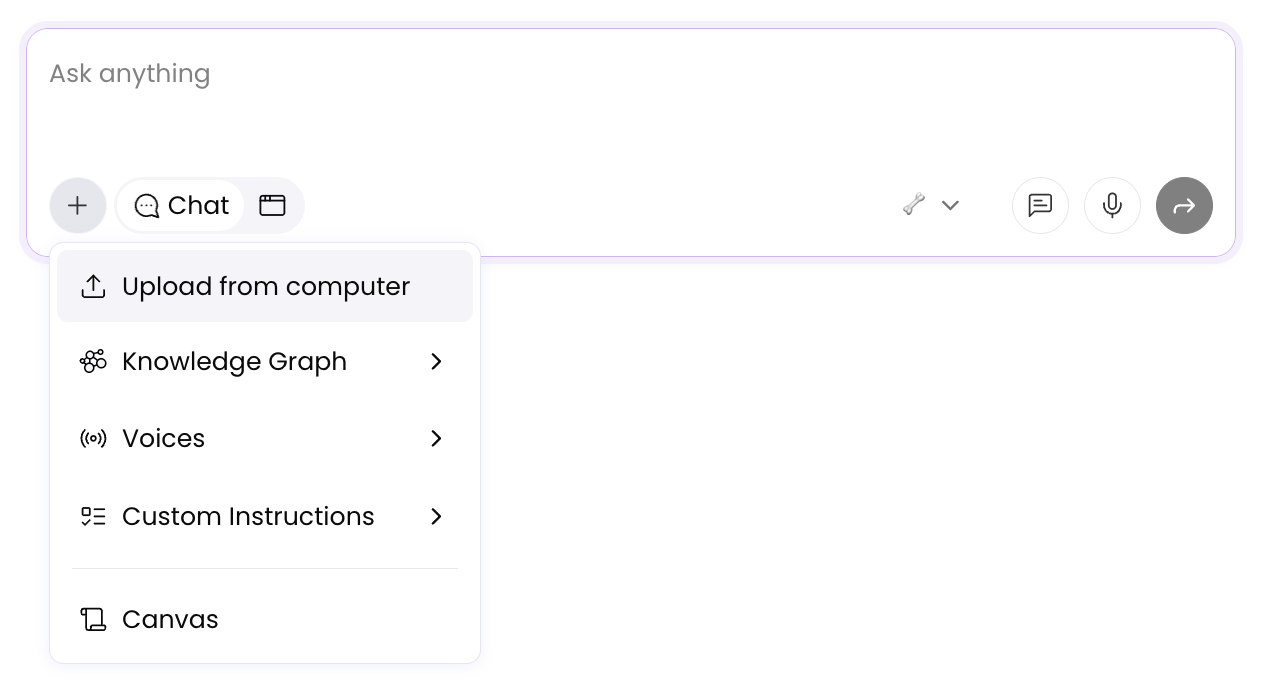
With WRITER Agent, you can work with source files to analyze, research, transform, summarize, and more. Drag your documents into the input field, or select the + icon to upload your file(s).
In chat mode you can add up to 10 files, 100MB per file, and a total of 500K words per session.
WRITER Agent supports these file types: .pdf, .csv, .doc, .docx, .xls, .xlsx, .ppt, .pptx, .txt, .html as well as .png and .jpg images.
Enter your request in the input field, select enter, and watch WRITER Agent get to work on your request.

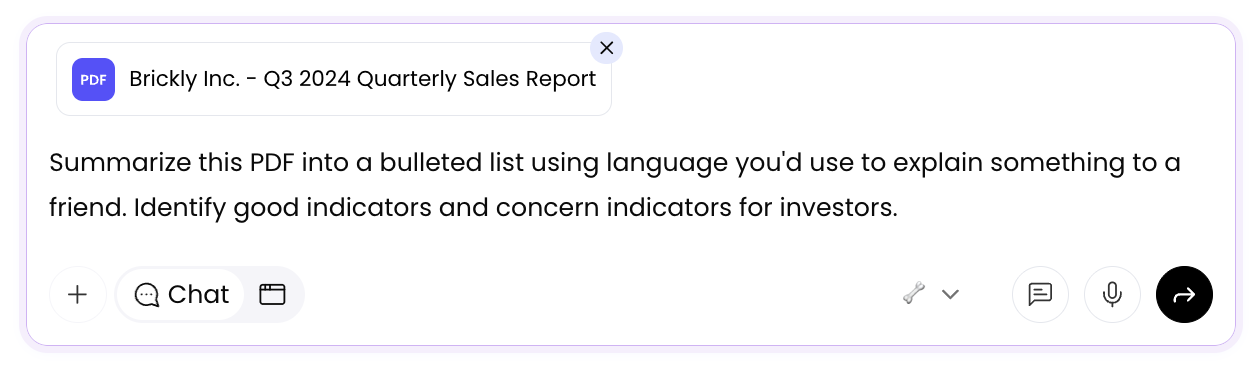
Example: Need to show your boss that you're on top of industry news? One company just published its quarterly earnings report, but you don't have time to read through the lengthy document. Download the earnings report as a PDF. In the input field, select the + and Upload from computer. Use the following prompt:
Summarize this PDF into a bulleted list using language you'd use to explain something to a friend. Identify good indicators and concern indicators for investors.
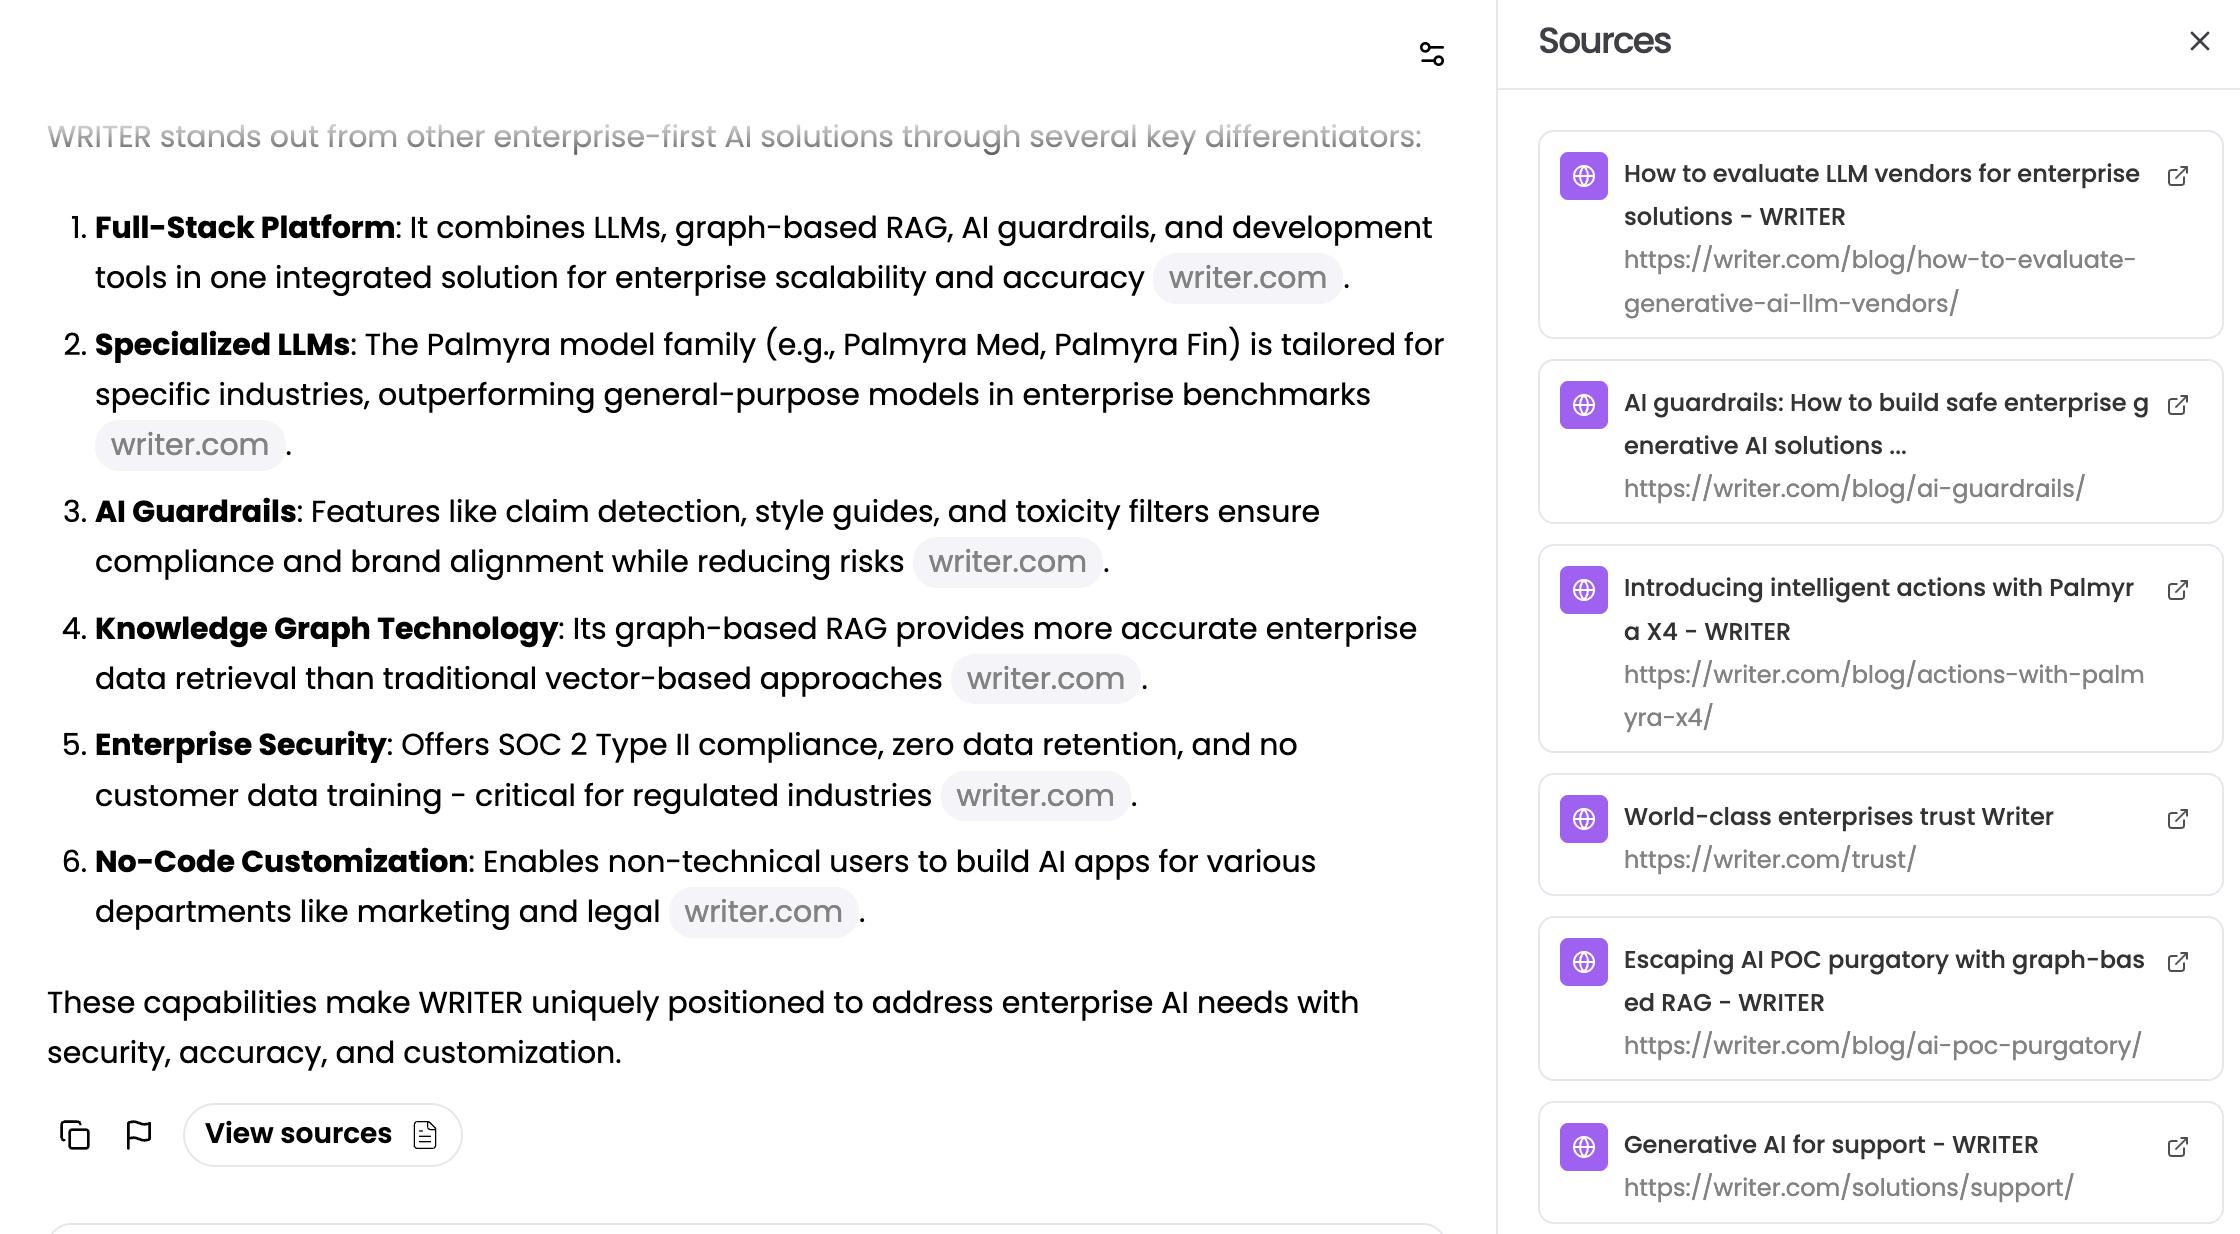
Viewing sources
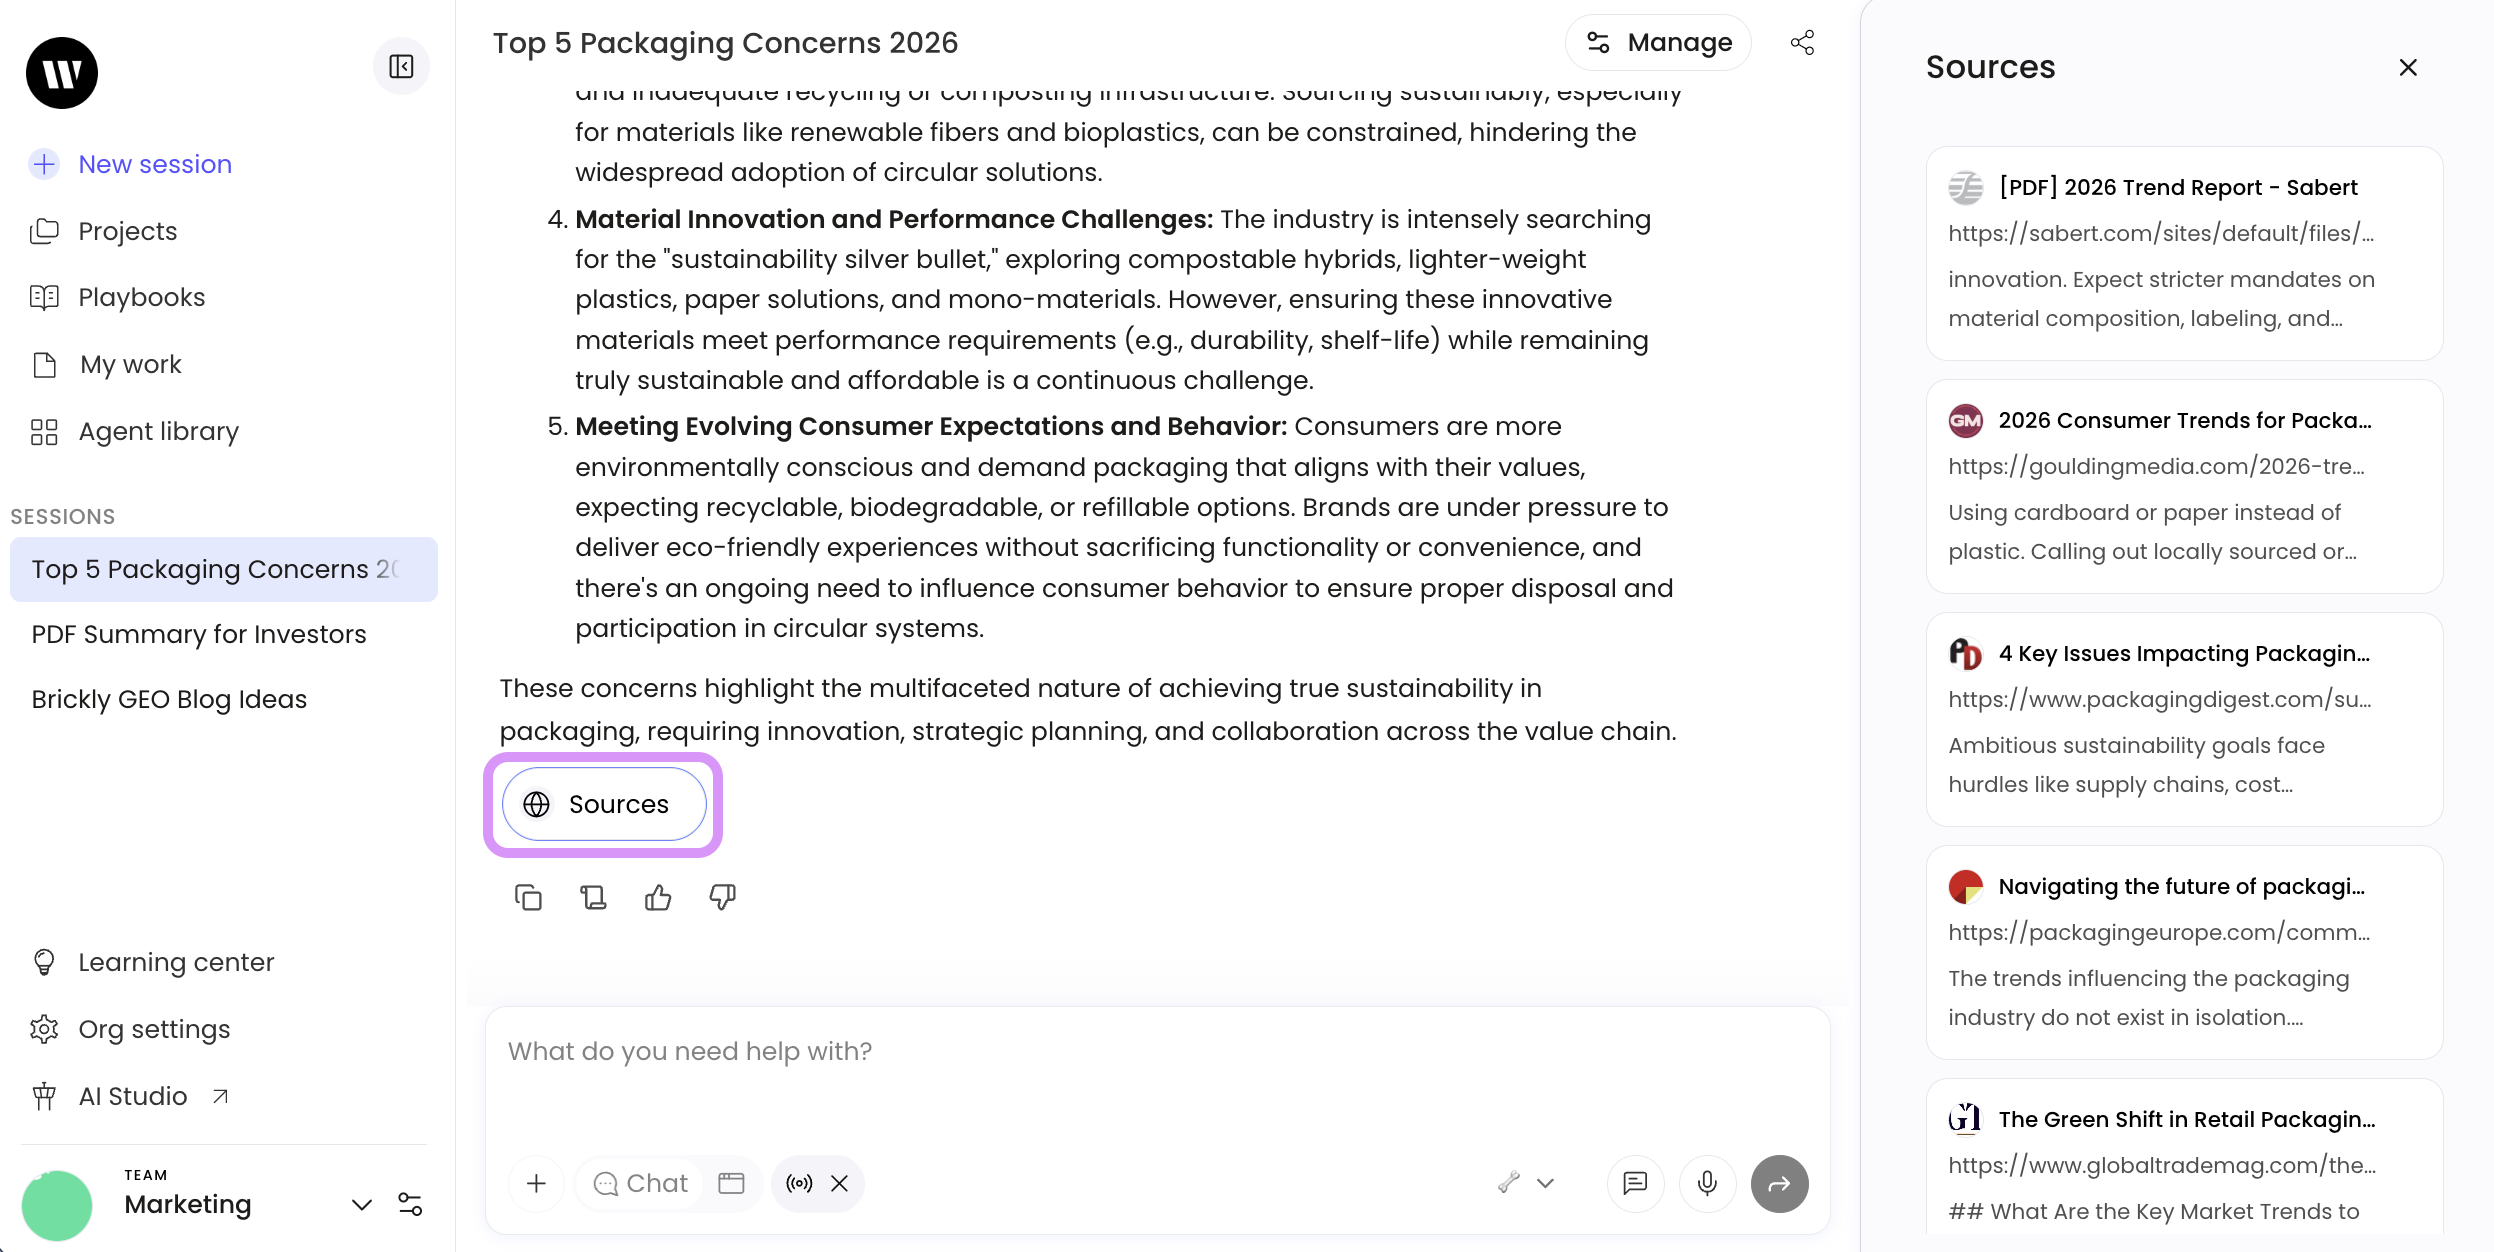
Whenever WRITER Agent references a source - whether it’s a document, a website, or a Knowledge Graph - it cites its sources at the bottom of the output.
When you select the View sources button, WRITER Agent will open up a list of cited sources for that output. You can select any source tile to scroll directly to the relevant passage in the source file. The relevant passage will be highlighted in green.
Using Knowledge Graph
Sometimes, uploading individual source files isn’t sufficient enough to answer your questions:
You need to access internal company data which isn’t easily exportable and might be spread across different sources
You aren’t sure which documents have the answer – it could be in any of thousands of files!
Knowledge Graph lets you search across many sources of internal data, both structured and unstructured. It then analyzes all of the most important results, and then gives you a good answer in a few minutes, not hours. Please take note Knowledge Graph is only accessible via chat mode at this time.
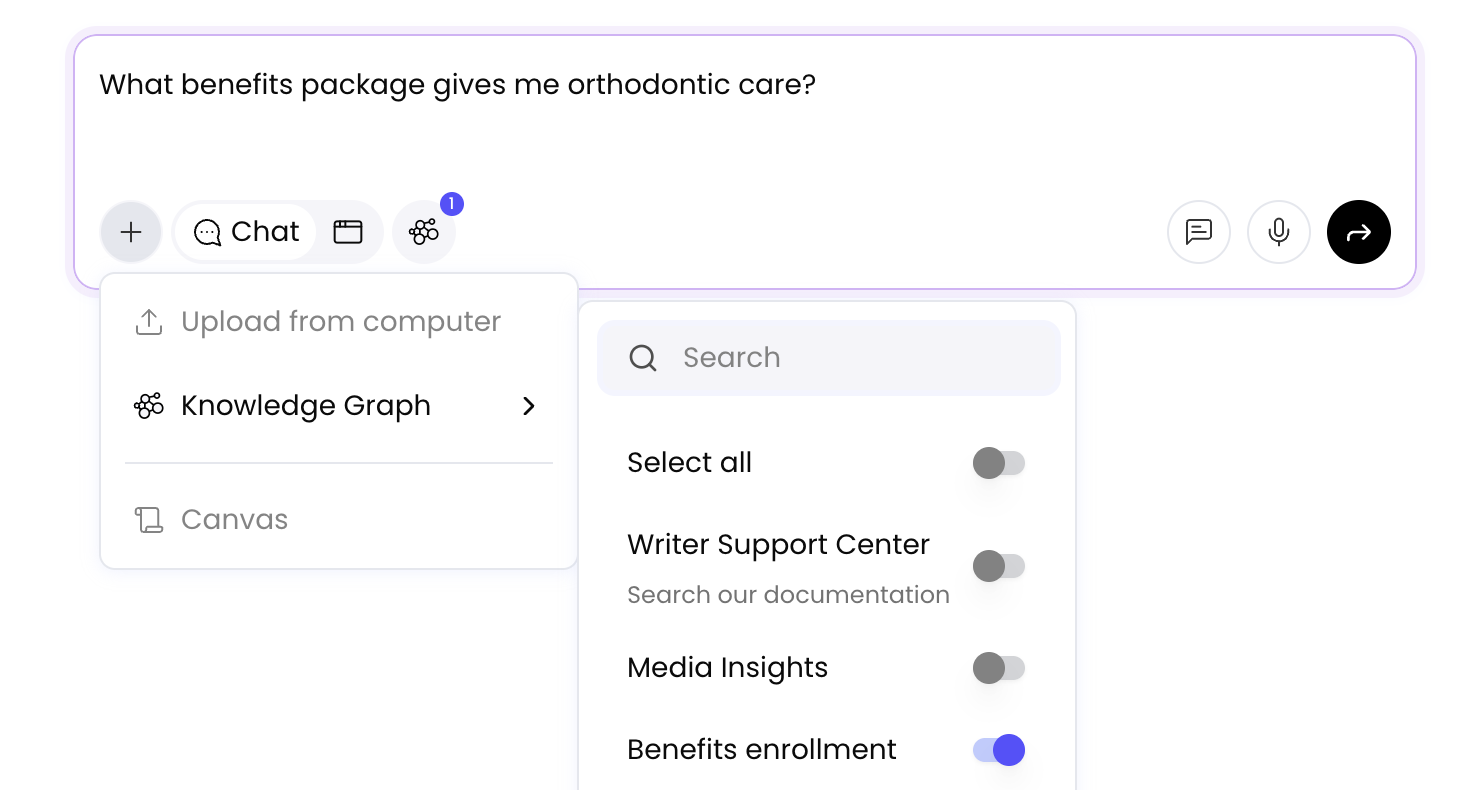
Select the + icon, then select Knowledge Graph, then select the graph(s) you'd like to search. Enter your query and submit it.
To change or remove the selected Knowledge Graph from your Ask WRITER session, select the Knowledge Graph icon and adjust your graph selections.
When WRITER Agent generates an output based on sources from your knowledge graph, it will display inline citations, so you can see precisely where and how sources contributed to your output.
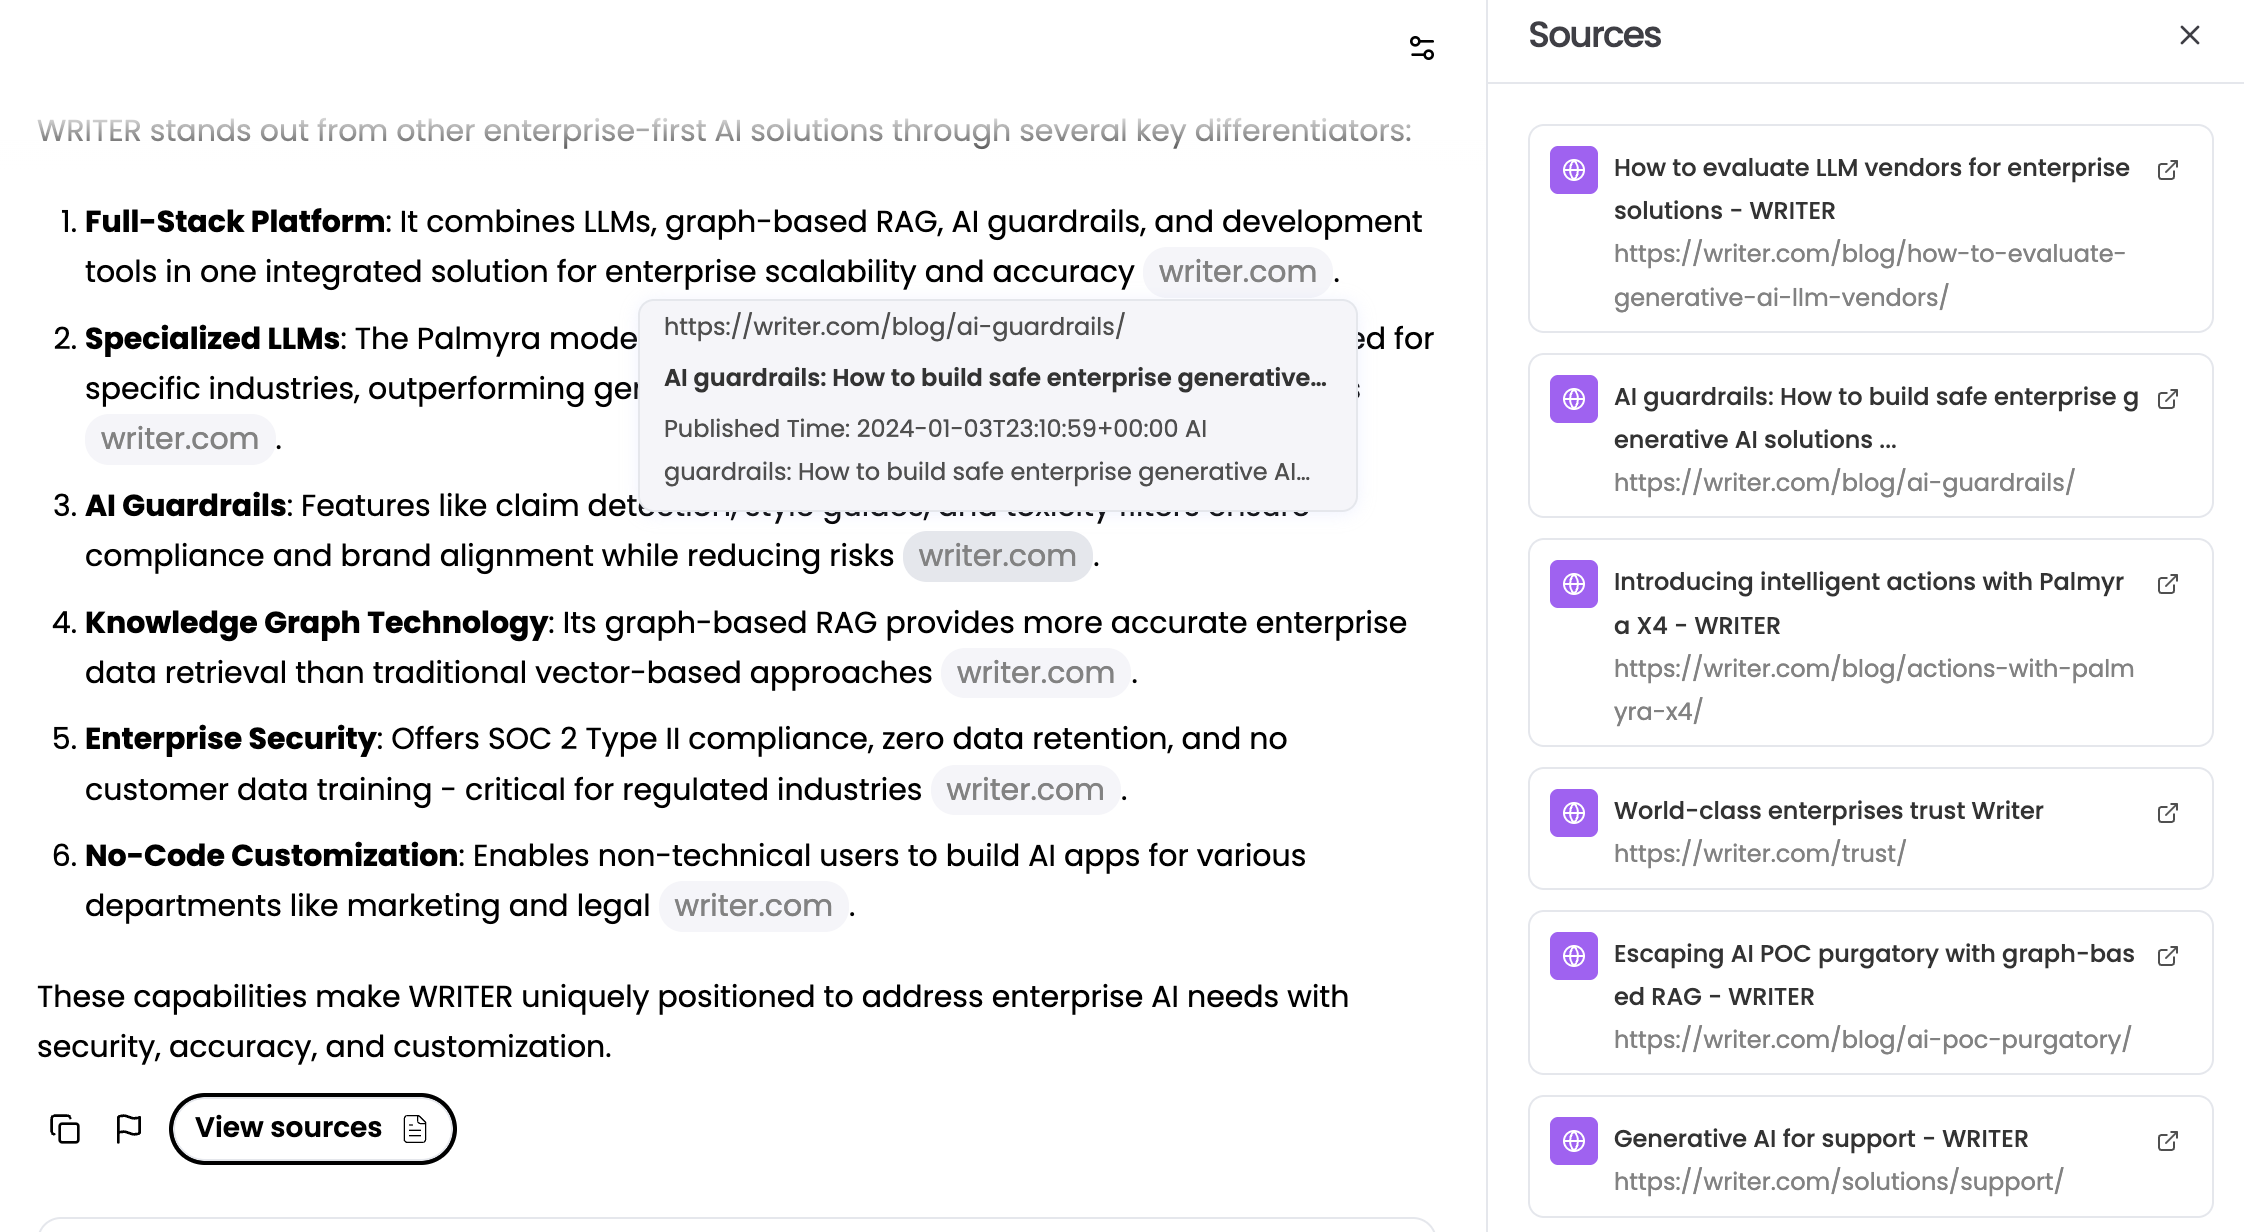
Hover over the inline citation to display the contributing file name, page number, and snippet.
To see and download the files, select View sources.
Using Canvas
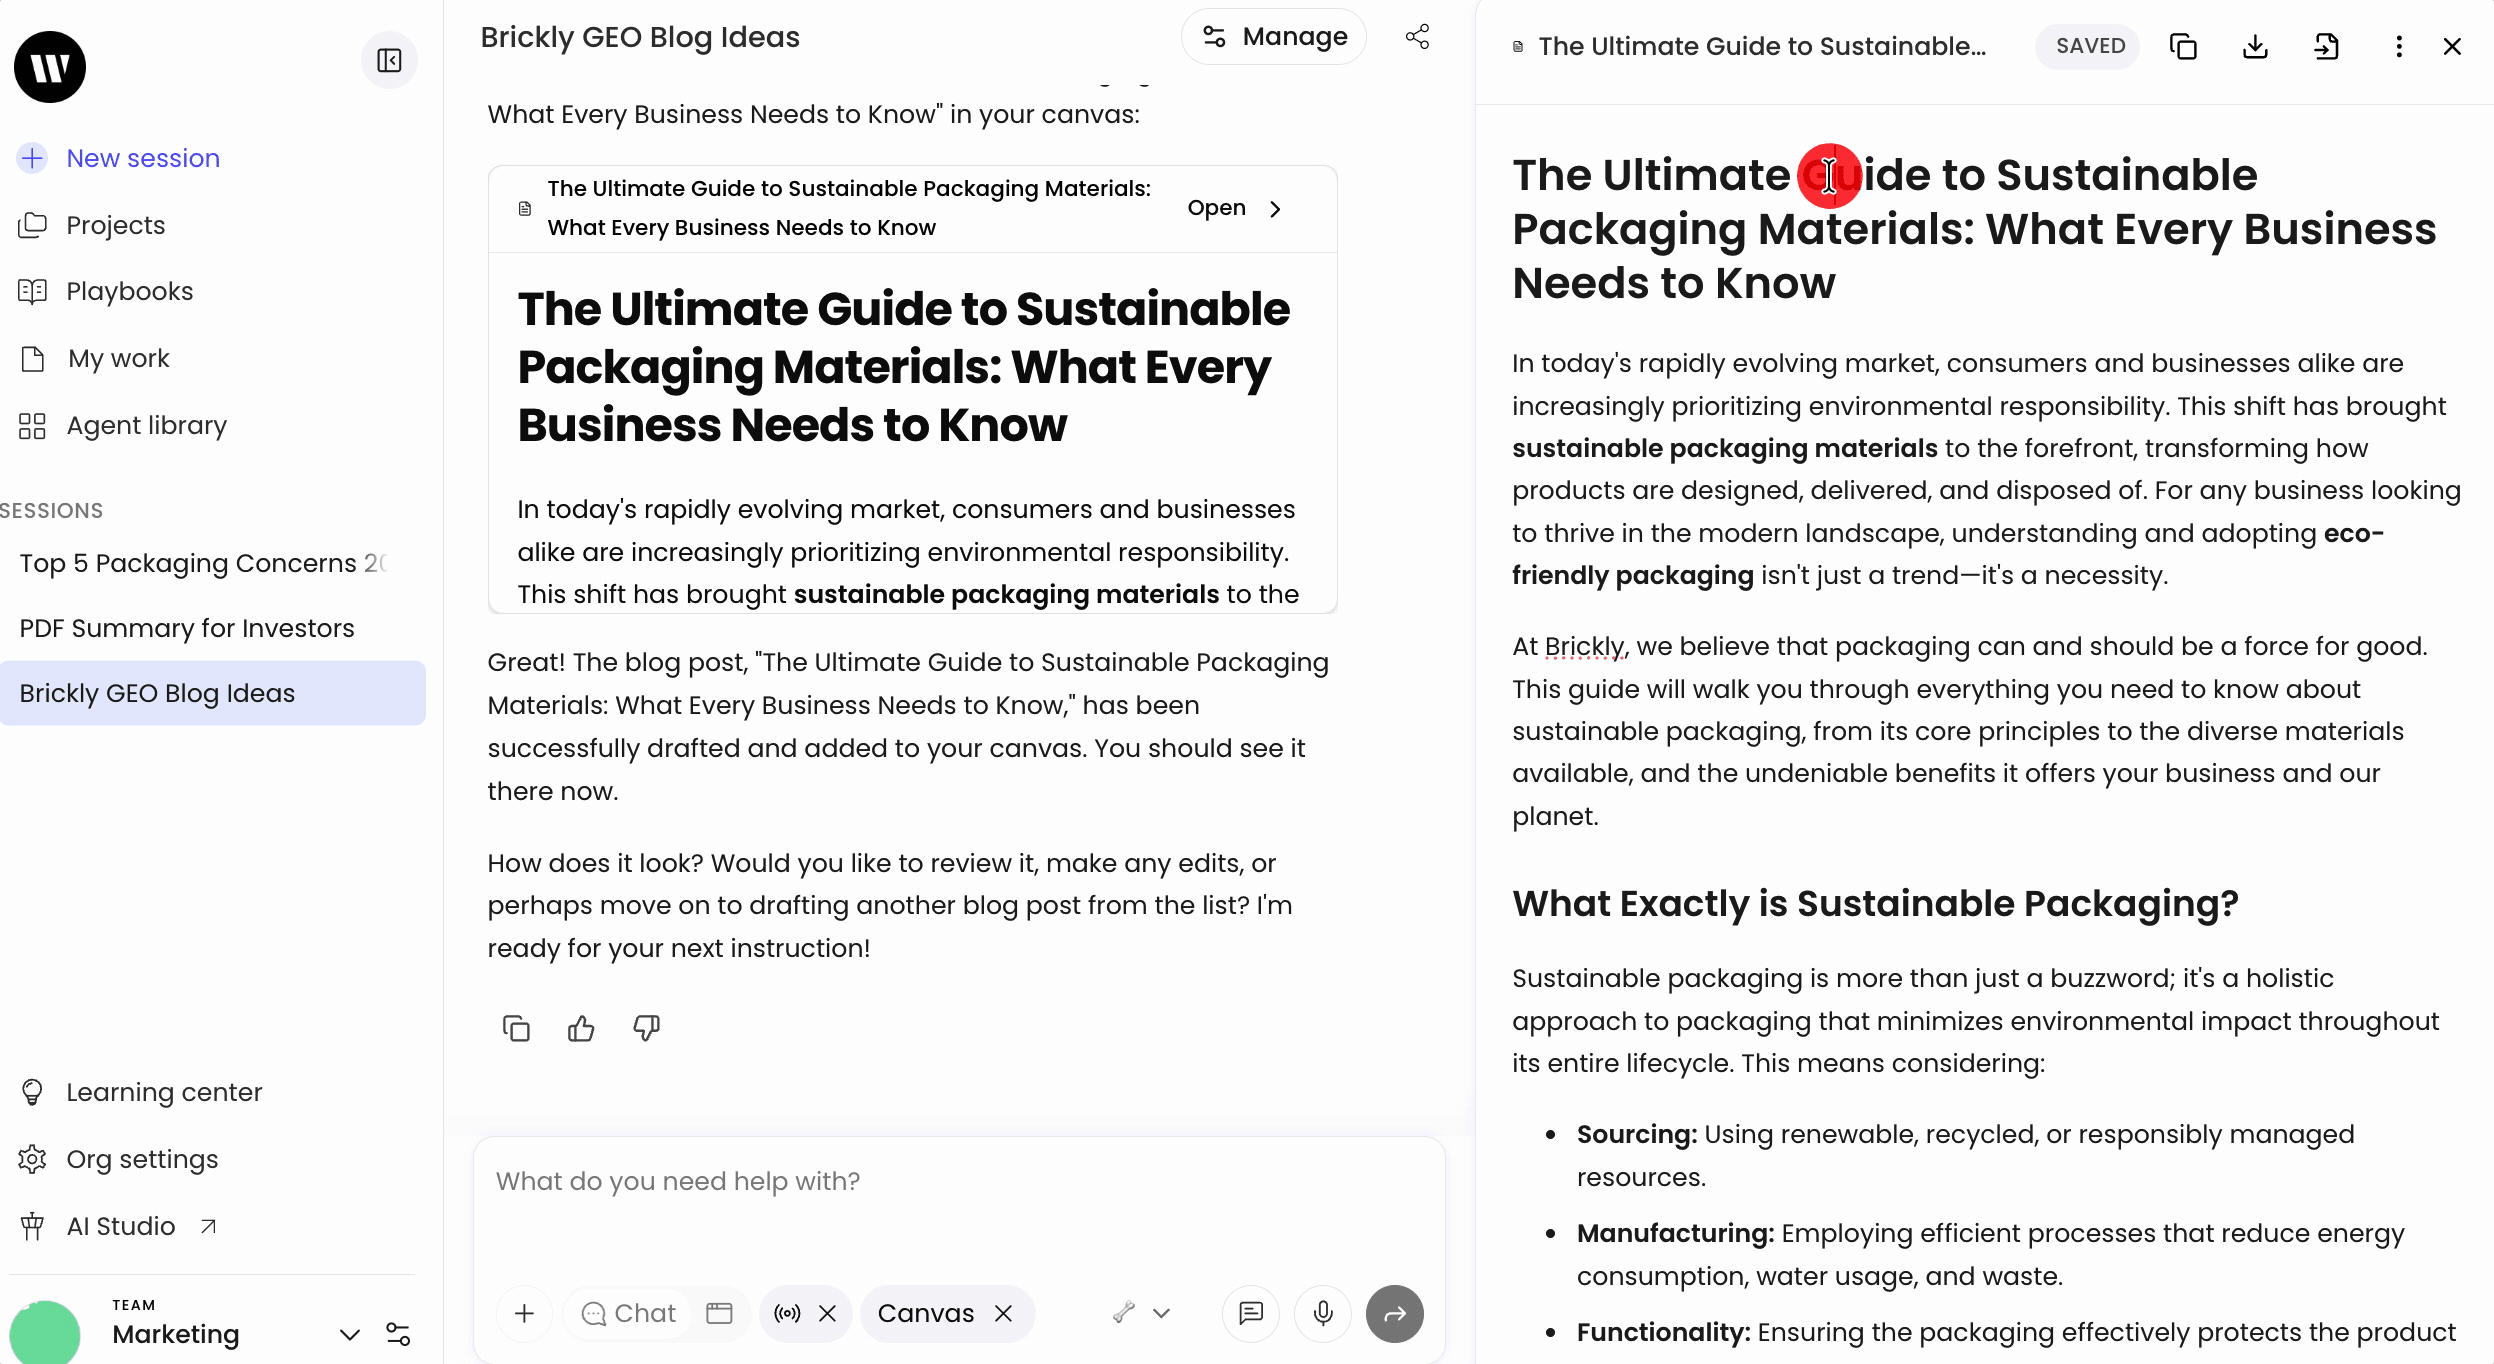
Canvas is an interactive workspace where you can iterate, tweak, and riff on your output until it's perfect. Canvas is especially helpful for structured content, like tables, formatted reports, or blog posts. Within the canvas, you'll be able to make inline edits, transform specific sections, and more. You can click directly into the text to make edits or chat back and forth with WRITER Agent to make changes.

When making your request, select the canvas icon to create a workspace for your output. You can do this within an active chat mode session or by starting a new session and selecting the canvas option from the + menu. Once your output is sent to the canvas, you'll be able to make endless updates and iterations until it's perfect.

In the top right corner, you have a few options to work directly with your canvas content:
Copy: Copy the contents of your canvas to your computer's clipboard.
Download: Download your Canvas to finalize your work in another tool/
Send to doc: Happy with your output? Send your finished first draft to doc mode, so you can view suggestions and check the content against your company's style guide. Learn more here.
Translate: Translate all of the content in your canvas to another language.
Rewrite: Transform your text. Learn more about rewriting text here.
Close: Use the X to close the Canvas panel.

You can highlight specific text within the canvas to show the edit menu. Within the menu you can prompt WRITER Agent to edit for you. Simply tell it what to change and each edit will create a new Canvas version so you can always navigate back to a older version if you don’t like the changes.
Example prompts & use cases for chat mode
Just ask WRITER Agent:
Use Case: Understand the scope of potential projects handled by WRITER Agent.
Example Prompt: "I am a {sales engineer} at {Brickly.ai}. Generate a list of robust use cases for WRITER Agent, with example prompts. These should be complex, second-level tasks that deliver high quality results and take advantage of WRITER Agents tool calling, orchestration and reasoning skills."
Financial Services
Use Case: Prepare a comprehensive pre-meeting briefing package for a high-value potential client.
Example Prompt: "I'm meeting with the CFO of 'Global Tech Innovators Inc.' next week to discuss our wealth management services. I need to be fully prepared. Can you search the web for their latest financial reports, news, and strategic initiatives? Also, pull together a profile on the CFO. Based on that, can you identify a few potential financial challenges or opportunities they might have? Please synthesize everything into a structured briefing document with sections for a company overview, key financials, the CFO's profile, and some potential talking points for me."
Use Case: Create a multi-channel marketing campaign for a new investment product.
Example Prompt: "We're launching a new 'Future-First ESG Fund' for tech-savvy millennials. I need a campaign to get the word out. Could you start by researching the financial concerns and communication styles of this audience? Then, write a 1,200-word blog post titled 'Why Your Portfolio Needs to Be as Forward-Thinking as You Are,' a script for a 60-second promo video, and a few engaging posts for LinkedIn. Also, could you create the HTML/CSS for a simple landing page to capture leads? Finally, package all of it into a zip file for me."
Use Case: Design and document a more efficient client onboarding workflow.
Example Prompt: "Our current client onboarding process is too manual. I want to streamline it. Can you help me design a new workflow? Please create a flowchart using Mermaid syntax that shows the new, more automated process. Then, write up a formal Standard Operating Procedure (SOP) based on that flowchart, and also create a simple, friendly PDF checklist we can give to new clients to guide them through the steps."
Retail & Consumer Packaged Goods (CPG)
Use Case: Develop a new product.
Example Prompt: "I am a researcher at ChocoFlava Corp. I am trying to combat declining sales by coming out with new flavors and compositions of candy. I’d like to build a comprehensive end-to-end plan where we research what trends and competitors are rising, and then create an idea for a new candy bar or candy product, and then come up with a name, marketing plan, customer personas, etc. Let’s first focus on the competitive landscape, then map out the ideas, personas, and plan."
Use Case: Create customized sales pitches for different retail channels.
Example Prompt: "I need to pitch our new 'Verve' protein bar to two very different retailers: a high-end grocery chain and a chain of fitness centers. Could you help me create a tailored sales deck for each? For the grocery chain, the pitch should focus on organic ingredients and clean-label trends. For the gyms, it should emphasize protein content and post-workout benefits. I'll need two separate 5-slide PowerPoint presentations, each with a slightly different angle."
Technology
Use Case: Develop a research plan for a product in development.
Example Prompt: "I’m working on a new product that aims to add memory to chatbots powered by large language models. Can you search Hugging Face and find me the 10 most popular research papers on the topic of providing LLMs with memory published in the last six months. Create a CSV table with the title, link to the paper, and name of the lead or corresponding author. Then search the web and see if you can find email contacts or personal websites for each of these authors. Finally, give me a quick written breakdown of the tools and techniques these researchers used to add memory to LLMs and rank them in order of complexity."
Use Case: Transform a creative brief into a project plan and generate supporting assets.
Example Prompt: "You are a marketing program manager coordinating a new campaign. Start with the creative brief and brand voice guidelines and generate a marketing copy and design in Google Docs. Create a working plan that outlines work which is needed to launch this campaign, and assign teams that are appropriate to carry out this work. If tasks are missing owners or dependencies aren’t clear, flag them for review rather than guessing. Output should be a fully launched campaign with tracked links and live assets."
Use Case: Enrich inbound leads, assign prioritization, and route to reps.
Example Prompt: "You are a RevOps assistant qualifying new inbound leads.
Enrich the lead using ZoomInfo, Check if the lead meets ICP criteria using internal documentation. Assign a prioritization level and route the lead based on the current routing rules. Output should be a fully routed lead record in Salesforce."
Healthcare & Life Sciences
Use Case: Prepare a comprehensive package for a hospital's Value Analysis Committee (VAC) meeting.
Example Prompt: "We have a critical VAC meeting at St. Jude's Hospital to get our new 'CardioView 2.0' device approved. I need the ultimate prep package. Can you create a cost-benefit analysis in Excel, modeling the potential savings for the hospital based on the attached data? Also, please review the hospital's procurement guidelines (attached) and create a checklist showing how our device meets their requirements. Finally, could you write three short, powerful testimonial quotes from fictional doctors who love the device?"
Use Case: Streamline the clinical trial documentation submission process.
Example Prompt: "Our process for submitting trial documentation to regulatory bodies is a mess. I need to standardize it. Can you start by creating a master checklist in a spreadsheet of all the documents required for an FDA submission? Then, create Word templates for three of our key documents: a Protocol Summary, a Patient Consent Form, and a Site Information Sheet. Finally, please design a Mermaid flowchart that visualizes the entire process, from creation to final submission."
Use Case: Identify ideal clinical trial locations.
Example Prompt: "Please identify optimal locations for a new clinical trial of a drug to treat eczema? Please generate a ranked list of recommended trial sites, complete with a detailed report including maps and charts for the clinical operations team. Use factors like demographics, affordability, available space, and local regulations to rank the candidate site."
When should I use documents vs. Knowledge Graph?
If you’re unsure when to pull in a Knowledge Graph in chat mode vs when to use WRITER Agent in agent mode, take a look at our examples below:
Your account does not have Knowledge Graph enabled. | WRITER Agent |
|---|---|
You already know which file the answer is located in. | WRITER Agent |
The answer can be generated using 1-10 source files, of less than 350,000 total words. The source files are immediately available. | WRITER Agent |
You don't know which file the answer is located in. | Knowledge Graph |
The type of question requires accessing lots of varied source data, maybe even a mixture of structured and unstructured data | Knowledge Graph |
The answer requires using sources longer than 350,000 total words or using more than 10 source files. | Knowledge Graph |
The answer doesn't have one straightforward answer, but requires reading multiple sources to decide which one best helps answer the question. | Knowledge Graph |
FAQs
General
Where can I access WRITER Agent?
WRITER Agent is available on the web app. The legacy version of Ask WRITER is available in the WRITER Chrome extension and our macOS app.
What are the file size limits for WRITER Agent?
In chat mode you can upload 10 files each, 100MB per file, and a total of 500K words per session. In agent mode you can upload more files up to 100MB per file.
Conversations and sessions
What is a session?
A session is an instance of WRITER Agent where the chat history and uploaded files will persist even if you leave the chat. If there is a set of files you’ll work with consistently, you can upload them into a session and return to it repeatedly.
Does WRITER Agent consider the entire chat history when responding to a request?
WRITER Agent will consider the full chat history for all options you select except when working with Knowledge Graph. If you select a Knowledge Graph within WRITER Agent, it will consider the most recent three chat back-and-forths between you and WRITER as context for what it generates next. If you do not want WRITER Agent to consider previous chat history, you can create a new session.
Are sessions shareable with teammates?
Yes you can share your session replay using the share icon in the top right. This will show another user your session but will not allow them to chat with and build upon the session you share.
How do you access previous sessions?
You can access previous sessions by going to the Sessions menu on the left as well as from the My Work section.
Can you delete previous sessions?
Yes, you can delete previous sessions.
Are custom instructions only available at the user level?
Yes.
Uploading files
Is there a limit to how long your source(s) can be?
The number of words in all the files that you upload into a chat session can't exceed ~350,000 words. You can upload up to 10 sources to a single session, as long as their total number of words does not exceed 350,000 words.
What types of files can WRITER Agent handle?
Can parse text from these file types: xlsx/xls, csv, pptx/ppt, pdf, html, txt, srt, docx/doc, url, pasted text, past sources.
Can analyze .jpg and .png images.
Can parse text from tables but may not understand table formatting and layout.
Can parse PDFs but quality depends on how files were created. For example, if PDFs may have text that is an image, a file’s permission may not allow text to be copied, or the layout of a PDF’s layout may be hard for us to interpret (e.g., WRITER may struggle to render that a newsletter with multiple columns).
Can WRITER Agent parse numerical data?
WRITER Agent can fetch/receive numbers from uploaded sources, but it cannot perform operations at this time. For example, if you uploaded a document that said, "Brickly has 100 employees, 43 of whom are women" you'd be able to ask WRITER Agent, "How many employees does Brickly have?" and "How many women are employed at Brickly?" but you couldn't ask "What percent of Brickly employees are women?" at this time.
Can WRITER Agent translate content?
WRITER Agent can translate content 500 words. For longer translation, use a translation prebuilt agent.
Are the files you upload available to teammates?
No, they are private to just you unless you share the session.
Does WRITER Agent store the files I upload?
We store the files you upload to WRITER Agent to our Google Cloud Platform (GCP).
Can WRITER Agent analyze text across multiple files?
Yes, WRITER Agent will be looking across all source files you upload by default.
Are there limits to the number of files you can upload?
In chat mode can upload up to 10 files to the same session, but there's a limit to the number of words across all files you upload within the same session (~500,000).
Can you upload multiple files at once?
You can bulk upload 10 files at a time in chat mode.
Can you reference files you previously uploaded in a new session?
No.
I've uploaded a PDF but I'm getting an error message after I submit my prompt, "I apologize, but as an AI text-based model, I am unable to directly access or analyze attached files."
Double-check whether your PDF is encrypted. For security reasons, we cannot override the settings of your files. To check whether your PDF is encrypted:
Adobe Acrobat:
Windows: Choose the hamburger menu > Document Properties > Security - Are there restrictions under Document Restrictions Summary, e.g. Page Extraction?
MacOS: File > Document Properties > Security - Are there restrictions under Document Restrictions Summary, e.g. Page Extraction?
MacOS Preview:
Open the file. Click the (i) Info button in the toolbar. Select the lock to view security settings.
Security, transparency & other guardrails
How do we mitigate security, safety, and privacy risks given the level of autonomy and access of WRITER Agent?
WRITER Agent is designed with a multi-layered approach to mitigate risks associated with its autonomy, and backed by the security, reliability, and control provided by the WRITER platform.
Security Controls:
Isolated Sandbox Environment: Operates within a secure, containerized sandbox that is completely isolated from the host infrastructure and other user sessions.
Temporary Workspace: All files, data, and running processes are temporary and are permanently destroyed at the end of each session. This design prevents the persistence of malware or sensitive data.
Restricted Network Access: Outbound network connections are monitored and filtered, limiting it to standard web protocols (HTTP/S) and preventing malicious activities like network scanning or participation in DDoS attacks.
Safety Protocols:
Behavioral Guardrails: The underlying language model has built-in safety filters to prevent the generation of harmful, illegal, or unethical content.
Human-in-the-Loop Design: For critical actions, such as deploying applications or deleting files, the agent is programmed to stop and request explicit confirmation from the user. The user retains ultimate control over significant operations.
Resource Limiting: All processes are strictly limited in their use of CPU, memory, and execution time to prevent system instability or resource abuse.
Privacy Protections:
Stateless Sessions: WRITER Agent has no long-term memory and does not retain any data between sessions. Each interaction begins from a clean slate.
User-Controlled Data: WRITER Agent only has access to data that the user explicitly provides during an active session. It has no access to a user's local machine or files.
Encrypted Communication: All data transmitted between the user and the agent is protected with industry-standard HTTPS encryption.